
KID Manual Firmware 1797 REV D


The Kid Solar Charge Controller Instructions
39 | Page
1 0-268-1 REV D
turn off loads to prevent cycling.
The night detect has 3 different profiles.
Profile 1
: This setting looks at the PV voltage to be above the battery voltage plus some volts for the
MPPT to try to produce power (this is the default Setting).
Profile 2:
The unit will look through the day for the highest Voltage Open Circuit (unloaded) of the PV and
the Minimum turn on voltage will depend on the VOC% setting (adjustable). The VOC for this setting
does not take into account How much power if any, was produced.
Profile 3:
This setting will look through out the day at the VOC but Only if the power produced has been
more than the Min Low Power. Then it will take the VOC % setting and that will become the minimum
required PV voltage for the unit to detect a Daylight.
NightLight VOC%:
This is the VOC % to detect if there is enough sunlight or ambient light shining on the
PV to detect day VS Night. The Default is 90%.
To adjust the settings:
*Press main Menu
*Scroll to the right then select TECH and press Enter
*Select Calibrate and press Enter
*Press the right arrow until NightLight on PV Sensitivity is on the top line of the LCD
*Use the Up and Down buttons to adjust to the desired setting
*Press the SAVE button to keep the settings.
Reset to factory defaults.
Setting things back to factory defaults is useful after your brother in law
was observed messing with all the buttons and you can’t trust what he did. So, reset and start over
entering all the settings you know you want.
Firmware.
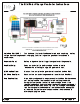
To do a firmware update on the kid you will need the following:
- A laptop or PC with Windows XP/7/8/8.1 or Linux. Mac is not supported.
- A USB Mini-B cable (not included).
Procedure:
- Go to http://www.midnitesolar.com/firmwareIndex.php and download the latest firmware file.
- Save the file to a known location on your PC (eg. Desktop \).
- Plug in the USB cable to the Kid connector located on the bottom of the unit.
- Plug the other end into an available USB port on the PC.
- Go to MAIN Menu on the Kid And scroll to the right to the TECH menu and press Enter.
- Press the down arrow key until Firmware Update is selected and press Enter.
- After 5 sec the unit will turn off and display FIRMWARE UPDATE.
- A new empty drive will appear in your PC, open it.
- Drag the downloaded file to this empty drive.
- The first green light should start blinking on the Kid and "UPDATING...' should appear on the
second line.
- It will take up to 2 minutes to update the kid.
The unit will reboot with new updated firmware.
- Unplug the USB cable.
About Kid CC:
Shows the current BootLoader and FirmWare versions.