
Installation Manual
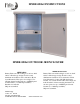


MNBE-8D2x2 Instructions (continued)
6 | P a g e 1 0 - 2 4 5 - 1 R E V : A
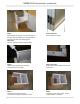
Step 7:
Apply silicone sealant to top edge and
Install back cover, secure from the inside
with ¼ Screws provided.
Step 8:
Install ground wire from the shelf to the
door with #10 nuts provided.
Assembled, complete and ready for batteries.
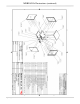
When adding breakers use 10-32 X 3/8 screws with
lockwashers for the battery disconnect breaker.
Use 6-32 X 5/16 screws with lockwashers for the C-Series
panel mount breakers. Use of longer screws may result in
damage to the breaker.
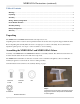
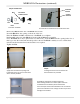
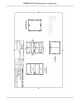
Unlocked
position
Locked
position
Remove the Bolt from the end of the Knob and set aside.
Insert the Knob into the opening on the front of the door.
Place the Washer and Nut on the threads of the Knob, do not tighten.
Put the pawl on the end of the Knob and secure with the Bolt removed earlier.
Note: The Knob turns only a quarter turn. You will need to orient the Knob into the opening in the door so
that it goes into the locked and unlocked positions shown. The Knob is usually set to be vertical when
unlocked and horizontal when locked but this is not required.
Tighten the Nut.
Knob with
Rubber washer
Door latch hardware
Nut
Washer
Key
Bolt
Pawl
Lock mechanism viewed from the inside of the door.
Step 6: Install Lock.