en USER MANUAL Dishwasher Power supply: 120 V Frequency: 60 Hz Capacity: 8 Place Settings Warning: Before using this product, please read this manual carefully and keep it for future reference. The design and specifications are subject to change without prior notice for product improvement. Consult with your dealer or manufacturer for details.
Dear user Thank you for letting Midea help you "make yourself at home." This manual is part of our commitment to your total satisfaction. Please read this manual carefully before use and keep it in a convenient place for future reference. To help us serve you better, please consider registering your product using our convenient Midea app MSmartlife, by visiting HYPERLINK http://www.midea.com, or by texting a picture of your proof of purchase to 1-866-646-4332.
Safety Precautions SAFETY PRECAUTIONS YOUR SAFETY AND THE SAFETY OF OTHERS ARE VERY IMPORTANT Operating Requirements To prevent injury to the user or other people and property damage, the instructions shown here must be followed. Incorrect operation due to ignoring of instructions may cause harm or damage, including death. The level of risk is shown by the following indications. Part and Specifications This symbol indicates the possibility of death or serious injury.
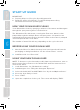
Safety Precautions Operating Requirements Part and Specifications Start Up Guide Controls Dishwasher Loading Dishwasher Use Dishwasher Care Troubleshooting 4 IMPORTANT SAFETY INSTRUCTIONS WARNING When using your dishwasher, follow basic precautions, including the following: ●● Read all instructions before using the dishwasher. ●● Use the dishwasher only for its intended function. ●● Use only detergents or rinse/wetting agents recommended for use in a dishwasher and keep them out of the reach of children.
Safety Precautions Operating Requirements ●● Do not use the dishwasher if it has a damaged power line or plug, and do not plug the dishwasher into a damaged outlet. Failure to observe these instructions may result in electrical shock. ●● This manual does not cover every possible condition or situation that may occur. ●● Remove the door to the washing compartment when removing an old dishwasher from service or discarding it.
Safety Safety Precautions Precautions Operating Operating Requirements Requirements Parts and Part and Features Specifications Start Up Start Up Guide Guide Controls Controls Dishwasher Dishwasher Loading Loading Dishwasher Dishwasher Use Use Dishwasher Dishwasher Care Care Troubleshooting Troubleshooting 6 CAUTION ●● Never use harsh chemicals to clean your dishwasher.
Safety Precautions OPERATING REQUIREMENTS ELECTRICAL REQUIREMENTS Operating Requirements WARNING Electrical Shock Hazard Electrically ground dishwasher. Connect ground wire to green ground connector in terminal box. Do not use an extension cord. Failure to follow these instructions can result in death, fire, or electrical shock.
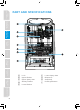
Safety Precautions PART AND SPECIFICATIONS Operating Requirements Part and Specifications Start Up Guide Controls Dishwasher Loading Dishwasher Use Dishwasher Care Troubleshooting 8 A) Lock B) Upper Basket F) Lower Spray Arm G) Dispenser C) Upper Spray Arm D) Cutlery Basket H) Cup Shelf I) Heating Element E) Lower Basket
Dimensions 17.6 x 22.6 x 32.4 inches 450 x 575 x 825 mm (W x D x H) Power Supply 120V, 60Hz Water feed pressure 20 psi–80 psi (0.14 MPa–0.
Safety Precautions START UP GUIDE Operating Requirements IMPORTANT: ●● Properly dispose of/recycle all packing material. ●● Read this entire User Manual. You will find important safety information and useful operating tips. HOW YOUR DISHWASHER CLEANS Part and Parts and Specifications Features Your dishwasher cleans by spraying a mixture of hot water and detergent through the spray arms against soiled surfaces. The dishwasher fills with water covering the filter area.
A B C G C D E F Safety Precautions CONTROLS Operating Requirements B) DELAY START The Delay time feature allows you to program the dishwasher to began the selected wash cycle 1 to 24 hours later. C) CYCLES Press this button to select the appropriate washing program, the corresponding program indicator will be lit. Start Up Guide ●● Press the “Delay -/+” control repeatedly to toggle from 1 to 24H.
Safety Precautions Operating Requirements Part and Specifications Start Up Guide Controls Dishwasher Loading Dishwasher Use Dishwasher Care Troubleshooting 12 RINSE Use for pre-rinsing dishes or glasses. This is only a rinse that keeps food from drying on your dishes and reduces odor buildup in your dishwasher until you are ready to wash a full load. D) CHILD LOCK Use to lock all controls and prevent children from accidently changing the dishwasher cycle or starting the dishwasher.
Part and Specifications Start Up Guide ●● If an error occurs which is critical to the machines function and safe operation, the control shall shut down and indicate an error code in the display window. (See Error Codes) ●● If Error codes are displayed, contact the dealer or qualified service center. They will available to provide assistance in trouble shooting the problem and/or locate and authorized service technician if needed.
Safety Precautions PREPARING AND LOADING DISHES Dish Preparation Operating Requirements Part and Specifications Scrape away large pieces of food, bones, pits, toothpicks, etc. The continuously filtered wash system will remove the remaining food particles. Burned on foods should be loosened before loading. Empty liquids from glasses and cups.
Part and Specifications Features and appearance of racks and silverware basket as shown may vary from your model. Operating Requirements Loading the Lower Basket Safety Precautions The upper basket has been designed for small plates, mugs, glasses, and plastic items marked “dishwasher safe”, etc. For best results, place the bowls, cups, glasses with soiled surface facing down or toward the center. Tilt slightly for better drainage.
Safety Precautions Operating Requirements Large items should be turned so that the inside faces downward. Load large items such as pans and pots into the dishwasher so their open sides face downwards. We recommend loading cups, stemware, and small plates into the upper basket. Larger items should be placed along the edge so they do not interfere with the spray arm rotation. Check to ensure that they do not prevent the detergent dispenser from opening.
WARNING Part and Specifications TO AVOID BURN INJURY: Slightly open door and wait until spray arms and wash action stop. Hot water may splash out of dishwasher. Failure to do so may result in injury. Operating Requirements To add or remove items after wash cycle starts: 1. Open door slightly and wait a few seconds until wash action stops before completely opening. 2. Add the item. 3. Close the door firmly to latch and press START, then cycle will resume.
Safety Precautions DETERGENT AND RINSE AID DISPENSER Operating Requirements The detergent and rinse aid dispenser will automatically release the measured amount of detergent and rinse aid at the appropriate time during the dishwasher cycles. Part and Specifications Rinse aid greatly improves drying and reduces water spots and filming. Without rinse aid your dishes and dishwasher interior will have exces-sive moisture. The Heat Dry option will not perform as well without rinse aid.
Safety Precautions 2. Add the recommended amount of detergent to the detergent compartment. Operating Requirements Part and Specifications 3. Press down on the top of the cover to secure. Start Up Guide Controls Rinse aid improves the drying performance of the dishwasher. WARNING ●● DO NOT add regular detergent to the rinse aid dispenser. ●● DO NOT use powdered rinse aid in the rinse aid dispenser. Dishwasher Use This dishwasher has been designed to use liquid rinse aid only.
Safety Precautions To refill the rinse aid dispenser 1. Lift up the end tab of rinse aid cover to open. Operating Requirements Part and Specifications 2. Fill the rinse aid dispenser with liquid rinse aid until full. DO NOT overfill. Start Up Guide Controls Dishwasher Loading NOTE: Use the viewing port when filling the rinse aid reservoir. Dishwasher Use WARNING Do not fill the reservoir above the full level indicator. Excess rinse aid can overflow during the wash cycle. 3.
Keeping your dishwasher clean improves its performance, reduces unnecessary repairs, and lengthens its life. Start Up Guide NOTE: If your dishwasher has a stainless steel door panel, you can clean it with a stainless steel cleaner for Home Appliances or a similar product using a clean, soft cloth. Part and Specifications It's best to clean spills on the outside of your dishwasher as they occur. Use a soft, damp cloth on the control panel to gently wipe away spills and dust.
Safety Precautions Cleaning The Filters 1. Turn off the dishwasher. Operating Requirements Part and Specifications 2. Rotate the filter insert counterclockwise to unfasten and then detach the filter insert. Start Up Guide Controls 3. Remove the fine filter (flat, rectangular).
Safety Precautions 4. Remove any dirt or other remains from the filters, and then rinse them under running water. Operating Requirements Part and Specifications 5. Reassemble the filters in the reverse order of the disassembly, replace the filter insert, and rotate clockwise to the close arrow. Start Up Guide Controls If the filter insert is not closed properly, its performance will be decreased.
Safety Precautions Cleaning the Lower Spray Arm If your dishwasher does not seem to be cleaning adequately or the spray arm nozzles seem clogged, the lower spray arm can be removed and cleaned. Remove spray arm carefully to avoid damage. Operating Requirements Remove lower spray arm 1. Check whether the nozzle holes are clogged by food particles. 2. If cleaning is needed, remove the spray arm by pulling it upwards. 3. Clean the nozzles, and then push the spray arm back into place. 4.
PROBLEM POSSIBLE CAUSE SOLUTION Dishwasher won't start ●● ●● ●● ●● ●● ●● ●● ●● The wash cycle will beep to indicate the end of the cycle. Dishwasher operates too long ●● The dishwasher is ●● connected to cold water. The cycle time will vary due to the soil. ●● The sanitize option is selected. ●● ●● ●● ●● ●● ●● ●● ●● Use you dishwasher when the water pressure is normal. Make sure the dishwasher is connected to the hot water supply.
Safety Precautions Operating Requirements Part and Specifications Start Up Guide Controls Dishwasher Loading Dishwasher Use Dishwasher Care Troubleshooting 26 PROBLEM POSSIBLE CAUSE SOLUTION Dishes not drying enough ●● Rinse aid dispenser is empty. Improper loading of dishes. The cycle you chose did not included the drying. ●● Water hardness is too high. Improper loading of dishes. Old rinse aid is used. Rinse dispenser empty. ●● Using too much detergent.
SOLUTION ●● ●● Reddish stain. ●● Noises ●● ●● ●● ●● ●● Detergent cup opening\ ●● Drain pump sound. ●● A hard object has entered the wash module. When the object is ground up, the sound should stop. Water valve is turn off Door latch may not be properly seated ●● ●● Using an approved spot cleaner to remove the soil. Some tomato-based foods will cause this, use of the rinse only cycle right after loading this will decrease the staining. This is normal.
MIDEA DISHWASHER LIMITED WARRANTY ATTACH YOUR RECEIPT HERE. PROOF OF PURCHASE IS REQUIRED TO OBTAIN WARRANTY SERVICE. Please have the following information available when you call the Customer Service Center: Name, address and telephone number Model number and serial number A clear, detailed description of the problem Proof of purchase including dealer or retailer name and address IF YOU NEED SERVICE: 1.
LIFETIME LIMITED WARRANTY WHAT IS NOT COVERED 1. Commercial, non-residential or multiple-family use, or use inconsistent with published user, operator or installation instructions. 2. In-home Instruction on how to use your product. 3. Service to correct improper product maintenance or installation, installation not in accordance with electrical or plumbing codes or correction of household electrical or plumbing (i.e. house wiring, fuses, plumbing or water inlet hoses). 4. Consumable parts (i.e.
Free 3 months extension of the original limited warranty period!* Simply text a picture of your proof of purchase to: 1-844-224-1614 *The warranty extension is for the three months immediately following the completion of the product’s original warranty period. Individuals do not need to register the product in order to get all the rights and remedies of registered owners under the original limited warranty.