
Quick Start Guide


4. Installation
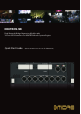
NEUTRON back panel with NEUTRON-NB installed in the expansion slot
Technical Speci cations
! This equipment is supplied by a mains voltage
that can cause electric shock injury. Before installing, setting up
or operating this equipment, make sure that you have read and
fully understand all of this section and the “Important safety
instructions” at the front of this manual.
Ideally a cool area is preferred, away from power distribution
equipment or other potential sources of interference.
Do not install the equipment in places of poor ventilation.
Do not install this equipment in a location subjected to excessive
heat, dust or mechanical vibration. Allow for adequate ventilation
around the equipment, making sure that its fans and vents are not
obstructed. Whenever possible, keep the equipment out of direct
sunlight.
Caution – Before installing the NEUTRON-NB Dual Network Bridge
Expansion Module into NEUTRON main processing unit’s expansion
slot, you must make sure that the main NEUTRON unit’s power switch
is turned o . Malfunctions or electrical shock may occur otherwise.
To install the NEUTRON-NB into the main NEUTRON unit’s
expansion slot:
(1) Make sure the host unit’s power is turned o .
(2) Loosen the 4 screws fastening the cover plate over the NEUTRON
unit’s expansion slot.
(3) Remove the cover plate and set aside. Keep the fastening screws
on hand.
(4) Identify the Expansion Module connectors inside the NEUTRON
unit’s expansion slot.
(5) Carefully remove the NEUTRON-NB from the packaging.
Caution – Before removing the NEUTRON-NB expansion module
from its protective bag, we recommend touching the grounded metal
chassis of the main NEUTRON unit to prevent electrostatic discharges
from a ecting the sensitive electronic components. It is generally a
good idea to hold the expansion module either by the face plate or
by the two small handles, but never touching the components on the
circuit board directly.
(6)
Align the NEUTRON-NB connectors with the connectors inside
the NEUTRON unit’s expansion slot and slowly slide the
NEUTRON-NB into the expansion slot. Apply light pressure,
and be very careful not to bend the pins. Push the NEUTRON-NB
all the way into the expansion slot to ensure the contacts are
r m l y c o n n e c t e d .
(7) Fasten the NEUTRON-NB into the expansion slot by using the
original 4 fastening screws from the expansion slot cover plate.
Be aware that damage or malfunctions may occur if the chassis
is not properly fastened.
(8) Make sure the chassis is rmly fastened into place before
powering on the main NEUTRON processing unit.
Inputs / Outputs
AES50 EtherCon x 10 Each providing 24 bidirectional channels of 24-bit, 96 kHz audio
Expansion
Expansion modules x 2
CM-1 format modules, each providing up to 64 channels of
bidirectional audio and asynchronous sample rate conversion
Dimensions
Height 96 mm (3.8"), 2U high
Width 303 mm (12.0")
Depth 306 mm (12.0")
Weight
Net 1.3 kg (2.9 lbs)
Shipping 2.1 kg (4.6 lbs)
Operation
Temperature +5°C to +45°C
Storage
Temperature -20°C to +60°C
13Quick Start Guide12 NEUTRON-NB