
User Manual
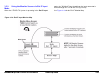
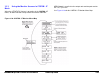
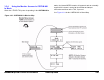
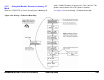
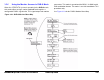
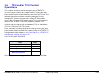
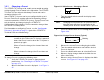
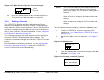
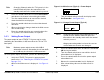
Table Of Contents
- About This Manual
- Copyright
- Proprietary Material
- Quality Certification
- Regulatory Status
- Conventions
- Symbols Used
- Warranty Information
- Introduction
- Product Description
- Routine Operation
- 3.1 Chapter Overview
- 3.2 Overview of Controls, Indicators, and Connectors
- 3.3 Preparing for Operation
- 3.4 Using the STRATA TX Screens
- 3.5 TXU and/or TCU Monitoring Operations
- 3.5.1 Using the Monitor Screens in MPEG Output Mode
- 3.5.2 Using the Monitor Screens in Ext IF Input Mode
- 3.5.3 Using the Monitor Screens in COFDM - IF Mode
- 3.5.4 Using the Monitor Screens in COFDM ASI In Mode
- 3.5.5 Using the Monitor Screens in Analog - IF Mode
- 3.5.6 Using the Monitor Screens in DVB-S Mode
- 3.6 TXU and/or TCU Control Operations
- 3.7 Front Panel vs. STRATA TX Configurator Settings
- Table 3-1: Front Panel vs. Configurator Settings
- Troubleshooting
- Channels & Frequencies
- A.1 Appendix Overview
- A.2 Initial Factory Presets
- A.2.1 3.4 to 3.8 GHz Channel Plan
- A.2.2 4.4 to 5.0 GHz Channel Plan
- A.2.3 6.4 to 7.1 GHz Channel Plan
- A.2.4 6.9 to 7.5 GHz Channel Plan
- A.2.5 7.4 to 8.0 GHz Channel Plan
- A.2.6 7.8 to 8.5 GHz Channel Plan
- A.2.7 8.2 to 8.9 GHz Channel Plan
- A.2.8 10.0 to 10.7 GHz Channel Plan
- A.2.9 10.5 to 11.2 GHz Channel Plan
- A.2.10 10.8 to 11.5 GHz Channel Plan
- A.2.11 12.7 to 13.25 GHz Channel Plan
- Glossary
- Specifications

Routine Operation 3-32STRATA TX Operator’s Guide/Tech Ref Manual
Note
Changing Channels when the TX System is in the
transmit mode will place the transmitter in the
standby mode when the control switch is pressed.
4. Press the control switch once to select Set Channel
and observe the channel selected begins to blink.
5. Turn the control switch cw or ccw until the desired
channel and offset are displayed.
6. Press the control switch once to select that channel
and offset.
7. Observe the display changes back to the Main screen
after a short delay.
8. Press the control switch for one second to place the
TX System in the transmit mode, as required.
3.6.3 Setting Power Output
The power output of your STRATA TX System can be set by
controlling the attenuation, in dB, from either the TXU or TCU
front panel.
Note
Maximum power output occurs with 0 dB of
attenuation selected. Attenuation levels from 0 dB
to -31 dB may be selected in 1 dB increments.
To select power output attenuation, perform the following steps:
1. Verify the STRATA TX System is connected and
powered up. See ”Powering the STRATA TX System”
on page 3-12.
2. Observe the Main screen is displayed. See Figure 3-
30.
Figure 3-30: Main Screen (Typical) - Power Output
3. Turn the control switch ccw until the display reads
Set PowerOut. See Figure 3-31.
Figure 3-31: Change Power Output (Typical)
Notes
Changing power output attenuation when the TX
System is in the transmit mode will place the
transmitter in the standby mode when the control
switch is pressed.
Output power attenuation level must be reset or
verified whenever Presets are changed .
4. Press the control switch once and observe the ATTN:
dB line begins to blink.
5. Turn the control switch cw or ccw until the desired
attenuation level is displayed.
6. Press the control switch to select the power output
attenuation level.
7. Observe the new attenuation level is displayed.
8. After a short delay, observe the Main screen is
displayed.
Preset 3
. W
Set PowerOut
Attn: dB