
User`s guide


Virtual CD v4 Documentation
Page 8 of 8
When installing Virtual CD under MS Windows XP, you may get some rather
drastic-sounding warnings about installing a non-certified hardware driver.
You can ignore these warnings (simply confirm and continue), as they refer
to the virtual CD driver, which will not damage your system in any way.
Once the installation is finished, you need to restart your computer in order to have it
detect the virtual drives. Under Windows XP/2000, after you restart your system, you
might prompted to restart it once again. You can answer this with "no", as an
additional reboot is not necessary.
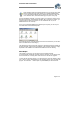
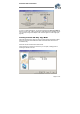
Once you've completed installation and restarted your computer, you can see your
new virtual drives in the Windows Explorer:
In this example, drive F: is the physical drive and G: is the virtual drive. (You can also
add more virtual drives at a later stage.)
The virtual drive is empty at this point, because no virtual CDs have been created yet
(let alone inserted!). At this point, the installation of the Virtual CD program is roughly
equivalent to the installation of a hardware CD-ROM drive in the PC housing.
First Steps
This chapter is for those of you who have never used Virtual CD before.
If you have already worked with an earlier version of Virtual CD, you can skip to page
25 for information on converting older virtual CDs for use with the new program.
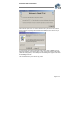
To work with the Virtual CD program, you need to begin of course by creating a virtual
CD. To do this, start by double-clicking on the Virtual CD program icon. This starts the
program. The "Welcome..." window opens only the first time you start Virtual CD: