
User guide

DiscView PRO User Guide
34
Configuration
To change the configuration of a DiscPort host or fileserver,
click on the appropriate icon in the DiscView Map window.
Select Configure from the Tools menu, or click on the
Configure toolbar icon. The current configuration for the
selected object displays. Refer to Chapter One – Automatic
Volume Configuration for information about changing the
configuration of CD-ROM volumes.
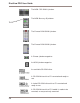
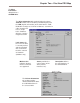
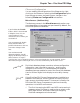
DiscPort Host Configuration
When you select your DiscPort Host and click on the
Configuration icon, the following dialog will display.
The Host Configuration
dialog for a DiscPort XL
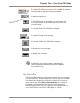
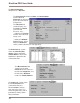
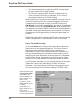
If applicable for the selected Host, the dialog will have an
Advanced button. Click on this button to see the advanced
options for the DiscPort Host, in this case for a host installed
on an ethernet network.
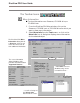
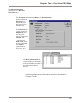
The Assigned Name is a default name given to
the host,
e.g.,
DISCPORT_0, DISCPORT_1,
etc
. You can change the name to a more
descriptive one by typing the new name in the
Assigned Name field.
The Attached Fileserver field displays the name
of the fileserver to which the DiscPort Host is
logically attached. You can attach the DiscPort to
another server by clicking on the drop-down list
button and selecting the name of that server.
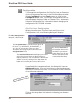
By default, Auto Lock is
not enabled. Click on the
checkbox if you want to
enable Auto Lock for any
volumes mounted on the
selected DiscPort Host.
Click on the drop-down list buttons to display your feature
options.
Host Configuration with
Advanced Options dialog