
User guide


DiscView PRO User Guide
126
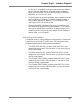
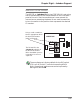
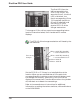
The first LED (from the
left) corresponds to the
SCSI ID for Drive 1, the
second to Drive 2, the third
LED is left blank, the
fourth corresponds to Drive
3 (if installed), the fifth to
Drive 4 (if installed), and
the sixth LED is the
physical SCSI ID of the
changer mechanism.
To change an ID for a drive, press the corresponding button
(see the illustration below) until the desired ID number
displays.
The SCSI ID of the changer mechanism will be set by the
rear switches.
Set the SCSI ID to ‘F’ if there is no installed drive at the
location. When you are satisfied that all IDs match their
corresponding switch settings, press the top left button to set
the changes into memory. Don’t worry, this turns off the
display at the same time. Close the door and turn the jukebox
off, then back on to detect the new settings.
Refer to the manufacturer’s instructions for additional
information on setting the various switches, dials and buttons
on the DRM-5004X.
Press to set
changes
Drive 2 SCSI ID
Drive 1 SCSI ID
Drive 4 SCSI ID (if installed)
— set unused drives to ‘F’
Drive 3 SCSI ID (if installed)
— set unused drives to ‘F’