
User guide


Chapter Seven – FastCD
109
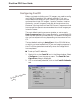
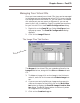
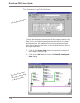
3. If you want to change the default directory for image stor-
age, click on the Browse button. The Browse FastCD
Image Directory dialog displays.
4. Click on the drop-down list button to display the available
drives. Make sure that the selection you make is mapped
to a hard disk volume on the specified server.
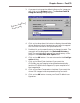
5. Double-click on the new directory to change the path. The
new path will be displayed in the Selected Directory
field. The available disk space of the new directory is dis-
played in the Available Disk Space field.
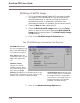
6. Click on the OK button. You are returned to the Configu-
ration dialog.
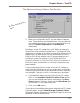
7. Click on the Auto Eject checkbox if you want the
CD-ROMs you are imaging to be ejected automatically
(and the CD-ROM drive supports it) upon completion of
the image-build.
8. Click on the Data Compression checkbox if you want the
virtual CD images to be compressed as they are built.
The Browse FastCD Image
Directory dialog
9. Click on the OK button to save your FastCD default con-
figuration.