
User`s guide


4-16 Microtek ScanWizard 5 User’s Guide (Macintosh)
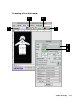
How to Scan a Line Art Image
1 Place the image to be scanned on your scanner’s glass bed.
2 Go to the Preview window and click the Scan Material icon. From the submenu that
appears, choose Reflective.
3 Go to the Settings window, and from the Type box, choose Line Art.
4 Click the Overview button to start an overview.
5 Select the Scan Frame tool from the Toolbar in the Preview window, and choose the area
to be scanned by dragging a rectangle around it. You will see a flashing frame (marquee)
around the selected area.
6 On the Resolution box, enter a Resolution value that at least matches the resolution of your
printer (300 or 600 dpi, for example) to obtain optimal results.
7 If you like what you see in the Preview window, click the Scan button to start scanning.
••
••
• Specify output dimensions (after step 2)
Go to the Settings window, and enter the desired output dimensions (width and height) in the
output dimension edit boxes. The scan frame may change slightly, and you may want to go back
to the Preview window to move the scan frame and enclose the area you want. For more details,
see “Scan Frame, Scaling, and Output” in the Supplementary Information section of the manual.
••
••
• See a more detailed preview image (after step 5)
Go to the Preview window, highlight the scan job you wish to see in detail, and click the Prescan
button. For more details, see “Overview and Prescan” in the Basic Setup and Features section of
the manual.
••
••
• Fine-tune the preview image with image processing options (after step 5)
For Line Art images, only the Threshold option is available. Threshold measures how gray levels
are converted to black and white, with the value of 128 (middle gray level) as the determining
point of conversion. Gray levels below the threshold are converted to black, while gray levels
above the threshold are converted to white.
If you want to.... Before the Final Scan