
User`s guide


5-52 Microtek ScanWizard 5 User's Guide (Macintosh version)
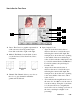
To use the Color Wheel:
1. To change the hue of an image, move the
pointer in the color wheel to its new color
position in the wheel.
2. To change the saturation of an image, drag
on the saturation bar. Dragging the scroll bar
to the left decreases saturation; dragging it to
the right increases saturation.
3. Use the Angle, Radius, and Picker as
necessary.
4. Click an action button. For more details, see
the section The Action buttons.
1 Color Wheel: The Color Wheel allows you
to add or remove a color cast from an image.
2 Angle: This shows the angle of the pointer on
the Color Wheel as measured in degrees, and
a value can also be entered directly in the
edit box to move the cursor to any point in
the Wheel.
Example: 0˚ corresponds to the color red on
the Wheel, 60˚ to the color yellow, 120˚ to
the color green, 180˚ to the color cyan, 240˚
to the color blue, and 300˚ to the color
magenta.
3 Radius: This field shows the amount of shift
towards a particular color and works in
tandem with the Angle field. The Radius
range extends from 0 located at the center of
the Color Wheel and indicating the least
concentration of color, to 1, located at the
periphery of the Wheel and indicating the
greatest concentration of color.
Example: If your angle is 0˚ (red on the
Color Wheel) and the radius is 1, this results
in an intense reddish cast on the entire
image.
The Angle-Radius feature works differently
from that of the Saturation bar, which
increases the saturation of all hues in the
image without tending towards any particu-
lar color cast.
4 Picker: The Picker lets you pick a known
neutral gray shade in your image and adjusts
it to a closer, truer gray. The grays in an
image may have a particular color cast
which can be verified through the color
information in the Information window. A
gray that tends towards a reddish tint, for
instance, will have its R value skewed higher
than the G and B values. By using the Picker
on a gray area, the gray is adjusted so that
the RGB values become approximately
equal.
5 Saturation bar: This lets you change the
intensity of the hues (colors) in your image.
Use Saturation selectively, because increas-
ing saturation will increase the intensity of
all hues in the image.