
User`s guide


5-44 Microtek ScanWizard 5 User's Guide (Macintosh version)
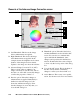
1 Histogram: The histogram is a graphic
representation of how all the pixels in an
image are distributed across brightness and
darkness levels. The darkest pixels are at the
left; the lightest pixels are at the right.
A histogram skewed heavily to the left
indicates that the image has many more dark
pixels than light. Conversely, a histogram
skewed heavily to the right will indicate a
light image as it has more light pixels than
dark. The height of the histogram indicates the
number of pixels at that point in the histo-
gram.
2 Sliders: The sliders are used to adjust the
Black and White points of the image. The
values of the black and white points are
reflected in the edit boxes below.
3 Auto: The Auto button automatically judges
the darkest and whitest points and clips
excessive black or white points. The clipping
percentage of the white/black points is
accessible by clicking the Setup button.
4 Channel: The channel button lets you control
the shadow and highlight settings for a
particular color channel (red, green, or blue),
or for the Master channel (red, green, and blue
simultaneously). For CMYK images, the
channel selections are cyan, magenta, yellow
and black (for K).
5 Input, Count, Percent: These figures provide
information about the histogram. The figures
will appear only when the cursor is on the
histogram or if a slider is being moved.
• The Input value indicates the color value
of the data displayed in the histogram.
• The Count value indicates the number of
pixels at the Input value. If Input value is
2 and Count value is 1300, then there are
1300 pixels in the image at the Input
value of 2.
• The Percent value is the percentage of
all pixels in the image where color
value is less than or equal to the input
value. For example, if Percent is 15%
and Input value is 2, it means that 15%
of all pixels in the image have a value
of 2 or less.
6 Pickers: The Pickers can be used instead of
the sliders to set the Black and White points,
based on color values in the preview image.
The Picker on the left sets the Black point;
the Picker on the right sets the White point.
• To set the White point: Click the Picker
on the right, then click on the preview
image to define the reference point.
• To set the Black point: Click the Picker
on the left, then click on the preview
image to define the reference point.
7 Setup: This button provides you with
advanced controls for setting the white/
black clipping points, as well as for deter-
mining the output levels for the white/black
points on your printer.
For more information on how to use the
options in the dialog box, see the section
"White/Black Point Setup" under The
Preferences Menu section of the manual.