
User`s guide


5-32 Microtek ScanWizard 5 User's Guide (Macintosh)
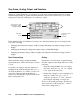
1 Job: This shows the current scan job as
indicated by the Scan Job window and by
the selected image in the Preview win-
dow.
2 Type: This shows the image type of the
current scan job.
3 Resolution: This lets you specify the
output resolution in your final scan.
4 Resolution list box: This provides
predefined resolution values for easier
selection of the resolution setting.
5 Resolution unit: This provides the unit of
selection for resolution. Choose from ppi
and several lpi options.
6 Scan Frame settings: These settings
(which include the Scan Frame width and
height edit boxes) represent the area on
the scan bed that you wish to scan.
7 Output settings: These settings (which
include the Output width and height edit
boxes) represent the dimensions of the
image when it is output to either a monitor
or printer.
8 Scaling: This lets you scale images,
creating larger or smaller images from the
original source image in the process. The
Scaling list box beside the scaling edit
box provides predefined scaling percent-
ages.
9 Image size: This shows the size of the file
when the image is scanned. The resulting
file size depends on the image type (color,
grayscale, etc); resolution; and dimen-
sions of the image.
10 Scan Frame options: These options
influence the behavior of the scan frame
relative to the overview image.
11 Unit of measurement: This lets you choose
your desired unit of measurement, which
will then be reflected in the rulers
alongside the Preview window. Choose
from inch, cm, mm, point, or pixel.
12 Transform: This lets you flip horizontally
or rotate the image in increments of 90
degrees.
13 Advanced Image Correction (AIC)
controls: These controls let you adjust and
enhance the image, and image corrections
can be displayed in real time.
14 Custom options: These allow you to add
or remove custom settings for each AIC
control.
15 Reset: This button changes settings in the
Advanced Image Correction controls to
their default values.