
User Guide


2
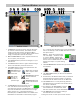
6. The Scan/Scan to button performs the final
scan, and delivers the scanned image to
your application program. The Scan button is available
only when ScanWizard 5 is launched from an image-
editing program (e.g., Photoshop Elements or
Photoshop LE). The Scan To button is available when
ScanWizard 5 is launched as a stand-alone program
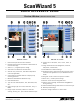
1. The Menu bar provides 5 menus: Scanner Menu (set
up scanner-to-host interface); View Menu (control
image and view/hide options); Preferences Menu
(customize software); Correction Menu (adjust/correct
image); and Help Menu (access online help).
2. Unit of measurement for rulers. Options include inch,
cm, mm, point, pixel, and pica.
3. The Overview button previews the image(s) on your
scanner bed.
4. The Prescan button shows a higher resolution image
of the area selected by the Scan Frame tool.
5. The Toolbar selects actions to be performed on the
overview or prescan image.
Preview Window (Advanced Control Panel only)
Mac OS 9.x versionWindows version
(e.g., launched from the Start menu or the ScanWizard 5
icon on the desktop). Click the Scan To button to active
the options menu:
Scan to saves the scanned image
into a file; Copy sends the output
to a printer; E-mail attaches the
output to an E-mail message; OCR converts
the text into an editable format; or To Web
uploads the output to a photo-sharing
website.
7. The Scan Material icon indicates the type of the current
scan material.
8. The Switch button takes you back to the Standard
Control Panel.
9. For Windows, the Minimize button lets you minimize
the Advanced Control Panel window. The same is
achieved with the Shrink button for the Macintosh.
10. The Inactive button is a non-performing feature in
ScanWizard 5 but is included in the interface due to
the nature of Windows.
11. For Windows, the Close button is used to
exit ScanWizard 5. For Macintosh, select
Quit from the File menu to exit ScanWizard 5.
12. The Status bar gives useful tips relating to
the selected tool in the Toolbar.
13. Drag this corner to resize your Preview window.
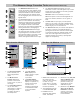
Reflective
Positive film
Negative film
Scan Frame: Lets
you select a scan
frame area
Zoom: Click to enlarge;
Shift or Option+Click
to shrink
Pan: Scrolls
through an
overview or
prescan image
Black Point tool: Click to
set black reference
point.
White Point tool: Click
to set white reference
point.