
User Guide

—
—
Q
Q
u
u
i
i
c
c
k
k
S
S
t
t
a
a
r
r
t
t
G
G
u
u
i
i
d
d
e
e
—
—
25
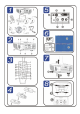
MAKE CONNECTIONS
Warning:
As a safety precaution, disconnect all
power to the projector and connecting
devices before making connections.
Label Description
A
Audio-in
Connect an audio cable
(not supplied) from the
computer’s audio-out
connector.
Connect the supplied
audio cable (mini jack-
to-RCA x 2) from a
video device.
B
RS-232
Reserved service port
for firmware upgrades.
C
DVI-I
Connect the supplied
DVI cable from a com-
puter.
D
Video
Connect a composite
video cable (not sup-
plied) from a video
device.
E
S-video
Connect the supplied
S-video cable from a
video device.
E
F
USB
Connect the USB cable
(supplied) from a com-
puter
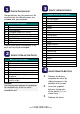
6
SET LANGUAGE
1.
Connect the power cord to the
projector (A). Connect the
other end to a wall outlet.
The Power LED and Lamp-
ready LED turn on.
2.
Turn on the connected de-
vices.
3.
Ensure the Lamp-ready LED is
orange (not flashing) and then
press the Power button to turn
on the projector (B).
The projector splash screen
displays and connected
devices are detected.
4.
Press the Menu button and
then press the cursor
button until Language is
highlighted (C).
5.
Press the cursor button
until the language you want is
highlighted (D).
6.
Press the cursor or
button to select the language.
7.
Press the Menu button twice to
close the OSD.
8.
To finish your presentation,
turn off the projector.