
User Guide
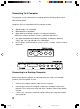
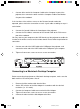
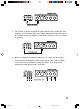

1. Set the DIP switches of the Mac adapter in accordance with the desired
resolution (i.e. 19” mode)
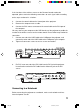
2. Connect one end of the Mac Adapter to the PowerBook Monitor Out port.
3. Tighten all connector screws to ensure secure connections.
4. Connect the other end of the Mac Adapter to the Computer Cable.
5. Connect the other end of the Computer Cable to the Computer In port of the
projector.
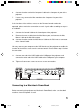
If the functions of the wireless mouse on the Remote Control need to be
operated, please make the connections to each signal cable according to steps 6
to 8 below:
6. Connect the Control Cable to the Control port of the projector.
7. Connect the Mac Mouse Cable to the PS/2 Mouse connector of the Control
Cable.
8. Connect the other end of the Mac Mouse Cable to the mouse port of the
PowerBook.
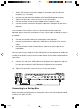
You may connect your computer to the USB interface of the projector to enable the
function of the wireless mouse on the remote control. Please follow step 9 below for
connection.
9. Connect one end of the USB Cable to the USB port of the projector, and con-
nect the other end of the USB Cable to the USB port of your computer.
10. Tighten all connector screws to ensure secure connections.
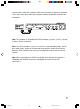
Connecting to a Set-top Box
Before connecting the projector to a Set-top Box, make sure that the power of both
machines has been shut off.
COM 1
1 2 3 4 5 6
ON
VX2.p65 02-10-18, 11:0516