
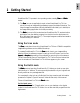
User Guide


Introduction 1-3
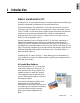
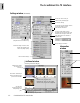
Color Meter Display: Displays
input and output pixel values of
the selected area in the prescan
image on preview
Pixel Sample Preview area: Shows
pixelized display of the spot in the
prescan image where mouse
pointer is pinpointed
Cursor Locator: Shows x, y
position of mouse cursor on
the current prescan image on
preview.
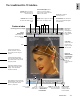
Preview window
(showing prescan image)
Overview button: Previews
the entire film holder in Job
Panel
Prescan button: Previews a
high-resolution image of the
selected scan job
Scan Material icon: Selects the
type of scan material (Negative
or Positive Film)
Scan button: Starts the
scanning process.
Unit of
Measurement:
Choose from inch,
cm, mm, point, pica,
& pixel
Ruler
Preview of prescan image or the
currently selected scan job in
Job Panel
Toolbar: (Left to right) Scan Frame,
Zoom, Pane, and Dropper Tools
The ScanWizard Pro TX Interface
Color Meter Options: Provides
further options for the Sample
Display of the Information
window (see below)
Window Corner:
Drag to propor-
tionally resize the
Preview window
Status bar: Provides tips
relative to the selected
tool in the Toolbar
Prescan image
resolution
Handy
buttons for
Zoom in/out
Eject button:
Ejects the
filmstrip/slide/
APS cartridge
holder from the
scanner
High & Low
(White & Black)
Points Markers:
Pinpoint to the
white & black
points of
current prescan
image
Prescan Frame Option: When
option is set to “Scan Frame,”
only the area enclosed by Scan
Frame is prescanned
Switch for
momentary flashing
of White & Black
Points Markers
Prescan Frame option
showing “Scan Frame”
setting icon
Zoom in/out ratio
status
Scan Frame:
Selects the area
for final scan.
Drag on corner/
side to resize