
User Guide


5-10 ScanWizard Pro TX User’s Guide
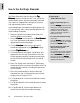
How to Customize Negative Film
With ScanWizard Pro TX, you can create a
customized film profile for your negative film,
based on an existing negative film profile. This
lets you create film profiles at will or as the need
arises, and allows you to use the profiles for
subsequent scans as well.
1. Place the negative filmstrip or cartridge to be
customized in the proper film holder and
insert into your scanner.
2. Go to the
PreviewPreview
PreviewPreview
Preview window and click the
ScanScan
ScanScan
Scan
Material Material
Material Material
Material icon. From the submenu that
appears, choose
Negative FilmNegative Film
Negative FilmNegative Film
Negative Film.
3. Go to the
SettingsSettings
SettingsSettings
Settings window, and click the
FilmFilm
FilmFilm
Film
TT
TT
T
ype ype
ype ype
ype button. Select
Custom Custom
Custom Custom
Custom (
CrCr
CrCr
Cr
eate Customeate Custom
eate Customeate Custom
eate Custom
Film Film
Film Film
Film Type for Mac) at the bottom of the
menu.
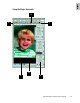
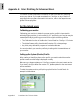
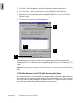
4. When a dialog box appears, follow the steps
outlined. First, click the
Overview Overview
Overview Overview
Overview option in
the dialog box. When the overview image
appears in the dialog box window, select the
film base (the perimeter just outside the image
exposure area).
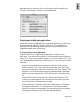
5. Click the
PrescanPrescan
PrescanPrescan
Prescan option. When the prescan
image appears, fine-tune the selection area
you made in step #4 to make sure that the
film base is properly selected.
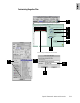
6. Choose the base film type on which the
custom negative film profile will be based. In
general, select an existing film profile closest
to your new film type. In this example, we
chose Kodak Gold 100-6.
7. Click the
CustomizeCustomize
CustomizeCustomize
Customize option in the dialog box.
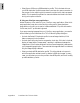
8. When the customization process is com-
pleted, enter a file name for the new negative
film profile and a description. Take note that
the new film will appear in the
SettingsSettings
SettingsSettings
Settings
Window Film Type menu by description, not
by file name.
9. Click the
SaveSave
SaveSave
Save button. The saved profile will
now appear in the Film Type menu in the
SettingsSettings
SettingsSettings
Settings window.
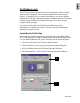
10.Click the
Close Close
Close Close
Close button in the
CustomizeCustomize
CustomizeCustomize
Customize
Negative Film TNegative Film T
Negative Film TNegative Film T
Negative Film T
ype ype
ype ype
ype dialog box to return to
the
PrPr
PrPr
Pr
eview eview
eview eview
eview window.
11.Select the newly created customized profile
from the
Film TFilm T
Film TFilm T
Film T
ypeype
ypeype
ype menu to scan your new
negative film type. In this example, it is Kodak
Gold 100 New.