
User Guide


5-8 ScanWizard Pro TX User’s Guide
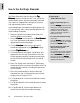
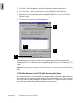
How to Use the Magic Diamonds
The “Magic Diamonds” that are a part of the
TT
TT
T
agag
agag
ag
Windows Windows
Windows Windows
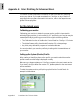
Windows feature in ScanWizard Pro TX let you set the
white and black points, as well as remove any unwanted
color casts in an image without having to bring up the
color adjustment/correction screens.
In the example here, the image has a slightly grayish cast
(i.e., less contrast), which can be removed easily with the
use of the Magic Diamonds.
1. Place the originals into the appropriate holder, and
insert the holder into the scanner.
2. Go to the
PreviewPreview
PreviewPreview
Preview window and click the
Scan MaterialScan Material
Scan MaterialScan Material
Scan Material
icon. From the submenu that appears, choose the
appropriate film scan material type.
3. Click the
OverviewOverview
OverviewOverview
Overview button, and you will see the
thumbnail images appear in your
Job PanelJob Panel
Job PanelJob Panel
Job Panel window. .
4. Click the
TT
TT
T
ag Wag W
ag Wag W
ag W
indows indows
indows indows
indows tool.
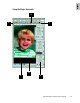
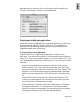
5. Click a white area in the image. A “Tag Window” will
appear with the color strip on the bottom of the Tag
window appearing as white, indicating the spot where
you had clicked. Move the Tag Window to a desired
location.
6. Next, click a black area in the image. A “Tag Window”
will appear with the color strip on the bottom of the Tag
window appearing as black, indicating the spot where
you had clicked.
7. Now, click the area where you wish to remove the
unwanted color cast. In the example here, we clicked
the gray color on the boy’s T-shirt.
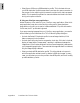
8. For Tag Window #1, click the white diamond to set the
white point.
9. For Tag Windows #2, click the black diamond to set the
black point.
10.For Tag Window #3, click the center diamond to
remove the color cast and neutralize the image.
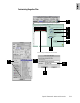
If you want to....
Before the Final Scan
• Select an output image type (after
step 2)
Go to the
SettingsSettings
SettingsSettings
Settings window, and from
the Type box, choose the appropriate
image type for the image to be
scanned. For monitor display of
images, choose RGB, Grayscale, or
Web /Internet colors.
• See a more detailed preview image
(after step 3)
Go to the
PrPr
PrPr
Pr
evieweview
evieweview
eview window, highlight
the scan job you wish to see in detail,
and click the
Prescan Prescan
Prescan Prescan
Prescan button.
• Fine-tune the preview image with
image processing options
(after step 10)
Go to the Preview window, and select
the desired image-processing option
from the
Correction Correction
Correction Correction
Correction menu. Alterna-
tively, you can go to the
SettingsSettings
SettingsSettings
Settings
window and click on any of the AIC
image processing buttons.