
User Guide


Special Features & Advanced Scenarios 5-5
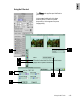
6. If desired, prescan the jobs by highlighting
each or all selected jobs in the
Job PanelJob Panel
Job PanelJob Panel
Job Panel
window for a clearer preview of each job. To
prescan, click the
PrescanPrescan
PrescanPrescan
Prescan button in the
PrPr
PrPr
Pr
eview eview
eview eview
eview window.
NOTE
: If you want to crop and prescan the area
enclosed by the scan frame only, you have to
initially click the
Frame Option Frame Option
Frame Option Frame Option
Frame Option (arrow icon) at
the right end of the
PrescanPrescan
PrescanPrescan
Prescan button and select the
Scan Frame Scan Frame
Scan Frame Scan Frame
Scan Frame option.
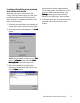
7. Make image enhancements to each or all of
the highlighted jobs with the
Settings Settings
Settings Settings
Settings window
Advanced Image Correction (AIC) tools.
NOTE
: If image correction adjustment is made
individually to each highlighted scan job, the
adjustments setting will remain effective for that
particular scan job only when applying the
Working Folder to subsequent scanning sessions.
Multiple adjustments with all scan jobs
highlighted is feasible.
At this stage, all the adjustments you have
made in Steps 4, 5, and 7 are automatically
saved in the “Web Gallery” working folder.
8. When you are satisfied with your adjustments
to the prescan images, click the
ScanScan
ScanScan
Scan button
to scan each or all of the highlighted jobs.
9. Click the
EjectEject
EjectEject
Eject icon to eject the slide holder
when you are done with scanning with the
current set of slides.
You are now ready to scan another set of
slides using the stored settings from the
Working Folder you have just created.
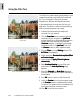
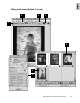
4. Click the
Select AllSelect All
Select AllSelect All
Select All button from the
JobJob
JobJob
Job
Panel Panel
Panel Panel
Panel window. With all the Scan Jobs (#1 to
#4) highlighted, go to the
Settings Settings
Settings Settings
Settings window.
Select 300 ppi as your resolution,
pixelpixel
pixelpixel
pixel as
your unit of measurement, then type the
desired output dimensions (approximately,
W=550, H=370 in this example). Next, check
the
Fixed Output Size Fixed Output Size
Fixed Output Size Fixed Output Size
Fixed Output Size option to preserve the
output dimensions when you decide later to
change the scan frame size.
The defined settings are applied to all scan
jobs. Note that as you define width, the height
value may vary a bit (or the other way
around) to keep the aspect ratio of the scan
frame.
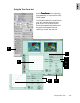
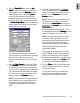
5. Select the
Scan Frame Scan Frame
Scan Frame Scan Frame
Scan Frame tool from the Toolbar
in the
PrPr
PrPr
Pr
evieweview
evieweview
eview window, and adjust the Scan
Frame flashing marquee as you would like it
to fit or crop the image of the highlighted scan
job. Observe the scan frame being simulated
in the scan job overview image as you adjust
the scan frame in the
PrPr
PrPr
Pr
evieweview
evieweview
eview window.
NOTE
: The individual scan frame adjustments will
remain effective for each corresponding Scan Job
number when applying the Working Folder to
subsequent scanning sessions for 35mm positive
slides.