
User Guide


5-4 ScanWizard Pro TX User’s Guide
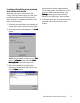
• Click the
NewNew
NewNew
New
......
......
... button if you wish to save
image settings in a new separate user-
defined folder. You will be prompted to
define a new folder in your disk.
If the dialog does not appear, click the
FileFile
FileFile
File
menu of the
Preview Preview
Preview Preview
Preview window and choose
New WNew W
New WNew W
New W
orking Folderorking Folder
orking Folderorking Folder
orking Folder. In the dialog box
that follows, enter a folder name, e.g., “Web
Gallery” as your new working folder. Then
click the
Open Open
Open Open
Open button.
3. Make sure that you have the correct
ScanScan
ScanScan
Scan
Material Material
Material Material
Material type (Positive Film) in the
PreviewPreview
PreviewPreview
Preview
window, then click the
OverOver
OverOver
Over
view view
view view
view button.
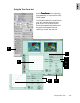
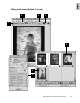
Observe thumbnail overview images appear in
the
Job Panel Job Panel
Job Panel Job Panel
Job Panel window.
How to Use the ScanWizard Pro TX Working Folders
At initial scanning session:
1. Place the color slides on the slide holder and
insert the slide holder into the scanner.
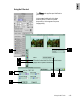
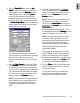
2. When the following dialog appears-
• Click
Use Current Use Current
Use Current Use Current
Use Current button if you wish to
save image settings in the default
DataData
DataData
Data
Working Folder located in your
ScanWizard Pro TX directory, or the folder
you have created in the previous scanning
session.
NOTE
: Each Working Folder may contain three
sets of defined settings, one each for 35mm
positive slides, 35 mm color negative strip and
APS negative film cartridge.
The ScanWizard Pro TX Working Folder is a tool that helps you enhance scanning productivity of
your scanning, especially when you have to perform several scanning jobs of the same type of
originals. All of your favorite image setting contexts for previews or prescans, including AIC adjust-
ments, are automatically saved and kept in a default or user-defined Working Folder. Several sets of
setting contexts may be saved. The accumulated settings are then retrieved and loaded into Scan-
Wizard Pro TX, and auto-applied to a new set of originals (of the same film and holder type) during
subsequent scanning sessions. This saves you time from performing needless repetitive adjustments.
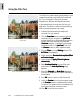
The following simple scenario is presented as an example. Suppose you often scan 35 millimeter
slides for posting in a website image gallery. The required image size for posting is approximately 370
by 550 pixels at 300 ppi resolution. This is a perfect scenario where the ScanWizard Pro TX Working
Folder feature can be utilized to cut back your scanning time.