
User Guide


5-2 ScanWizard Pro TX User’s Guide
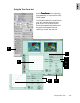
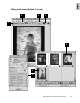
How to Edit and Scan Multiple Scan Jobs
When you need to adjust settings and scan several
images at a time or find yourself wanting to scan and
save images in batches, refer to the sample scenario
below.
NOTE
: Start Scan Wizard Pro TX from the Apple menu (for Mac)
or Start menu (for PC) if you want to batch scan images to file.
1. After inserting the color slide holder (used in this
example) into the scanner, choose
Positive FilmPositive Film
Positive FilmPositive Film
Positive Film as
your scan material.
2. Click the
OverviewOverview
OverviewOverview
Overview button. The images of all ori-
ginals appear in the
Job Panel Job Panel
Job Panel Job Panel
Job Panel window as thumbnails.
3. Select the thumbnail images from the
Job PanelJob Panel
Job PanelJob Panel
Job Panel that
you want to include as part of the batch scan as
follows
::
::
:
••
••
• To select all originals, click the
Select All Select All
Select All Select All
Select All button.
••
••
• To select randomly, click on the image while
pressing the
CtrlCtrl
CtrlCtrl
Ctrl key if you are a PC user. For Mac
users, press
ShiftShift
ShiftShift
Shift key instead.
••
••
• To select a range of originals, (e.g., thumbnails 2 to
4), for PC users, press and
hold
ShiftShift
ShiftShift
Shift key while
clicking on the start image (2), and then the last
image (4) of your selected range. For Mac users,
drag pointer across the selected thumbnails.
Notice that the selected thumbnails are highlighted.
4. Click the
PrPr
PrPr
Pr
escan escan
escan escan
escan button in the
PrPr
PrPr
Pr
eview eview
eview eview
eview window. The
selected thumbnails images are prescanned. The last
selected image will display in the
PrPr
PrPr
Pr
evieweview
evieweview
eview window. To
view the other prescanned images, click their
corresponding thumbnail in the
Job PanelJob Panel
Job PanelJob Panel
Job Panel.
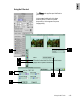
5. Highlight the thumbnails in the
Job Panel Job Panel
Job Panel Job Panel
Job Panel window for
which new settings are to be applied (note that these
thumbnails represent the prescan images). When new
settings from the
Settings Settings
Settings Settings
Settings window are applied to the
images, the adjustments are applied simultaneously to
all the selected images.
6. If you like what you see in the
PrPr
PrPr
Pr
eview eview
eview eview
eview window, click
the
Scan Scan
Scan Scan
Scan button to start scanning. All thumbnails in
the
Job PanelJob Panel
Job PanelJob Panel
Job Panel with a check mark will be scanned.
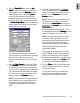
If you want to....
Before the Final Scan
• Select an output image type (after step 5)
Go to the
Settings Settings
Settings Settings
Settings window, and from the
TT
TT
T
ypeype
ypeype
ype box, choose the appropriate image
type for the individual image on preview or
for all highlighted scan jobs in the
JobJob
JobJob
Job
Panel Panel
Panel Panel
Panel simultaneously.
• Specify output dimensions (after step 5)
Go to the
Settings Settings
Settings Settings
Settings window, and enter the
desired output dimensions (width and
height) in the output dimension edit boxes
for individual the image on preview or for
all highlighted scan jobs in the
Job PanelJob Panel
Job PanelJob Panel
Job Panel
simultaneously. The scan frame may change
slightly, and you may want to go back to the
Preview Preview
Preview Preview
Preview window to readjust the scan frame.
• Change output image resolution
(after step 5)
Go to the
Settings Settings
Settings Settings
Settings window, and enter the
resolution value in the
Resolution Resolution
Resolution Resolution
Resolution edit box
for the individual image on preview or for
all highlighted scan jobs in the
Job PanelJob Panel
Job PanelJob Panel
Job Panel
simultaneously.
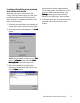
• Fine-tune the preview image with Advance
Image Correction (AIC) tools (after step 5)
Go to the
PrPr
PrPr
Pr
eview eview
eview eview
eview window, and select the
desired image-processing option from the
Correction Correction
Correction Correction
Correction menu, or click an appropriate
AIC tool from the
Setting Setting
Setting Setting
Setting window. Apply
corrections to the individual image on
preview. If all your images are of the same
TT
TT
T
ypeype
ypeype
ype, you can apply image corrections to
all highlighted scan jobs in the
Job PanelJob Panel
Job PanelJob Panel
Job Panel
simultaneously. The dialog box for the
corresponding AIC tool will then appear.
Details on usage for each tool is discussed
in the preceding chapter, Using the Advanced
Image Correction Tools.