
User Guide


Using the AIC Tools 4-19
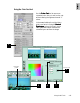
Using the Selective Color tool
Use the
Selective Color Selective Color
Selective Color Selective Color
Selective Color tool to perform color
correction to a specific color range without altering the
other colors in an image.
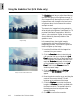
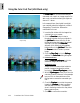
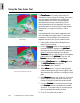
In the example below, the color of the blue sky is
changed with an increase in saturation, but all other
colors in the image are held
constant and remain unchanged.
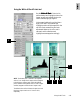
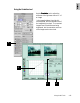
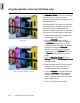
Be sure that the “ From” color
label is highlighted when
selecting the color to be
corrected
For Windows users
Shift + Click the
Neutral EyedropperNeutral Eyedropper
Neutral EyedropperNeutral Eyedropper
Neutral Eyedropper
pointer to increase, or Ctrl + Click to
decrease area of the color to be
corrected.
7. Enable the
TT
TT
T
oo
oo
o color mode label to enter the
color that will take the place of the affected
color in the original. Then click on the Color
Wheel and move the
TT
TT
T
oo
oo
o color marker to the
desired color and chroma position.
4
7
New button for
defining
succeeding
colors to be
changed
6
5 8
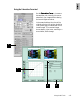
8. Uncheck the
Show Affected Areas Show Affected Areas
Show Affected Areas Show Affected Areas
Show Affected Areas option to
see the corrected result, displayed on the
right thumbnail.
9. Check the
PreviewPreview
PreviewPreview
Preview box so that the prescan
image in the
PreviewPreview
PreviewPreview
Preview window is updated with
the latest correction. The update is done in
the background and so may take a few
moments to show. Click
OKOK
OKOK
OK to confirm the
correction.
3
9
Use this Eyedropper to
pinpoint the color to be
corrected
Use this Eyedropper to
adjust the color range
to be affected (Delta
LCH values)
6