
User Guide


4-8 ScanWizard Pro TX User’s Guide
Using the Dynamic Range Tool
The
Dynamic RangeDynamic Range
Dynamic RangeDynamic Range
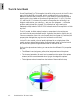
Dynamic Range tool is used to set the density
capture range of the scanner and displays the
density distribution (histogram) of the image to be
scanned.
The Auto range (default) feature automatically
determines the Dmin (minimum density, lightest
tone) and Dmax (maximum density, darkest tone) of
the image, and sets the scanner capture range.
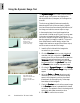
In the example here, the original image has low
contrast and a limited range of tones, as can be seen
in the narrow image histogram. The solution: To
narrow the scanner’s range of density capture to the
density range of the image (or smaller). This would
then redistribute the small density range of the
image to the maximum range of the scanner output,
and thus restore contrast to the image.
1. Insert the film holder with the image to be
corrected into your scanner.
2. Click the
OverviewOverview
OverviewOverview
Overview button to start a thumbnail
overview of all your originals in the
Job PanelJob Panel
Job PanelJob Panel
Job Panel
window, then click on the thumbnail to select the
image. If thumbnail overview is not required
(
OverviewOverview
OverviewOverview
Overview skipped), click directly on the image-
less frame position in the
Job PanelJob Panel
Job PanelJob Panel
Job Panel. Then click
the
Prescan Prescan
Prescan Prescan
Prescan button to obtain a prescan image.
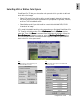
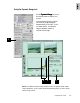
3. Click the AIC
Dynamic Range Dynamic Range
Dynamic Range Dynamic Range
Dynamic Range tool in the
SettingsSettings
SettingsSettings
Settings
window. The
AIC:Dynamic Range AIC:Dynamic Range
AIC:Dynamic Range AIC:Dynamic Range
AIC:Dynamic Range dialog will then
appear.
4. Adjust the
DminDmin
DminDmin
Dmin and
Dmax Dmax
Dmax Dmax
Dmax values to an opti-
mized range. To do this, compress the density
space in the histogram by moving the sliders
toward each other stopping only at the steep
boundaries of the histogram.
5. Check the
PreviewPreview
PreviewPreview
Preview box so that the prescan image
in the
PreviewPreview
PreviewPreview
Preview window is updated with the latest
correction. The update is done in the background
and so may take a few moments to show.
6. Click
OKOK
OKOK
OK to confirm the correction.
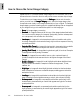
Same image and its
lightness histogram after
density correction,
showing a broader tonal
range
Original image and its
lightness histogram
before density
correction, showing
narrow tonal range