
User Guide


Using the AIC Tools 4-5
Adding a Custom Setting
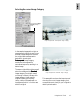
To the right of each AIC (Advanced Image Correction) tool status box is a
TT
TT
T
oolool
oolool
ool
Setting Setting
Setting Setting
Setting pull-down menu that features predefined settings for the AIC tool. For
instance, some of these settings include
Automatic Automatic
Automatic Automatic
Automatic or
No CorNo Cor
No CorNo Cor
No Cor
rr
rr
r
ectionection
ectionection
ection. You can also
add your own custom image correction setting to each AIC tool. The custom setting
can then be retrieved or loaded, and applied to your scan job at any time in the
future.
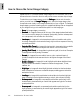
To do this, choose an AIC tool (click on a tool icon or
Custom Custom
Custom Custom
Custom from the
TT
TT
T
oolool
oolool
ool
Setting Setting
Setting Setting
Setting pull-down menu). When the AIC tool dialog box appears, apply the
adjustments you desire to the image. Then click the
Add to Menu Add to Menu
Add to Menu Add to Menu
Add to Menu button at the
bottom of the AIC tool dialog box. When the
Save Save
Save Save
Save dialog box comes up, enter a
name for the new custom setting.
The adjustments you have just made and saved becomes your custom-made setting
and will appear in the
TT
TT
T
ool Setting ool Setting
ool Setting ool Setting
ool Setting pull-down menu for that particular AIC tool the
next time you access the menu. Choose it to apply the particular custom
adjustment to a new image.
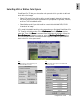
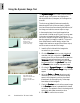
Saved custom setting (e.g.,
New
saturation custom setting
) is listed
in the Tool Setting menu.
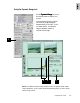
To apply the Color Cast
custom
setting
to a new image, click on
this expansion arrow and choose
New saturation custom setting
from the menu
Click to save current custom setting
and add to AIC (Color Cast in this
example) predefined settings menu in
the Settings window (see figure at
right)