
User Guide


3-6 ScanWizard Pro TX User’s Guide
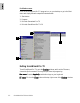
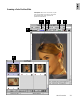
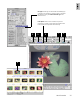
1. Place the APS cartridge holder into the scanner.
2. The
Scan Material Scan Material
Scan Material Scan Material
Scan Material icon in the
Preview Preview
Preview Preview
Preview window
will automatically change to
Negative FilmNegative Film
Negative FilmNegative Film
Negative Film
status. You will notice the change in the appear-
ance of the icon if the submenu was previously
set for positive film.
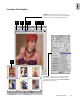
3. Click the
OverviewOverview
OverviewOverview
Overview button to start a thumbnail
overview of all your originals in the
Job PanelJob Panel
Job PanelJob Panel
Job Panel
window.
NOTE
: If you do not need to overview the originals,
skip Steps 3 & 4 and directly prescan the original
after selecting its frame position in the
Job Panel Job Panel
Job Panel Job Panel
Job Panel
window.
4. Select the image you want to scan by clicking on
its thumbnail in the
Job PanelJob Panel
Job PanelJob Panel
Job Panel window (at the
same time, making sure the corresponding
checkbox is checked). The selected image is
highlighted. Before you perform the actual scan,
you need to do a prescan to zoom-in and see a
clearer view of the image.
5. Click the
PrPr
PrPr
Pr
escanescan
escanescan
escan button in the
PrPr
PrPr
Pr
eview eview
eview eview
eview window.
At the end of the prescanning process, the
zoom-in image will appear in the
PreviewPreview
PreviewPreview
Preview
window. The image is now ready for image
editing.
6. Click the
Scan FrameScan Frame
Scan FrameScan Frame
Scan Frame tool from the
PreviewPreview
PreviewPreview
Preview
window Toolbar, and adjust the flashing scan
frame (marquee) around the selected area of the
image that you wish to scan. Alternatively, you
can click and hold pointer inside the frame and
drag the frame to the selected area.
7. If you like what you see in the Preview window,
click the
ScanScan
ScanScan
Scan button to start scanning.
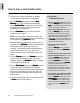
How to Scan Images from the APS Film Cartridge
If you want to....
Before the Final Scan
• Select an output image type (after step 2)
Go to the
SettingsSettings
SettingsSettings
Settings window, and from the
TT
TT
T
ypeype
ypeype
ype box, choose the appropriate output type
for the image to be scanned.
• Specify output dimensions (after step 2)
Go to the
SettingsSettings
SettingsSettings
Settings window, and enter the
desired output dimensions (width and height)
in the output dimension edit boxes. The scan
frame may change slightly, and you may want
to go back to the
PreviewPreview
PreviewPreview
Preview window to readjust
the scan frame for the selected area.
• Adjust Film Type (after step 6)
If you need to adjust the film type setting or
create a customized film profile, go to the
Film TFilm T
Film TFilm T
Film T
ype ype
ype ype
ype list box in the
Settings Settings
Settings Settings
Settings window
and select a new film type from the list; or
click
CustomCustom
CustomCustom
Custom (at the bottom of the list) to
create a new customized film profile.
• Change output image resolution (after step 6)
Go to the
SettingsSettings
SettingsSettings
Settings window, and enter the
resolution value in the
ResolutionResolution
ResolutionResolution
Resolution edit box.
• Fine-tune preview image with Advanced
Image Correction (AIC) tools (after step 6)
Go to the
PrPr
PrPr
Pr
eview eview
eview eview
eview window, and select the
desired image-processing option from the
Correction Correction
Correction Correction
Correction menu or click an appropriate AIC
tool from the
SettingsSettings
SettingsSettings
Settings window. The dialog
box for the corresponding AIC tool will then
appear. Details on usage for each AIC tools
are discussed in the next chapter, Using the
Advanced Image Correction Tools.
• See a preview image of the selected/fine
tuned image in scan frame (after step 6)
Go to the
PreviewPreview
PreviewPreview
Preview window and click the
Frame Option Frame Option
Frame Option Frame Option
Frame Option (arrow located at right end of
PrescanPrescan
PrescanPrescan
Prescan button) and select the
Scan FrameScan Frame
Scan FrameScan Frame
Scan Frame
option from the resulting menu. Then click
the
PrescanPrescan
PrescanPrescan
Prescan button again.