
User Guide

Customizing the OCR panel
from, i.e., English, French, German, Italian, Spanish.
Document Type Size
Defines the font size of your final output – available selections include : Small (6-9 pts.),
Medium - Default (10-14 pts.), and Large (15 pts and above).
Scan Type
Defines the color output for your document. Make sure you choose the correct image
type; it is always best to choose the right image type. For instance, if you choose True
Color to scan a gray-level image, a bigger file size and longer scanning time results with
little improvement to image quality. Likewise, if your original is text only without images,
choose Black & White to achieve better quality than Gray.
Send to Application
Defines the application that will edit and save the scanned document. .RTF, .XLS, or .TXT
format is used if an "extensive text editing" is required. It will automatically open your
default or selected word processing application after scanning.
If .PDF with hidden text is selected from the list – it will directly open Adobe Acrobat
Reader, allowing you to view and print the scanned material in its original form. Plain
.PDF supports viewing, printing, and minor editing.
.HTM is another file format also available from the list – this supports standard web
formatting especially when incorporating scanned materials to a website.
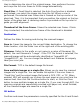
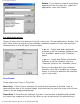
If the application you prefer to use is not shown on the list yet, add it to the list by –
For Windows users:
Choose Custom from the bottom of the list. Use the resulting dialog box to search and
add the new application to the list.
Application full path: Enter the full path
name, or click the yellow folder icon to
browse and search for the new application.
Application alias: Enter an alias for the
application to be added.
Add: When you have located your new
application, click Add to include the new
application to the Application alias list.
Then click Close.
file:///D|/msc/WebHelp/panel_OCR.htm (2 of 5) [8/20/03 2:29:22 AM]