
User Guide


9
Getting Started - before connecting
to the Internet
Now that you have installed EyeStar Mail v3.0 into your system, it is time to get
you up and going. But first, in order to make sure that your line of communication
in the Internet world is always available and ready, it is recommended that you set
up your work environment first before doing anything else.
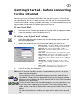
To run Send Mail:
1. Click Start on the Taskbar and locate the EyeStar Mail v3.0 program folder.
2. From the submenu, select Send Mail to run it.
To define your default mail settings:
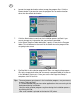
1. In the Send Mail program window, click the Mail Setup button to open the
Mail Setting dialog box.
2. Specify the following necessary information about your mail server.
➪ Mail encoding - Select from MIME or UUCode. MIME is
the default and is commonly used by most mail clients.
➪ Character set - Select from US-ASCII or ISO-1
➪ Mail server - Specify the SMTP mail server you area
connected to.
➪ User name - Specify the name of your internet account.
➪ Reply address - Specify the e-mail address to which you
want the recipient to reply to. This will automatically
appear in the “From” entry box when you are sending an
e-mail.
➪ Waiting time - Specify how long to que the e-mail
message before actually sending it to out to your mail
server.
➪ Keep copies - Select to save a copy of the e-mail
message to your hard drive after sending it out.
3. Click OK to close the dialog box.
Notes:An IP (Internet Provider) account is required before you can set up the
above-mentioned options.
You can directly run the Send Mail program from either Video Panel or
Card Maker. Simply click the appropriate button on the program window.
Whatever you are working on at that moment will be sent to the Send Mail
program as an attachment.
On the left-hand side of the Send Mail program, you may sometimes see
one or more icons appearing on the panel. These may indicate video,
audio, and/or snapshot file attachments coming from Video Panel or Card
Maker.
For more information on sending messages online, please refer to page
28.