
User Guide


31
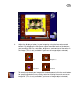
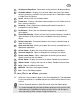
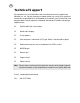
1 Scroll preceding album - Moves back to the previously displayed albums.
2 Available albums - Displays a set of three albums per view. Each album
contains previously saved files that you can work on in Card Maker or open
in Video Panel for viewing.
3 Scroll - Moves to the next available album.
4 Frame item - Displays a thumbnail representation of a file. Double-click an
item’s name to change it.
5 Scroll up - Shows the previously displayed thumbnail image that is
included in the active album.
6 Scroll down - Shows the next thumbnail image that is included in the
active album.
7 Show/Hide filmstrip - Shows or hides the filmstrip that displays thumbnail
representations of all the files that are included the currently selected
album.
8 Delete frame item - Permanently deletes the currently selected image or
video file from disk.
9 Open selected item - Allows you to open the currently selected item in its
appropriate application.
10 Active album - Displays the name of the currently selected album.
11 Insert an image file - Opens a dialog box for locating a new album.
12 Create a new album - Opens a dialog box for creating a new album.
Specify a name for the new album.
13 Delete album - Displays the name of an album. Double-click to rename.
14 Album’s name - Displays the name of an album. Double-click to rename.
15 Help - Opens the Album online help.
16 Minimize - Minimizes the program window.
17 Exit - Closes the Album program.
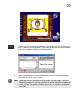
To save files to an album, you can:
Select the “Save to album” option in any Save dialog boxes. The drop-down
list of existing albums is enabled and you can choose which album to save
a file to.
Click the Snapshot button in Video Panel and select the Album option.
Tip: It is recommended that you keep the Album program running on the side
while working in Card Maker for quicker access to files and also get an
idea right away of what a certain image file looks like.
☞