
User Guide


28
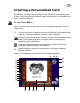
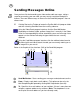
Sending Messages Online
Once you have finished recording your video and/or audio messages, taking a
snapshot or creating, your own card, you may want to send them through the
Internet. There are different ways on how to run the Send Mail program. You can
choose from:
Clicking Start on the Taskbar to locate the EyeStar Mail v3.0 program folder
and then selecting Send Mail from the resulting submenu.
Using the Video Panel program interface, click the Send Mail button.
Depending on the data (video, audio or image) that is currently in the Video
Panel, the corresponding file will be attached to your e-mail message. Icons
appears on the side bar indicating the type of data that are currently
attached.
Using the Card Maker program interface, click the mailbox button found at
the lower right-hand side to attach the card you are currently working on as
an image file in your e-mail.
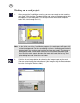
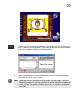
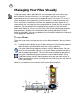
Below is the Graphical User Interface (GUI) of the Send Mail program.
1 Send Mail button - Starts sending your messages and attachments online.
2 From - Displays reply back e-mail address. This option can be set in the
Mail Setup dialog box opened by clicking Mail Setup button (item #9).
3 To - Specifies the e-mail address of your recipient. If there is more than one
recipient, separate addresses by commas. (Note: The drop-down list can
recall up to 30 e-mail addresses you have already used.)
7
8
5432
1
13
12
11
10
9
15
14
☞