
User Guide


26
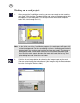
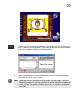
5. Click the Load button to locate the folder where the mask file you want is
saved.
6. In the Load Mask File dialog box, select the mask file you want to use and
then click the Open button.
7. Click OK to close the insert Mask dialog box and apply it on the image in
your card project.
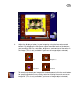
Tips: Using a mask helps you blend the images with the background making it
appear as part of the whole image. A mask allows you to make the
background show through certain portions of your image. EyeStar Mail
v3.0 provides predefined masks that you can choose from. Simply open
the Album program and find the Templates album. From the Filmstrip that
displays the thumbnails of available mask files, select one and then drag
and drop it into the Card Maker workspace.