
User Guide


22
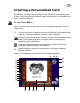
1 Create a new project - Creates a new card project in the workspace. It
opens the New template dialog box for choosing a solid color or a
predefined background. If a project is currently open in the workspace, it
prompts you to save the project first before inserting a new template.
2 Open a project - Opens a previously saved Card Maker project. This
opens a dialog box for locating the file.
3 Save project - Saves the project you are currently working on to a project
file(*.ICM). This format allows you to do more editing in the future without
merging all your objects in your card project into one image. This way, you
can still work on the objects independently. You can also save the file to an
album for better file management.
4 Print - Sends the image data to the printer. This opens a preview window
displaying how your card will be printed on paper. You can also print
multiple copies of the currently open card on a single sheet by selecting the
Tile option when in Print mode.
5 Save As - Saves the current project into an image file. Card Maker merges
all objects to the background and saves the project data to an image file.
You can also have the option to save the image file to an album for better
file management.
6 Change template - Allows you to change the current background in the
card project. This opens a dialog box for choosing another template.
7 Insert an image - Insert an image to the current project as an image
object.
8 Select TWAIN source - Opens a dialog box for selecting the TWAIN
source to use an input device (i.e. scanners or digital cameras) for
acquiring an image. Fir more information on acquiring images, see the
Online Help.
9 Acquire - Allows you to get your photos into your computer. This means
that photo data are digitized so that you can work on them on your
computers. You can then create personalized eye-catching greeting cards.
10 Open Album - Runs the Album program. This program helps you organize
your photos efficiently. You can store your photos to different albums just
like the real-life photo albums where you can separate your photos
according to different categories. You can also drag and drop image files
from an album onto the Card Maker workspace.
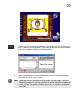
11 Add text - Opens a dialog box for adding text as an object into a card
project. In this dialog box, you can define the text attributes such as type,
size, style, alignment, and color of the font. Check out how the font looks
like with the current settings in the preview window of the same dialog box.