User Guide Microtek, International, Inc.
COPYRIGHT NOTICE Microtek makes no warranty of any kind with regard to this material, including, but not limited to, implied warranties of merchantability and fitness for a particular purpose. Microtek shall not be liable for errors contained herein or for incidental consequential damages in connection with the furnishing, performance, or use of this material. This document is protected by copyright.
Welcome to EyeStar Mail V3.0 Congratulations and thank you for using EyeStar Mail v3.0, the complete package for capturing live actions and cool snapshots that you can easily and quickly send to your family and friends over the Internet. This consumer video mail product allows you to record video and audio clips that can be saved in a self-executable file format, which is compatible in all types of mail clients that run on Windows 98 and NT.
What's Inside ➫ ➫ ➫ ➫ ➫ Introduction ............................................................................... 5 Getting User Support................................................................ 6 System Requirements .............................................................. 6 Installing EyeStar Mail v3.0 ......................................................... 7 Getting Started - before connecting to the Internet .................. 9 To run Send Mail ........................................
Introduction EyeStar Mail v3.0 is a complete consumer video package for recording audio and video clips that you can send to your family and friends. This package includes all the software you will need for capturing, creating personalized cards, and sending messages online. You can also visually organize your files as they get bigger. EyeStar Mail v3.0 offers: Video Panel - Serves as your video, audio, and image data source. Capture those data using your video or digital camera and microphone.
Getting User Support The different programs that are included in this package are all easy-to-use. In any case, you may have some questions that you want to ask about certain features. To find out more about EyeStar Mail v3.0, you can use the following resources: ☞ User Guide - Offers an overview of the whole package and also basic information on the function of each program. This will help you get started right away.
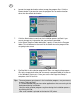
Installing EyeStar Mail v3.0 The EyeStar Mail v3.0 installation program runs from within Windows and contains complete instructions on the installation process. Make sure you use this program to install EyeStar Mail v3.0 as some files require decompression during the installation process and may need to be copied to a specific destination. To install EyeStar Mail v3.0: 1.
6. Locate the target destination where to copy the program files. Click the Browse button if you want to store the program files to another location other than the default destination. 7. Click the Next button to continue the installation process or Back if you want to change any information that you previously provided. 8. In the Select Program Folder dialog box, specify a name for the Program folder. This will determine the name of the folder where the program files are going to be saved. 9.
Getting Started - before connecting to the Internet Now that you have installed EyeStar Mail v3.0 into your system, it is time to get you up and going. But first, in order to make sure that your line of communication in the Internet world is always available and ready, it is recommended that you set up your work environment first before doing anything else. To run Send Mail: 1. 2. Click Start on the Taskbar and locate the EyeStar Mail v3.0 program folder. From the submenu, select Send Mail to run it.
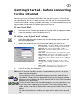
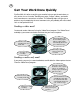
Get Your Work Done Quickly EyeStar Mail v3.0 offers everything you need to help you get the work done as easy and as fast as it can be. Sending messages, images, videos, and audio have never been as convenient as before. The following topics will give you a quickest way of completing the most common tasks you probably will want to do it such a short period of time. Sending a video mail: Create and send a video mail using the Video Panel program.
Sending a greeting card mail: Create a greeting card in no time at all and send it through the Internet so that the person on the other end will get your card right away. Here’s how: Run the Video Panel program. Then from the Video Panel program interface: 1. Watch the preview on the Video Capture panel to determine if your camera is focused properly. 2. Runs the Card Maker program for creating personalized greeting cards that you can send to your family and friends. 3.
6. Double-click the template you want to use. 5. Select the Templates ablum to display pre-defined templates. This template will then open in the Card Maker program. With Card Maker and Album running alongside each other, you can finish everything really fast using drag-and drop operations. After inserting your image, you can now make the image look like it’s part of the background.
8. Click and drag the desired mask files on the Card Maker workspace (or doubleclick). 7. Select the Masks album to display the available mask files on the Filmstrip. Note: If you want to change the orientation of your image click the Rotate button. Each click turns the image 90 degree counterclockwise. 10. Finally, click Send Mail to send your finished greeting card in the Send Mail program as an attachment file. 9. Click the Text button to add your personal greeting or messages.
Phase 1 Phase 1 Phase 1 Note: If you encounter any problem while sending your e-mail, please refer back to page 9 on how to check your mail settings. Or, for more information on sending messages online, please refer to page 28.
Preparing Your Audio, Video, and Image Files Now that you have everything installed and have properly set up your work environment, it’s time to collect the data that you will want to send online. Video Panel is the program you can use to do this for you. To run Video Panel: 1. Click Start on the Taskbar and locate the EyeStar Mail v3.0 program folder. 2. From the submenu, select Video Panel to run it. Below is the Graphical User Interface (GUI) of the Video Panel program.
7 Show/Hide Options panel - Toggles between displaying the commonly used commands for capturing and the options for defining the video source’s capture and display settings. 8 Open Card Maker - Runs the Card Maker program for creating personalized greeting cards that you can send to your family and friends. 9 Snapshot - Captures an image frame and automatically sends it to your preferred destination: Card Maker - Opens the captured image frame directly in Card Maker.
Defining Your Video Settings The Video Panel program allows you to define the video source’s capture and display settings. For more information about your video options, please refer to the user’s manuals that came with video capture board and the capture device. Below is the Video Panel GUI displaying the basic video settings you can define.
Creating Live Messages The Video Panel program is the tool you need for creating video and audio files that can contain your important messages. Recording a video/audio clip: Before you start recording your message, be sure to check your video settings in the Video Options panel. Click the Show/Hide Video Options panel button to define your video settings. These options vary depending on the type of video capture device that is connected to your machine. 1.
Capturing a single image frame: You may sometimes want to take a snap photo of yourself or something else to put on a personalized card. To do this, you can use your capture video device to take the shot. 1. Adjust the camera to the desired view. Check the preview on the Video capture panel. 2. Click the Snapshot button. 3. From the resulting dialog box, select where to send the captured image frame: Card Maker - Opens the captured image in the Card Maker program for creating unique cards.
4.a In the File: Save As dialog box. locate the folder as to where you want to save the image file and then specify a file name for it. Click Save to start the process. 4.b In the Album dialog box, specify a name for the captured image where a thumbnail representing the file will be added to the specified album. Click OK to start the process. Notes: The Video Capture panel displays a preview of the captured image frame. Check if you are satisfied with the shot.
Creating a Personalized Card Card Maker is the tool for creating unique cards and putting your favorite photos in them. Once you have your image file ready, you can open it in Card Maker and express your own creativity. To run Card Maker: There are several ways on how you can run the Card Maker program. You can choose from: ☞ Clicking Start on the Taskbar to locate the EyeStar Mail v3.0 program folder and then , selecting Card Maker from the resulting submenu.
1 Create a new project - Creates a new card project in the workspace. It opens the New template dialog box for choosing a solid color or a predefined background. If a project is currently open in the workspace, it prompts you to save the project first before inserting a new template. 2 Open a project - Opens a previously saved Card Maker project. This opens a dialog box for locating the file. 3 Save project - Saves the project you are currently working on to a project file(*.ICM).
12 13 14 15 16 17 Delete - Deletes the currently selected object from the card project. Undo - Reverses the previously applied action. Horizontal/Vertical scroll bars - Adjust the focus on a particular area when the image is larger than the workspace window. Click and drag the scroll bar slider to quickly find a spot in an image that is not currently visible. You have to zoom in the image to activate the scroll bar. Resize - Changes the size of the selected image object.
Working on a card project: 1. After you get the Card Maker running, you are now ready to start creating your card. Click the New Template button and select a background for your card project in the dialog box. (To see a preview of what each template looks like, click through the list.) Note: In the initial use of the Card Maker program, the workspace will open with a black background. For the succeeding sessions, the background color is determined in the settings you had the last time you used it.
3. 4. Adjust the display of colors in your image by using the four color control buttons. By dragging the little green square around of each of the buttons, you can adjust the hue, saturation, brightness, and contrast of the colors in the image. (This is only available if you have an image object selected.
5. Click the Load button to locate the folder where the mask file you want is saved. 6. In the Load Mask File dialog box, select the mask file you want to use and then click the Open button. 7. Click OK to close the insert Mask dialog box and apply it on the image in your card project. Tips: Using a mask helps you blend the images with the background making it appear as part of the whole image. A mask allows you to make the background show through certain portions of your image. EyeStar Mail v3.
8. Click the Insert text button for adding in your greeting or any messages, as well as, define the text attributes. If you want to edit your text again, doubleclick the next object to open the Text dialog box. 9. When satisfied with the overall appearance, you are now ready to output your card to a file or send it online. Note: Check out the next section on how to send e-mail messages.
Sending Messages Online Once you have finished recording your video and/or audio messages, taking a snapshot or creating, your own card, you may want to send them through the Internet. There are different ways on how to run the Send Mail program. You can choose from: ☞ Clicking Start on the Taskbar to locate the EyeStar Mail v3.0 program folder and then selecting Send Mail from the resulting submenu. Using the Video Panel program interface, click the Send Mail button.
4 Carbon Copy (Cc) - Includes anybody you want to inform that you have sent an e-mail to the specified recipient. If there is more than one recipient, separate addresses by commas. (Note: The drop-down list can recall up to 30 e-mail addresses you have already used.) 5 Subject - Gives the recipient an idea of what your entire e-mail is about. 6 Minimize - Minimizes the program window. 7 Exit - Closes the Send Mail program. 8 Help - Opens the Send Mail online help.
Managing Your Files Visually Collecting image, video, and audio files can sometimes get out of hand if you don’t organize your files efficiently. It is also helpful if you can see a visual representation of a file rather than just depending on its file name. This is why a small (thumbnail), that isabout the size of the thumb, is used to represent your files in an album. A thumbnail resembles the appearance of the actual file it is representing (e.g. an image file or an image frame of a video file).
1 Scroll preceding album - Moves back to the previously displayed albums. 2 Available albums - Displays a set of three albums per view. Each album contains previously saved files that you can work on in Card Maker or open in Video Panel for viewing. 3 Scroll - Moves to the next available album. 4 Frame item - Displays a thumbnail representation of a file. Double-click an item’s name to change it. 5 Scroll up - Shows the previously displayed thumbnail image that is included in the active album.
Microtek International, Inc. Software License Agreement This document is a legal Agreement between you, the licensee, and Microtek Inc. Please read this Agreement carefully before installing the Software. If you do not agree to the terms of this Agreement, you should not continue installing and destroy the CD and all accompanying items in the package. License. Microtek Inc.
Limitation of Liability and Remedies. In no event shall Microtek Inc. and its licensors be liable for any loss of profit or any other commercial damage, including but not limited to special, incidental, consequential, punitive or other damages arising out of the use or inability to use the software, even if Microtek Inc. and its licensors are advised, in advance, of the possibility of such loss or damage and whether or not such loss or damage are foreseeable.
Technical Support All registered users of EyeStar Mail v3.0 are entitled to technical support from Microtek Inc., Inc. You can contact our support centers by e-mail or fax and these information are provided for in the Readme.txt file found in your EyeStar Mail v3.0 program folder. Please prepare the following information first before contacting a support center: ☞ EyeStar Mail v3.