
User Guide


Microtek RDC Software Documentation
Subject: ScanWizard Pro Color Management Page 12
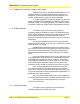
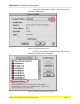
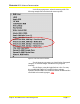
3.0 Settings Window
In ScanWizard Pro, you must do the followings in the
Settings Window:
Ø Select the proper image type and resolution; consult your
profiler documentation. Select 48-Bit RGB Colors if possible,
which contains most color information.
Ø Click the Reset button to reset all settings.
Ø Select Full Range in the D-Range popup menu.
Please note that the default of D-Range popup menu is
Automatic, which must not be used to create profiles nor to scan
and apply profile.
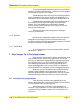
3.1 Scanning with Scanner RGB
We recommend you profile scanner with Scanner RGB
data because this is how Microtek Scanner Profiler (MSP) profile
scanners. You may also select and use the profiles with
ScanWizard Pro as those created by MSP.
These settings should be always used if you’re using these
profiles. In the Color Matching Setup dialog box, the key settings
are:
Ø RGB Color Matching: On
Enable this option.
Ø Embed ICC Destination Profile In Scan Image: On
This item will not effect your operation as long as it is not a
problem for your profiler.
Ø RGB Destination: Your Desired Color Profile
Select Scanner RGB.
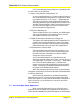
3.2 Scanning Raw Image Data
If you want to, you may also scan “raw” data from
ScanWizard Pro to the profiler. This is suggested by most 3
rd
party
profilers, which is not quite applicable to ScanWizard Pro. As we
recommended earlier, you should scan with Scanner RGB to
profile.
The difference is that Microtek Scanner Profiler (MSP)
does not profile the scanner with raw data. Therefore, you should
not use your 3
rd
party profiles in ScanWizard Pro. Otherwise,
image will not appear right.
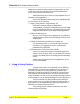
However, it is OK to use your 3
rd
party profiles with other
applications as long as the images are also scanned as raw data
and then apply with your profile.