Color Management Software Engineering, RDC Microtek International Inc.
Microtek RDC Software Documentation 1 Introduction Every color input or output device has its own gamut, i.e. the range of colors they can produce. A successful artwork for print or for online use relies on accurate color reproduction. ScanWizard Pro provides complete color management solution for scanning to let you achieve color consistency for your application.
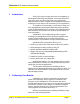
Microtek RDC Software Documentation Ø The Calibration function of the Monitor Control Panel for ColorSync 2.5 or later. Ø Adobe Gamma utility, from Adobe Photoshop 5.0 or later. Ø Any third-party monitor calibration programs or hardware calibrator You can also obtain your monitor profile by checking with the manufacturer of your monitor.
Microtek RDC Software Documentation Figure 2. Mac OS ColorSync Control Panel The Display profile is the only setting that ScanWizard Pro will be using in the ColorSync control panel. You should not change the display profile in the middle of running ScanWizard Pro, which recognizes the profile during its start up time. Whenever you change the display profile, your must restart ScanWizard Pro. If you have more than one monitor, each monitor has its own display profile selection.
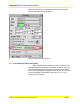
Microtek RDC Software Documentation The color management functions are accessible from a few various places, discussed in the following sections. 1.0 Microtek Scanner Profiler The color space of a scanned image is "described" by a scanner profile, i.e. a scanner profile is used as the "source" profile in the color matching process. Every Microtek scanner comes with a set of default 16-bit resolution look up table scanner profile.
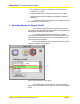
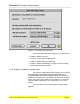
Microtek RDC Software Documentation Please note that you may use different scanner profiles for each scan job; this adds up more flexibility. Figure 3. Scanner Profile Popup Menu 1.2 Color Matching Setup Dialog Box When ScanWizard Pro is started for the very first time, the Color Matching Setup dialog box is displayed to ask you setup your color management parameters; unlike scanner profile discussed earlier, these parameters are applied to all scan jobs.
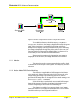
Microtek RDC Software Documentation Figure 4. Color Matching Setup Dialog Box In the Color Matching Setup dialog box, you will be able to: Ø Enable or disable soft proof Ø View the current system display profile Ø Enable or disable RGB color matching Ø Enable or disable embedding ICC profile to scanned images Ø Select output destination profile. 1.2.0 Display Using Monitor Compensation This function is applicable to RBG images only. For CMYK and LAB images, this function will be done implicitly, i.e.
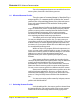
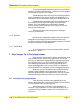
Microtek RDC Software Documentation Monitor RGB Data Scanner RGB Data Destintation RGB Data User’s Monitor Figure 5. Monitor Compensation and Non-Compensation Paths To enable this feature, check the Display Using Monitor Compensation check box; the image is displayed through the green path. If this check box is unchecked, RGB image is directly dumped to the display without performance any color matching; the image is displayed through the yellow path.
Microtek RDC Software Documentation 1.2.3 Embed ICC Destination Profile In Scan Image Enable this function to embed the RGB Destination or the CMYK Destination ICC profile (depends on the image type) in image data. If native mode RGB color matching function is not enabled, RGB destination profile will not be embedded.
Microtek RDC Software Documentation To specify the CMYK Destination profile, choose from the profiles provided by ScanWizard Pro, or choose your own profile if you have others stored on your system. ScanWizard Pro comes with a rich set of CMYK profiles for various applications. They are not installed as default and you must run the ICC Profile Installer from your ScanWizard Pro CD. ScanWizard Pro enumerates all the ICC profiles found in the ColorSync Profiles folder and displays the found CMYK profiles.
Microtek RDC Software Documentation In the Color Matching Setup dialog box of ScanWizard Pro, you will need to do the following: Ø Display Using Monitor Compensation: On If you’re using Photoshop 5.0.2 or later, make sure that you also check the Display Using Monitor Compensation check box in Photoshop’s File | Color Settings… | RGB dialog box. This will ensure that the scanned images displayed in the Photoshop match the preview images shown in the Preview Window of ScanWizard Pro.
Microtek RDC Software Documentation dumped to the monitor without monitor compensation. In other words, they don’t have standard color matching mechanism to ensure color consistency across devices. Adobe Photoshop 4.0 or earlier is a good example of a nonColorSync–savvy application.
Microtek RDC Software Documentation 3.0 Settings Window In ScanWizard Pro, you must do the followings in the Settings Window: Ø Select the proper image type and resolution; consult your profiler documentation. Select 48-Bit RGB Colors if possible, which contains most color information. Ø Click the Reset button to reset all settings. Ø Select Full Range in the D-Range popup menu.
Microtek RDC Software Documentation To scan raw data, you need to go through two steps. First, run the Preferences | More… command to bring up the More Preferences dialog box. In the Color Space Mode popup menu, select Native mode. The default setting is LCH mode. Secondly, run Preferences | Color Matching Setup… and select the followings: Ø RGB Color Matching: Off With this option disabled, ScanWizard Pro will scan and deliver raw image data to you. 3.
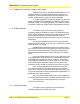
Microtek RDC Software Documentation First, select “Select Scanner Profile…” menu item to bring up Scanner Profile Menu. Figure 7. Scanner Profile Dialog Box Secondly, click the Import button at the top right corner to bring up the profile selection dialog box. Figure 8.
Microtek RDC Software Documentation Thirdly, go to the folder and check the “Show All Files” to display all files in the folder. Otherwise, the 3rd party scanner profile will not be displayed. Select the profile and click Open button to select it. Please note that you may also select the 3rd party scanner profiles in the RGB Destination popup menu in the Color Matching Setup dialog box. This will work fine. 4.
Microtek RDC Software Documentation sophisticated color management engine. Also, you retain the flexibility of using all image processing functions. If you defer the color matching process, you can not apply any image processing function and yet you have to be very careful how the image is scanned with ScanWizard Pro. Otherwise, the image will be matched incorrectly. 5.0.0 Using MSP Profiles If you’re using profiles created by MSP, you must scan images using Scanner RGB color space.
Microtek RDC Software Documentation In the From popup menu, select the scanner profile. The following example lists a few Microtek scanner profile: Figure 10. Microtek Scanner Profiles For the Intent pop-up menu, you should select “Perceptual (Images)” for scanned images. ScanWizard use perceptual internally. For the Engine, using the Apple Built-in is fine. You may also install Kodak CMM if you install ColorSync package separated. Kodak CMM is not installed as default.