Operating Instructions Thank you for purchasing this high-resolution multi-scan color monitor. Please read this guide thoroughly before installation. FCC RADIO FREQUENCY INTERFERENCE STATEMENT WARNING: (FOR FCC CERTIFIED MODELS) This monitor has been tested and found compliant with the limits for a Class B digital device, pursuant to part 15 of the FCC Rules. These limits are designed to provide proper protection against harmful interference to a residential installation.
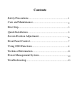
Contents Safety Precautions........................................................ 1 Care and Maintenance.................................................. 2 First Step......................................................................3 Quick Installation......................................................... 5 Screen Position Adjustment..........................................6 Front Panel Control...................................................... 7 Using OSD Functions............................
Safety Precautions This monitor is manufactured and tested on the ground principle that a user’s safety comes first. However, improper use or installation may not only damage the monitor but endanger the user as well. As a safety precaution, go over the following WARNINGS carefully before installation, and keep this guide handy. WARNINGS: l This monitor should be operated only at the correct power sources indicated on the label at the rear end of the monitor.
Care and Maintenance Care l Avoid exposing your monitor directly to sunlight or other heat sources. Place your monitor away from the sun to reduce glare. l Put your monitor in a well-ventilated area. Do not place anything heavy on top of your monitor. l Make certain that your monitor is installed in a clean and moisture-free area. l Keep your monitor away from magnets, motors, transformers, speakers, and TV sets.
First Step This User’s manual contains graphics and information that is for reference purposes only and is subject to change without notice. Introduction Congratulations for purchasing this high-performance 17-inch color TFT LCD monitor. This monitor provides flicker-free and color images at optimal resolutions. Through this user guide, we will introduce to you all the features, functions, and technical specifications of this LCD monitor.
This monitor package comes with: l LCD Monitor l Video cable l AC Power cord l AC to DC Adapter l Audio cable l User’s manual l Floppy Disk (for test pattern and set up) 4
Quick Installation To install the monitor on your host system, please follow the steps below: Steps 1. Open the connector cover first. 2. Open the cable cover. 3. Connect the Video cable. a. Make sure that both the monitor and computer are powered OFF. b. Connect the video cable to the computer first, then to the monitor. 4. Connect the power cord. Connect the power cord to the monitor through the AC/DC adapter, then to a properly grounded AC outlet. 5. Connect the Audio cable. a.
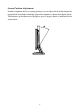
Screen Position Adjustment In order to optimize the best viewing position, you can adjust the tilt of the monitor by using both of your hands to hold the edges of the monitor as shown in the figure below. The monitor can be adjusted to 30 degrees up or 5 degrees down as indicated by the arrow below.
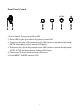
Front Panel Control AUTO MENU 1. Power Switch: To turn power ON or OFF. 2. Power LED: Lights up to indicate that power is turned ON. 3. To increase the value of the parameter in the OSD you have selected for adjustment. MUTE: Audio Mute hot key without OSD display. 4. To decrease the value of the parameter in the OSD you have selected for adjustment. AUTO: AUTO adjustment hot key without OSD display. 5. Select down: To move downward in the OSD menu. 6. Select MENU: To EXIT and enter OSD.
Using OSD Functions BRIGHTNESS CONTRAST ANALOG CONTRAST AUTO CONTRAST COLOR TEMPERATURE NATIVE 1280 x 1024 FV: 84.8Hz FH:90.9KHz AUTO ADJUST LEFT/RIGHY UP/DOWN H.SIZE FINE B 100 CURRENT INPUT IS DSUB ANALOG FH:90.9KHz LANGUAGE RECALL DEFAULTS OSD TIME OUT OSD LEFT/RIGHT OSD UP/DOWN EXPANSION 1280 x 1024 FV: 84.8Hz FH:90.9KHz 1280 x 1024 VOLUME TREBLE BASS BALANCE AUTO ADJUSTING PLEASE WAIT 1280 x 1024 FV: 84.8Hz 100 FH:90.9KHz STATURATION HUE FLESH TONE FV: 84.
l Standard OSD Operation 1. Press any front panel key to activate the OSD menu. 2. Use the Select Up or Down keys to move up or down through the menu. The para meter will be highlighted when selected. 3. Use + or - to increase or decrease the value of the parameter, or to select among different options. 4. To quit the OSD screen at any time during the operation, press the Select Up and Down keys together at the same time. If no keys are pressed for a time period, the OSD automatically disappears.
Item Function Description Color Balance Press “-” or “+” to select 9300, 7500, 6500 and USER. Only when USER is selected, can you make adjustment to the R/G/B content. Press + and - simultaneously to restore to factory default setting. Press + to turn on this function. The Auto-Adjust will automatically adjust the V-Position, H-Position, Clock, and ClockPhase, with the whole process taking about 5 seconds.
Technical Information Specifications: LCD Display Display Type Display Area (H x W) Contrast Ratio Viewing Angle Operational Features Display Colors Resolution Brightness Response Time Interface Input Connector Multimedia Two Internal Speakers Users Controls Front Panel Controls OSD Controls Physical Specification Dimension (H x W x D) Net Weight Power Power Saving Power Consumption Regulation Safety & EMI 17" TFT LCD 337.92 x 270.336mm 400:1 150°H/ 140°V 16.
PRESET MODES To reduce the need for adjustment for different modes, the monitor has default setting modes that are most commonly used as given in the table below. If any of these display modes are detected, the monitor can self adjust the picture size and centering. For optimum adjustment, the user is suggested to perform the Auto Setup under Windows “Full Screen”pattern or using the pattern in the floppy disk provided.
Power Management System This monitor is equipped with power management functions which automatically reduce power consumption when not in use under the four power-saving modes. Note: The monitor automatically goes to the Power Management System (PMS) when it is idle. To release the monitor from the PMS condition, press any key on the keyboard or move the mouse. State LED Power ON Green <50 W On On STANDBY Amber <5W Off On SUSPEND Amber <5W On Off OFF Amber <5W Off Off Horizontal Sync.
Troubleshooting Before sending your LCD monitor for servicing, please check the troubleshooting list below to see if you can self-diagnose the problem. Problems No Picture Current Status LEDON to maximum or reset to their default ettings.