Operation Instructions Thank you for purchasing this monitor, a high-resolution multi-scan color monitor. Please read this guide thoroughly before installation. FCC RADIO FREQUENCY INTERFERENCE STATEMENT WARNING: (FOR FCC CERTIFIED MODELS) This monitor has been tested and found compliant with the limits for a Class B digital device, pursuant to part 15 of the FCC Rules. These limits are designed to provide proper protection against harmful interference to a residential installation.
Contents Safety Precautions.........................................................1 Care and Maintenance ..................................................2 First Step ......................................................................3 Front Panel Control ......................................................4 Installation....................................................................4 Using OSD Functions....................................................5 Timing Modes ..........................
Safety Precautions This monitor is manufactured and tested on the ground principle that a user’s safety comes first. However, improper use or installation may not only damage the monitor but endanger the user as well. As a safety precaution, go over the following WARNINGS carefully before installation, and keep this guide handy. WARNINGS: l This monitor should be operated only at the correct power sources indicated on the label at the rear end of the monitor.
Care and Maintenance Care l Avoid exposing your monitor directly to sunlight or other heat sources. Place your monitor away from the sun to reduce glare. l Put your monitor in a well ventilated area. Do not place anything heavy on top of your monitor. l Make certain that your monitor is installed in a clean and moisture-free area. l Keep your monitor away from magnets, motors, transformers, speakers, and TV sets.
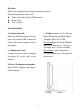
First Step Thank you for purchasing this high performance monitor ! This monitor package comes with: l Video cable with 15 pin D-SUB connector. l Power cable. l User’s manual Quick Installation 4. Windows users: Set the Timing Mode (Resolution and Refresh Rate) Example: 1024 x 768 @75 Hz Resolution Right-click on the Windows desktop > Properties > Settings > “Desktop Area”. Set the resolution. Refresh Rate (vertical frequency): See your graphic card’s user guide for instructions. 1.
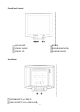
Front Panel Control OSD ON/OFF SCROLL DOWN SCROLL UP ENTER POWER INDICATOR POWER ON/OFF Installation POWER INPUT (AC INPUT) SINGAL INPUT (VGA 15PIN D-SUB) 4
Using the OSD Functions MAINMENU(example) 1 EXIT 2 SELECT Auto Adjust: For auto adjusting the horizontal position, vertical position, Clock and phase. H. Position: For adjusting the horizontal position of the picture. V. Position: For adjusting the vertical position of the picture. Brightness: For adjusting the brightness or the back-light current . Contrast: For adjusting the contrast picture. Phase: For adjusting the delay time between the horizontal synchronous signal and the picture.
Hot Key functions: When no OSD appears, press: the ‘ 1 ’ button to turn the OSD on/off, the‘ 2 ’ button to have the monitor auto-adjust and save all settings, the ‘ ’ button to adjust the contrast, the ‘ ’ button to adjust the brightness, or ‘ ’+‘ ’for Memory Recall.
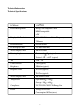
Technical Information Technical Specifications LCD Panel 15.0 TFT Power Management Energy Star compliant VESA DPMS compatible <5W Displayable Resolution XGA 1024x768max. Vertical Frequency 75Hzmax. Pixel Dimension 0.297x0.297mm LCD Display Color 16.7M(8 bits/color) Active Display Area 304.1x228.