Table of Contents FCC Information Important Safeguards Installation Control Key Pads on the Front Panel Layout of Cable & Connector on the Back Cover How to enter OSD Menu Factory Default Timing Setting Specifications Energy Declaration Cleaning the LCD Screen Trouble-Shooting 1 1 2 2 3 3 7 8 9 9 10
FCC Information This equipment has been tested and found to comply with the limits for a Class B digital device, pursuant to Part 15 of FCC Rules. These limits are designed to provide reasonable protection against harmful interference when the equipment is operated in a residential installation. This equipment generates, uses, and can radiate radio frequency energy and if not installed and used in accordance with the instruction manual may cause harmful interference to radio communications.
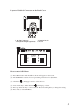
Installation 1. 2. 3. 4. Turn off the computer. Connect the video cable from VGA connector and audio line from output of the computer to the monitor. Connect power cable to the power outlet. Turn on the monitor and the computer. Wait about 30 seconds to adjust the picture with the adjustment controls to obtain the most optimum picture. Note: Please do not press the panel heavily because the surface of LCD panel is soft. Control Key Pads on the Front Panel 1. Menu Button : 2. 3. 4. 5. 6. 7.
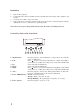
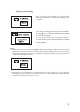
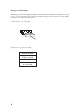
Layout of Cable & Connector on the Back Cover 1. D-Sub Connector 3. Earphone Output (optional) 2. Audio Line-in 4.AC In How to enter OSD Menu (1) Press Menu button and the OSD as shown will appear on the screen. (2) The OSD Menu contains 9 icons representing 9 functions for adjustment. (3) The hand pointing up is used to select the icon. (4) Press menu key to make the hand pointing up or down. (5) Press up and down key to select sub-item. Press left and right key to change the setting.
Position AUTO LEFT/RIGHT DOWN/UP Auto adjust the position, horizontal clock and dot delay. Horizontal position, adjust the horizontal display screen position . Vertical position, adjust the vertical display screen position . Clock HORZ. TOTAL DOT DELAY RESET Horizontal total clock, adjust the Horizontal Size to match LCD size. Adjust the dot delay to get best display focus.
Message of Auto Tuning Once you activate Auto Tuning, the following view indicating that the unit is executing Auto Tuning will be prompted. Successfully executing Auto Tuning, select ACCEPT by pressing key to confirm the adjustment Select UNDO to cancel the adjustment. If you do not make any selection within 5 seconds,then the unit will automatically confirm the adjustment. Notice 1. This function has to be executed when full screen picture is displayed.
Message of Video Input The message below will be displayed when horizontal and vertical synchronous signal from outside is off or out of acceptable range of this system. This message is erased in about 5 seconds and the system goes into the power saving mode. (1) No H_sync or V_sync input (2) H_sync or V_sync out of range OUT OF RANGE HSYNC : 43.2 KHz VSYNC : 85.0 Hz WORK RANGE HS : 31.5 -60.
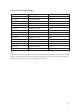
Factory Default Timing Setting Resolution 640 x 350 640 x 400 720 x 400 640 x 480 640 x 480 640 x 480 640 x 480 800 x 600 800 x 600 800 x 600 800 x 600 832 x 624 1024 x 768 1024 x 768 1024 x 768 H/V Frequency 31.5 KHz / 70.1 Hz 31.5 KHz / 70.1 Hz 31.5 KHz / 70.1 Hz 31.5 KHz / 60.0 Hz 35.0 KHz / 66.7 Hz (Macintosh) 37.9 KHz / 72.8 Hz 37.5 KHz / 75.0 Hz 35.2 KHz / 56.3 Hz 37.8 KHz / 60.3 Hz 48.0 KHz / 72.2 Hz 46.9 KHz / 75.0 Hz 49.7 KHz / 74.6 Hz (Macintosh) 48.2 KHz / 60.0 Hz 56.5 KHz / 70.1 Hz 60.
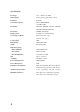
Specifications LCD type Input Signal Dot Pitch Scanning frequency Resolution Pixel Rate Display Color View Angle (CR>10) Control Type Plug & Play Audio Dimension (mm) Panel (HxWxD) Base (WxD) Overall (HxWxD) Tilt AC Input Power Management Power Dissipation Regulatory Compliance Ambient Temperature Humidity (Relative) 8 15.1 XGA Color TFT Analog (0.7Vp-p/75 ohm positive) 0.30 mm (H) 31.5KHz-60KHz (V) 56Hz-75Hz 1024x768 800x600 832x624 640x480 720x400 640x400 640x350 80 MHz (maximum) 16.
Energy Declaration This monitor is equipped with a function for saving of energy which supports the VESA Display Power Management Signaling ( DPMS ) standard. This means that the monitor must be connected to which supports VESA DPMS to fulfill the requirement in the NUTEK specification. Time settings are adjusted from the system unit by software. From indicated inactivity to Power Saving Position A2 the total time must not be set to more than 70 minutes.
Trouble-Shooting If you are experiencing difficulties with your monitor, check the following table for possible solutions. Problem ? No picture Items to check 1. The VGA card should be completely seated in the slot. 2. Power switch of the monitor and the PC should be in the ON position. 3. The signal cable should be completely connected to the video card / computer. 4. Check if the pins of the connector are bent or shrunk. ? Image is scrolling or unstable 1.