
User Guide

3
3. Installing software
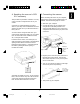
Insert the Microtek CD-ROM into your CD-ROM
drive. The Microtek Scanner Software installer
should come up automatically, and list the software
available for you. Click on each software program
in the order they appear on your screen to install
all of the components.
Note: If the Microtek Scanner Software is not
automatically displayed on the screen, click Start,
select Run and type d:\cdsetup (where d: is your CD-
ROM drive).
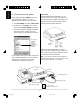
Step 1 Install Microtek ScanWizard Pro
Microtek ScanWizard Pro is the TWAIN driver
used for ArtixScan 2020 to communicate with
various applications. With the scanner connected,
you can run ScanWizard Pro independently or
acquire it by another application program.
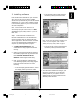
1.
Click Microtek ScanWizard Pro. The
ScanWizard Pro setup program should start
running.
2. When you have finished the above selections,
the installer program will copy the files to the
folder “Microtek ScanWizard Pro for
Windows” under Program file directory.
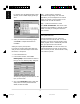
3. Next, you are prepared to install Microtek
Color Matching System (CMS) setup program.
Follow the screen instructions to do the
following:
• From the Display profiles selection, choose
the display profiles you want to install.
• From the RGB Output profiles selection,
choose the profiles you need to install.
Note: To add other CMS profiles provided by your
monitor or printer suppliers, refer to section
“Adding Third-party CMS profiles” on page 4.
• From the CMYK Output profiles selection,
choose the profiles you need to install.
4. The CMS will be installed according to your
selections, and then ask you to select the
default profile for your system. Choose a
default profile you want to install from the
different profile selections.
e_2815body.p65 11/9/00, 4:53 PM3