FCC Compliance Statement This device complies with part 15 of the FCC Rules. Operation is subject to the following two conditions: 1. This device may not cause harmful interference, and 2. This device must accept any interference received, including interference that may cause undesired operation. FCC Warning This equipment has been tested and found to comply with the limits for a Class B digital device, pursuant to Part 15 of the FCC Rules.
Radio Frequency Interference Statement Warning: This is a Class B product. In a domestic environment, this product may cause radio interference in which case the user may be required to take adequate measures. Canadian Doc Notice For Class B Computing Devices This digital apparatus does not exceed the Class B limits for radio noise emissions from digital apparatus as set out in the Radio Interference Regulation of the Canadian Department of Communications.
Table of Contents Introduction 1 Product Features .................................................................... 1 Unpacking .............................................................................. 2 Precautions ............................................................................ 2 Cleaning ................................................................................. 3 Installation 4 Installing the Monitor ............................................................
Appendixes A: Specifications ................................................................. 19 B: Supported Timing ........................................................... 20 C: Troubleshooting .............................................................. 21 D: Power Management ........................................................ 23 E: DDC (Plug and Play) ........................................................ 23 F: For Your Safety ................................................................
Introduction Congratulations on the purchase of your new Microtek LCD monitor! Providing a maximum resolution of 1280 x 1024 pixels with a flicker-free display at up to 75Hz refresh rate, your LCD monitor offers sharp and vibrant color display without the radiation emission and hazards associated with CRT monitors. Product Features • 17.0” TFT active matrix color crystal displays, Dot pitch 0.
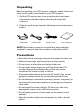
Unpacking Before unpacking your LCD monitor, prepare a stable, level, and clean surface near a wall outlet for your LCD monitor. 1. Set the LCD monitor box in an upright position and open from the top of the box before removing the right/left cushions. 2. Check to see that you have the following accessories shown below: User's VGA Cable Audio Cable Power Cord Manua l User’s Manual NOTE: Remember to save your original box and packaging material in case you need to transport or ship the monitor.
• Do not place the monitor directly under sunlight, in dusty surroundings, or near equipment which may generate strong magnetic fields. Cleaning Warning: If you drop any material or liquid such as water onto the monitor when cleaning, unplug the power cable immediately and contact your dealer or the nearest service center. Always make sure your hands are dry when unplugging the power cable. Caution: • For safety reasons, turn off the power switch and unplug the monitor before cleaning.
Installation Installing the Monitor • DO NOT install the monitor where sudden temperature changes may occur, or in humid, dusty, or smoky areas as fire, electric shock or damage may ensue. • DO NOT place your LCD monitor near a window as it may be severely damaged if exposed to rain, water, moisture, or sunlight. • MAINTAIN good ventilation; covering of ventilation slots or holes may cause fire.
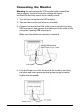
Connecting the Monitor Warning: Do not operate the LCD monitor with unspecified power supply. Usage of incorrect voltage will cause malfunction and may cause fire or electric shock. 1. Turn off your computer and LCD monitor. 2. Take out the monitor and place on the table. 3. Connect one end of the VGA cable to your monitor’s analog RGB input port, and connect the other end of the cable to the computer’s analog RGB output port. Make sure the cables are securely connected. VGA cable 4.
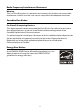
5. Turn on the LCD monitor. The power LED lights up orange. 6. Turn on your computer. The power LED changes from orange to green when the monitor detects the input signal source from the computer. At the same time, the image to be displayed appears on the screen. A conversion adapter (not supplied) may be required if you connect the monitor to the Apple Power Macintosh-series computer. The conversion adapter should be installed with the correct orientation as shown in the illustration.
Adjusting the Viewing Angle Your LCD monitor is designed to allow adjustment for optimal viewing angles. You can adjust the monitor upward to 20 degrees and downward to 5 degrees. The monitor can also be turned clockwise/counterclockwise to 45 degrees. Vertical Adjustment Pan Swivel Angle Left: 45° / Right: 45° Tilt Angle Tilt Back: 20° / Tilt Front: 5° NOTE: Do not touch the screen while changing the viewing angle, as this may damage the screen.
Operating the Monitor The LCD monitor has been preset at the factory with the Timing shown in the section “Appendix B” to achieve optimal display. You can adjust the display to the desired brightness and sharpness by following the instructions.
How to Use the OSD (On-Screen Display) The OSD (On-Screen Display) lets you easily adjust the various settings for your LCD Monitor to desired levels of performance. The OSD includes various function menus (SCREEN, GAIN CONTROL, COLOR, and MODE SELECT). You can toggle through these OSD function menus by pressing the MENU button. Operation Procedure The buttons on the bottom of the monitor are used to navigate the OSD.
Adjusting Monitor Display There are two ways to adjust the monitor screen: auto adjustment and manual adjustment. Auto Adjustment Auto Adjustment allows you to adjust the monitor display automatically. 1. Power ON the LCD monitor and computer. 2. Make sure that your LCD monitor is not in “Adjustment Locked” status by pressing “MENU“ and “Power“ simultaneously. 3. Press the “MENU” button to display the OSD function menu. The SCREEN function menu appears the first time. 4.
Manual Adjustment Manual Adjustment allows you to adjust the monitor display with user settings. 1. Power ON the LCD monitor and computer. 2. To perform manual adjustment of settings, follow the procedures outlined in the “Operating Procedure” section, and apply the procedures for settings described in the following section. NOTE: • It is recommended that automatic adjustment be performed when you set up the monitor the first time or after having changed an aspect of the current system.
Adjustment Lock This function is used to prevent the inadvertent changing of monitor settings. All the control buttons (except “Power”) will be locked when this feature is used. 1. Power OFF the LCD monitor. 2. Press the “MENU” and “Power“ buttons simultaneously until the message “ADJUSTMENT LOCKED” appears on the screen, indicating that all the buttons are in the locked position. 3.
OSD Function Menus SCREEN Menu Press the “MENU” button once to display the SCREEN menu. Four available options can be adjusted: CLOCK, PHASE, H-POS, and V-POS. NOTE: You can return the settings of the options to default values by pressing the “MENU” and “ ” buttons simultaneously. When the message “RESET” appears on the screen, this indicates that resetting is completed.
COLOR Menu Press the “MENU” button three times to display the COLOR menu. Press “ ” or “ ” to select 9300, 6500, 5000, or USER. When USER is selected, three options are available for further adjustments: R-CONTRAST, G-CONTRAST, and B-CONTRAST. Function Description R-CONTRAST Adjusts the Red color channels G-CONTRAST Adjusts the Green color channels B-CONTRAST Adjusts the Blue color channels MODE SELECT Menu Press the “MENU” button four times to display the MODE SELECT menu.
Other Adjustments Adjusting the Backlight This function allows you to adjust the brightness of the backlight. 1. Press either the “ ” or “ ” to display the VOLUME/ BACKLIGHT screen when the OSD menu is not displayed on the screen. VOL UME BAC K LIGHT 31 31 SELECT ¡¿/MODE 2. Press the “ / MODE” button to select “BACKLIGHT”. 3. Press the “ ” button to lower the brightness level; press the “ ” button to increase the brightness level.
Setting GAMMA This function allows you to adjust the color tone or brightness with one command. 1. Press the “ / MODE” button to display the GAMMA function menu when the OSD menu is not displayed on the screen. The GAMMA function menu — GAMMA1 appears the first time. 2. Press the “ / MODE” button to toggle through the GAMMA1, GAMMA2, GAMMA3, and GAMMA4 function menus. The GAMMA screen will disappear automatically if it is not in use for a period of time.
Installing the Arm A VESA-compliant arm allows you to mount your monitor on the wall. The accepted arm specifications for the monitor are: • Compatibility with the VESA standard • Required gap of 100mm x 100mm between the screw holes for the arm to be attached How to install the arm Caution: • Do not bend the cable too much or add extension cords, as this may cause malfunction.
5. Loosen the six stand-fixing screws, then remove the stand from the monitor. 6. Install the arm to the monitor with four arm-fixing screws. NOTE: • The stand preattached to the monitor is specially designed for use with this monitor. Once the stand is removed from the monitor, do not try to attach the stand to other devices. • Store the stand together with its fixing screws for future use. Using different types of screws may cause malfunction.
Appendix A: Specifications LCD type 17” SXGA Color TFT Display area 13.3” x 10.6” (337.9 x 270.3 mm) Input signal Analog RGB (0.7 Vp-p/75 ohm positive) Dot pitch 0.264 mm Scanning frequency (H) 31.5 ~ 80 KHz (V) 56 ~ 75 Hz Resolution 1280 x 1024 pixels Display color 16.
Appendix B: Supported Timing Analog H-sync (KHz ) V-sync (Hz ) Dot Frequency (MHz ) 640 x 480 31.5 60 25.175 800 x 600 37.9 60 40.0 46.9 75 49.5 48.363 60.004 65.0 56.476 70.069 75.0 60.023 75.029 78.75 60.0 75 78.75 1152 x 864 67.5 75 108.0 1280 x 960 60.0 60 108.0 64.0 60 108.0 80.0 75 135.0 720 x 400 31.5 70 28.3 640 x 400 31.469 70.068 25.175 640 x 400 24.825 56.422 21.052 640 x 480 35.0 66.7 30.2 832 x 624 49.7 74.6 57.3 1024 x 768 60.
Appendix C: Troubleshooting If the LCD monitor fails to function correctly, please follow the following steps for a possible solution. 1. Perform the adjustments according to the section, “Operating the Monitor.” 2. Refer to the rest of this section if you cannot find a proper item listed in “Operating the Monitor” or if the problem remains. 3.
C) Power indicator is orange Solution: • Make sure the signal cable is properly connected. • Make sure the computer is turned on. • Make sure the signal timing of the computer is within the specifications of the monitor. • Check to see if the monitor is on power management mode, and touch the keyboard or the mouse. Problem 2: The displayed image is distorted Solution: • Make sure the signal timing of the computer is within the specifications of the monitor. • Performs an automatic screen adjustment.
Appendix D: Power Management The LCD Monitor complies with the VESA DPMS (version 1.0p) power management proposal. The VESA DPMS proposal provides four phases of power saving modes by detecting the horizontal or vertical sync signal. Item DPMS Mode Display Power LED Power Consumption 1 On Normal Green 36*/38** Yes Yes H-sync V-sync 2 Stand-by No Display Orange 1.6W No Yes 3 Suspend No Display Orange 1.6W Yes No 1.
Appendix F: For Your Safety WARNING ALWAYS OPERATE UNDER THE SPECIFIED POWER SUPPLY Usage of incorrect voltage will cause malfunction and may cause fire or electric shock. PROTECT AND USE THE CABLE CORRECTLY Do not pull or bend the power cable and VGA cable or place the monitor or any heavy objects on the cables. If the cables are damaged, they may cause fire or electric shock.
CAUTION DISCONNECT CABLES WHEN MOVING THE MONITOR When moving the monitor, always turn off the switch, unplug the monitor, and disconnect the VGA cable. If the cables are not properly disconnected when moving the monitor, fire or electric shock may ensue. DO NOT TOUCH THE PLUG WITH WET HANDS Pulling or inserting the plug with wet hands may cause electric shock. HOLD THE PLUG WHEN DISCONNECTING To disconnect the power cable or VGA cable, always pull the cable by the plug.
Special Notes On LCD Monitors The following conditions are normal with LCD monitors and do not indicate a problem. • When turning on the LCD monitor for the first time, the picture may not fit in the display area. This is because of the type of computer being used. In this case, adjust the picture position to its correct position. (See the section, “Operating the Monitor”.) • The screen may flicker during initial use. Turn off the power switch and then turn it on again; the flickering should disappear.