USER'S MANUAL
FCC Compliance Statement This device complies with part 15 of the FCC Rules. Operation is subject to the following two conditions: 1. This device may not cause harmful interference, and 2. This device must accept any interference received, including interference that may cause undesired operation. FCC Warning This equipment has been tested and found to comply with the limits for a Class B digital device, pursuant to Part 15 of the FCC Rules.
Radio Frequency Interference Statement Warning: This is a Class B product. In a domestic environment, this product may cause radio interference in which case the user may be required to take adequate measures. Canadian Doc Notice For Class B Computing Devices This digital apparatus does not exceed the Class B limits for radio noise emissions from digital apparatus as set out in the Radio Interference Regulation of the Canadian Department of Communications.
Table of Contents Introduction 1 Product Features .................................................................... 1 Unpacking .............................................................................. 1 Precautions ............................................................................ 2 Cleaning ................................................................................. 3 Installation 4 Installing the Monitor ............................................................
iv
Introduction Congratulations on the purchase of your new Microtek LCD monitor! Providing a maximum resolution of 1024 x 768 pixels with a flicker-free display at up to 75Hz refresh rate, your LCD monitor offers sharp and vibrant color display without the radiation emission and hazards associated with CRT monitors. Product Features • 15.
Unpacking Before unpacking your LCD monitor, prepare a stable, level, and clean surface near a wall outlet for your LCD monitor. 1. Set the LCD monitor box in an upright position and open from the top of the box before removing the right/left cushions. 2.
• Do not apply pressure to the screen, as the screen is very delicate. • Keep the monitor away from extremely hot, cold or humid places. • Do not place the monitor directly under sunlight, in dusty surroundings, or near equipment which may generate strong magnetic fields. Cleaning Warning: If you drop any material or liquid such as water onto the monitor when cleaning, unplug the power cable immediately and contact your dealer or the nearest service center.
Installation Installing the Monitor • DO NOT install the monitor where sudden temperature changes may occur, or in humid, dusty, or smoky areas as fire, electric shock or damage may ensue. • DO NOT place your LCD monitor near a window as it may be severely damaged if exposed to rain, water, moisture, or sunlight. • MAINTAIN good ventilation; covering of ventilation slots or holes may cause fire.
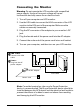
Connecting the Monitor Warning: Do not operate the LCD monitor with unspecified power supply. Usage of incorrect voltage will cause malfunction and may cause fire or electric shock. 1. Turn off your computer and LCD monitor. 2. Use the VGA cable to connect the VGA connector of the LCD monitor to the VGA port of the computer. Make sure the cables are securely connected. 3. Plug the DC connector of the adapter to your monitor’s DC jack. 4. Plug the female end of the power cord into the AC adapter. 5.
Operating the Monitor The LCD monitor has been preset at the factory with the Timing shown in the section “Appendix B” to achieve optimal display. You can adjust the display to the desired brightness and sharpness by following the instructions. Buttons EXIT Functions Exit the OSD (On-Screen Display). Press to select main menu items. Press to select submenu items. — Adjust setting bars (i.e., CONTRAST, BRIGHTNESS, etc.) to decrease setting values of the OSD. + Adjust setting bars ( i.e.
Adjusting Monitor Display There are two ways to adjust the monitor screen: auto adjustment and manual adjustment Auto Adjustment 1. Power ON the LCD monitor and computer. 2. Make sure that your LCD monitor is not “CONTROLLOCKED” by pressing “ “ and “—“ simultaneously. 3. Press ”—“ to unlock. The “CONTROL LOCK” screen will disappear automatically or you may press “EXIT” to exit from the screen. 4. Press either the “ ” or “ “ to display the OSD screen. 5.
OSD Adjustment Lock This function is used to prevent inadvertent changing of monitor settings. All adjusted items (except "BRIGHTNESS") will be locked when this feature is used. 1. Press the “ ” and “—“ buttons simultaneously; the “CONTROL LOCK” screen is displayed. 2. Press the "+" button, which becomes the "CONTROL LOCK" status. The "LOCKED" message will be displayed in the upper right corner of the screen indicating that the OSD is in the locked position. 3.
The Menu Table To access the menu and submenu items shown in the table below, refer to the section “Operating Procedure” (p. 7). Main Menu Submenu Function (BRIGHTNESS) Adjusts the level of brightness and darkness. (CONTRAST) Adjusts the RGB color pattern set of the contrast. BL (BLACK LEVEL) Adjusts the level of darkness for the black level. (LANGUAGE) To choose the OSD language, press "+" or "—". (CLOCK) Adjusts the number of pixels from the source video.
Appendix A: Specifications LCDType 15” XGA Color TFT Display Area 12.0” x 9.0” (304.1 x 228.1 mm) Input Signal Analog ( 0.7 Vp-p/75 ohm positive) Dot Pitch 0.297 mm Scanning Frequency (H) 30 ~ 60 KHz (V) 55 ~ 75 Hz Resolution 1024 x 768 pixels Display Color 16 million colors Luminance 220 nit (Typical) Contrast Ratio 300:1 (Typical) Response Time 35 ms (Typical) Viewing Angle (H)120°/(V)100° Control Type OSD Plug and Play VESA DDC 1/2B Audio No Dimension (H x W x D) 14.4” x 13.
Appendix B: Supported Timing Analog Display Mode Horiz ontal Frequency Vertical Frequency 31.5 KHz 60.0 Hz 37.5 KHz 75.0 Hz 31.5 KHz 70.1 Hz 35.1 KHz 56.3 Hz 37.9 KHz 60.3 Hz 46.9 KHz 75.0 Hz 48.1 KHz 72.o Hz 48.4 KHz 60.0 Hz 56.5 KHz 70.0 Hz 58.1 KHz 72.0 Hz 60.0 KHz 75.0 Hz 640 x 480 35.0 KHz 66.7Hz 832 x 624 49.7 KHz 74.6 Hz 640 x 350 31.5 KHz 70.
Appendix C: Troubleshooting If the LCD monitor fails to function correctly, please follow the following steps for a possible solution. 1. Perform the adjustments according to the section, “Operating the Monitor.” 2. Refer to the rest of this section if you cannot find a proper item listed in “Operating the Monitor” or if the problem remains. 3.
Problem Check to See... No Display The problem is caused by the following 3 reasons, see the problems a), b), and c) for solving. If the power cord is firmly plugged in the socket. a) Power indicator does not light up If the power switch is turned on. If the AC socket is working. Please check using another piece of electrical equipment. If the blank screen saver is active, touch the keyboard or mouse. Increase the CONTRAST and/or BRIGHTNESS. b) Power indicator is If the computer is ON.
Appendix D: Power Management The LCD Monitor complies with the VESA DPMS (version 1.0p) power management proposal. The VESA DPMS proposal provides four phases of power saving modes by detecting the horizontal or vertical sync signal.
Appendix E: For Your Safety WARNING ALWAYS OPERATE UNDER THE SPECIFIED POWER SUPPLY Usage of incorrect voltage will cause malfunction and may cause fire or electric shock. PROTECT AND USE THE CABLE CORRECTLY Do not pull or bend the power cable and VGA cable or place the monitor or any heavy objects on the cables. If the cables are damaged, they may cause fire or electric shock.
CAUTION DISCONNECT CABLES WHEN MOVING THE MONITOR When moving the monitor, always turn off the switch, unplug the monitor, and disconnect the VGA cable. If the cables are not properly disconnected when moving the monitor, fire or electric shock may ensue. DO NOT TOUCH THE PLUG WITH WET HANDS Pulling or inserting the plug with wet hands may cause electric shock. HOLD THE PLUG WHEN DISCONNECTING To disconnect the power cable or VGA cable, always pull the cable by the plug.
Special Notes On LCD Monitors The following conditions are normal with LCD monitors and do not indicate a problem. • When turning on the LCD monitor for the first time, the picture may not fit in the display area. This is because of the type of computer being used. In this case, adjust the picture position to its correct position. (See the section, “Operating the Monitor”.) • The screen may flicker during initial use. Turn off the power switch and then turn it on again; the flickering should disappear.