Copyright © 2005 Microtek International,Inc. Microtek® is a registered trademark of Microtek International, Inc. All other trademarks or registered trademarks are the property of their respective holders. Specifications, software and hardware bundles are subject to change without notice. Delivery of technical support services subject to change without notice. Not responsible for typographical errors. A new FCC Compliance Statement This device complies with part 15 of the FCC Rules.
CE mark for Class B ITE (Following European standard EN55022/ 1998; EN61000-3-2/1995; EN61000-3-3/1995, EN55024/1998, EN60950/1992+A1+A2+A3+A4+A11) Radio Frequency Interference Statement Warning: This is a Class B product. In a domestic environment, this product may cause radio interference in which case the user may be required to take adequate measures.
Table of Contents Introduction .................................................................................. 1 Product Features ..................................................................... Unpacking ............................................................................... Precautions ............................................................................. Cleaning .................................................................................. 1 2 2 3 Connecting the Monitor ....
Introduction Congratulations on the purchase of your new Microtek LCD monitor! With a 21" TFT active matrix color crystal display and offering a maximum resolution of 1024 x 768 pixels, your Microtek 21" LCD monitor offers sharp and vibrant color display with low radiation emission. And with its low power consumption, the monitor helps you reduce your power bill as well.
Unpacking Before unpacking your LCD monitor, prepare a stable, level, and clean surface near a wall outlet for your LCD monitor. 1. Set the LCD monitor box in an upright position and open from the top of the box before removing the right/left cushions. 2.
• Do not touch the screen directly with your fingers as you may damage the screen, and oil from your skin is difficult to remove. • Do not apply pressure to the screen, as the screen is very delicate. • Keep the monitor away from extremely hot, cold or humid places. • Do not place the monitor directly under sunlight, in dusty surroundings, or near equipment which may generate strong magnetic fields.
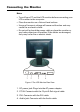
Connecting the Monitor Note: • Turn off your PC and the LCD monitor before connecting your LCD monitor to the computer. • Place the monitor on a flat and level surface. • Usage of incorrect voltage will cause malfunction and may cause fire or electric shock. • Do not pull or bend the power cable or place the monitor or any heavy objects on the cables. If the cables are damaged, they may cause fire or electric shock. 1 2 3 4 Figure-1: The LCD Monitor Rear View 1.
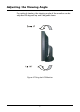
Adjusting the Viewing Angle For optimal viewing, the viewing angle of the monitor can be adjusted 35 degrees up and 5 degrees down.
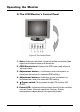
Operating the Monitor A. The LCD Monitor’s Control Panel Figure-3: The Control Panel 1. Auto: Automatically fixes, centers and fine-tunes the video signal to eliminate noise and distortion. 2. OSD Menu/select: Displays the OSD menu and selects a submenu item. 3. Adjustment button —: Indicates cursor movement, or decreases the value of a selected OSD setting. 4. Adjustment button +: Indicates cursor movement, or increases the value of a selected OSD setting. 5.
B. Hot Keys 1. Volume adjust hot key —: Decreases the volume. 2. Volume adjust hot key +: Increases the volume. C. Adjusting the Monitor’s Display 1. Pressing the OSD Menu button causes the screen below (Figure 4) to appear. 2. Press the + or — button to select a menu item. 3. Press the OSD Menu button again to enter the selected submenu. 4. Press the + or — button to change the value. 5. Select EXIT and press the OSD Menu button when finished adjusting.
The Menu Table Main Menu Submenu Function BRIGHTNESS Adjusts the level of brightness and darkness. CONTRAST Adjusts the RGB color pattern set of the contrast. DISPLAY ADJUST V-POSITION Moves the screen vertically (up/down). H-POSITION Moves the screen horizontally (left/right). PITCH Adjusts image distortion appearing as vertical bars or noise. PHASE Adjusts image distortion appearing as horizontal bars or noise. SHARPNESS Adjusts the LCD monitor display to sharpen the image.
TFT LCD Monitor Specifications LCDType 21” XGA Color TFT Display Area 13.3” x 10.6” (337.9 x 270.3 mm) Input Signal Analog (0.7 Vp-p/75 ohm positive) Dot Pitch 0.420 mm Resolution 1024 x 768 pixels Display Color 16.77 million colors Contrast Ratio 400:1 Brightness 450 nit Contrast Ratio 450:1 Response Time 30 ms Display Mode VGA, SVGA, XGA Viewing Angle (H) 170°/(V) 170° Dimensions (H x W x D) 18.7” x 15.5" x 7.7" (572 x 475 x 235 mm) Gross/Net Weight 24.3/21.6 lbs. (11/9.
Supported Timing Item Resolution Horizontal Scanning Frequency (KHz) Vertical Scanning Frequency (Hz) 0 720 x 350 31.469 70.087 1 640 x 480 31.469 59.940 2 640 x 480 35.000 66.667 3 640 x 480 37.861 72.809 4 640 x 480 37.500 75.000 5 720 x 400 31.469 70.087 6 800 x 600 35.156 56.250 7 800 x 600 37.879 60.317 8 800 x 600 48.077 72.188 9 800 x 600 46.875 75.000 10 832 x 624 49.750 74.500 11 1024 x 768 48.363 60.004 12 1024 x 768 56.476 70.
Troubleshooting This LCD monitor comes pre-adjusted with standard VGA timing. Due to output timing differences among various VGA cards, you may initially experience an unstable or unclear display when a new display mode or new VGA card is selected. Before applying any of the following troubleshooting procedures, you should first apply the Auto Adjust option in the OSD menu.