
User Guide


Microtek MTMA Installing and Getting Started 3
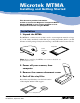
8. Place the MTMA on the scanning surface
Place the MTMA horizontally on the top of the scanner bed. The MTMA will auto-
align itself with the scanner through magnetic attraction. Normally, the MTMA
should be oriented as shown in the illustration below, with the back cliff of the
MTMA sitting on the front edge of the scanner glass.
When you click on the “Scan” button in step 10, the MTMA will move automatically
down the length of the scan bed and scan the image.
Note
: If your MTMA does not move with the orientation shown above and after
you click the Scan button, this may be due to your use of a different “family” of
scanners (e.g., ScanMaker 4600, 4700, X12USL, etc.). In this case, turn the MTMA
180° around, making the front side of the MTMA sit on the front edge of the scanner
glass bed. Then retry by clicking the Scan button as explained in step 10.
The
front
side of the
MTMA must sit on the
front edge of the
scanner glass.
The
back cliff
of the
MTMA must sit on the
front edge of the scanner
glass.
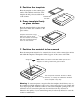
9. Connect the MTMA to your scanner
Plug the MTMA connector into the
15-pin Accessory port on the back of
your scanner.
Power