D ra ft Nokia 6210 Navigator User Guide Draft April 25, 2008
0434 DECLARATION OF CONFORMITY Hereby, NOKIA CORPORATION declares that this RM-419 product is in compliance with the essential requirements and other relevant provisions of Directive 1999/5/EC. A copy of the Declaration of Conformity can be found at http://www.nokia.com/phones/declaration_of_conformity/. © 2008 Nokia. All rights reserved. Nokia, Nokia Connecting People, Navi, Visual Radio and Nokia Care are trademarks or registered trademarks of Nokia Corporation.
Export controls This device may contain commodities, technology or software subject to export laws and regulations from the US and other countries. Diversion contrary to law is prohibited. FCC/INDUSTRY CANADA NOTICE Your device may cause TV or radio interference (for example, when using a telephone in close proximity to receiving equipment). The FCC or Industry Canada can require you to stop using your telephone if such interference cannot be eliminated.
Contents SAFETY.............................................. 6 4. Write text................................... 27 Support ............................................. 8 Traditional and predictive text input........ 27 Copy and delete text ..................................... 28 Help ...................................................................... 8 Nokia support and contact information .... 8 5. Messaging .................................. 28 Insert a (U)SIM card and battery ................
10.Media......................................... 47 Music player.................................................... Nokia Podcasting........................................... Radio ................................................................. RealPlayer ........................................................ Flash Player ..................................................... Recorder ........................................................... 47 49 51 52 53 53 Voice commands .......................
SAFETY Read these simple guidelines. Not following them may be dangerous or illegal. Read the complete user guide for further information. SWITCH ON SAFELY Do not switch the device on when wireless phone use is prohibited or when it may cause interference or danger. ROAD SAFETY COMES FIRST Obey all local laws. Always keep your hands free to operate the vehicle while driving. Your first consideration while driving should be road safety.
Consider installing antivirus and other security software on your device and any connected computer. Your device may have preinstalled bookmarks and links for third-party internet sites. You may also access other third-party sites through your device. Third-party sites are not affiliated with Nokia, and Nokia does not endorse or assume liability for them. If you choose to access such sites, you should take precautions for security or content.
Support ■ Help Your device has context-sensitive help. To access help when an application is open, select Options > Help. To switch between help and the application that is open in the background, select and hold , and select from the list of open applications. To open help from the main menu, select > Help > Help. Select an application to view a list of help topics, and select the related help text. To open a keyword list, select Options > Search. ■ Nokia support and contact information ft Check www.
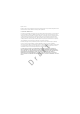
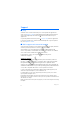
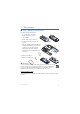
1. Get started ■ Insert a (U)SIM card and battery This device uses BL-5F batteries. 1. To open the back cover of the device, press the back cover release button. 2. Lift the back cover to remove it. 3. To remove the battery, lift it from the end. ra ft 4. Slide the (U)SIM card into the SIM card holder. Ensure that the gold-coloured contact area on the card is facing downward on the device, and the beveled corner faces toward the card holder slot. 5. Replace the battery. 6. Replace the back cover.
1. Open the memory card slot door. 2. Place the memory card in the slot with the gold-coloured area facing down. Push the card gently to lock it into place. 3. Close the slot door. Remove a memory card ft Important: Do not remove the memory card in the middle of an operation when the card is being accessed. Removing the card in the middle of an operation may damage the memory card as well as the device, and data stored on the card may be corrupted. 1. In the standby mode, briefly press the power key.
■ Switch the device on and off Press and hold the power key. If the device asks for a PIN code, enter the PIN code, and select OK. If the device asks for the lock code, enter the lock code, and select OK. The factory setting for the lock code is 12345. Set time and date To set the correct time zone, time, and date, select the country you are presently in, then enter the local time and date.
your device. Your device may automatically configure browser, multimedia messaging, access point, and streaming settings based on the SIM card used. Otherwise, you can use the Sett. wizard application to configure the settings, or you may receive the settings directly as a configuration message, which you save to your device. For more information on availability, contact your service provider or nearest authorised Nokia dealer.
2.
■ Standby mode When you have switched on the device, and it is registered to a network, the device is in the standby mode and ready for use. To select the view for the standby mode, select > Settings > Phone sett. > General > Personalisation > Standby mode > Standby theme. Keep your device away from magnets or magnetic fields as they may cause some applications to activate unexpectedly. Shortcuts in the standby mode To open a list of most recently dialled numbers, press the call key.
Important: In the offline profile you cannot make or receive any calls, or use other features that require cellular network coverage. Calls may still be possible to the official emergency number programmed into your device. To make calls, you must first activate the phone function by changing profiles. If the device has been locked, enter the lock code. ■ Indicators Icons or — The device is connected to a UMTS or GSM network. — HSDPA (network service) in the UMTS network is activated.
— The GPS receiver is active Other indicators may also be shown. Light indication GPS light The GPS light blinks when your device is trying to establish a GPS connection, and remains on when the GPS connection is established. When you close an application using GPS connection, the light blinks quickly a few times. Status light The status light blinks slowly for a few minutes after a missed event, such as a missed call.
■ Switch between applications To switch between open applications, do one of the following: • Select Options > Show open applicats. and the application. • Press and hold . Scroll to an application, and select it. ■ Close an application To close an application or a folder, select Back and Exit as many times as needed to return to the standby mode, or select Options > Exit. Leaving applications running in the background increases the demand on battery power and reduces the battery life.
To set the device to automatically lock the keypad after a certain time, select Settings > Phone sett. > General > Security > Phone and SIM card > Keypad autolock period > User defined and the desired time. > Opening the slide unlocks the keypad. To unlock the keypad when the slide is closed, press the left selection key and select OK within 1.5 seconds. When the device or keypad is locked, calls may be possible to the official emergency number programmed into your device.
The PIN2 code may be supplied with the SIM card and is required for some functions. The module PIN is required to access the information in the security module. The signing PIN is required for the digital signature. The module PIN and the signing PIN are supplied with the SIM card if the SIM card has a security module in it. PUK codes The personal unblocking key (PUK) code or the universal personal unblocking key (UPUK) code (8 digits) are required to change a blocked PIN code and UPIN code, respectively.
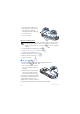
■ Connect a compatible headset Do not connect products that create an output signal as this may cause damage to the device. Do not connect any voltage source to the Nokia AV Connector. When connecting any external device or any headset, other than those approved by Nokia for use with this device, to the Nokia AV Connector, pay special attention to volume levels. ■ Connect a USB data cable ft Connect a compatible USB data cable to the USB connector.
To make a call from Contacts, select > Contacts. Scroll to the desired name; or enter the first letters of the name, and scroll to the desired name. To call the number, press the call key. To call a recently dialled number from the standby mode, press the call key. Speed dialling Speed dialling is a quick way to call frequently used numbers from the standby mode.
If you are using a compatible headset with the headset key, press and hold the headset key. 2. When Speak now is displayed, speak the voice command clearly. The device plays the voice command of the best match. After 1.5 seconds, the device dials the number; if the result is not the correct one, before dialling select another entry. Make a conference call Your device supports conference calls (network service) between a maximum of six participants, including yourself. 1.
To activate the call waiting function (network service), select Phone sett. > Phone > Call > Call waiting > Activate. > Settings > ■ Video calls Make a video call To make a video call, you may need to have a USIM card and be within the coverage of a UMTS network. For availability of and subscription to video call services, contact your service provider. A video call can only be made between two parties and when no other voice, video, or data calls are active.
Call waiting (network service) — See “Call waiting,” p. 22. Reject call with message and Message text — See “Answer or reject a call,” p. 22. Own video in recvd.
Network Select > Settings > Phone sett. > Phone > Network and from the following: Network mode — to select which network to use (this is shown only if it is supported by the service provider). If you select Dual mode, the device uses the GSM or UMTS network automatically. Operator selection — to set the device to search for and automatically select one of the available networks, select Automatic. To select the desired network manually from a list of networks, select Manual.
Video saving — to set whether the live videos are automatically saved Preferred saving memory — to select whether to save the videos to the device memory or to a memory card Capability alert tone — to set an alert tone to sound when video sharing is available during a call If you know a recipient’s SIP address, you can save it to Contacts. Select > Contacts, the contact, and Options > Edit > Options > Add detail > SIP or Share video. Enter the SIP address (username@domainname).
4. Write text ■ Traditional and predictive text input When you write text, on the display indicates predictive text input and traditional text input. To set the predictive text input on or off, press # repeatedly, or press *, and select Activate predictive text or Predictive text > Off. , , or next to the text input indicator indicates the character case or number mode. To change the character case, or to change between letter and number mode, press # repeatedly.
To erase a character, press the clear key. To erase more characters, press and hold the clear key. To insert a space, press 0. To move the cursor to the next line, press 0 three times. ■ Copy and delete text 1. To select letters and words, press and hold #, and at the same time scroll left or right. To select lines of text, press and hold #, and at the same time scroll up or down. 2. To copy the text, press and hold #, and at the same time select Copy. To delete the selected text, press the clear key. 5.
3. To enter the subject for a multimedia, or e-mail message, scroll down to the Subject field. If the subject field is not visible for a multimedia message, select Options > Message header fields, mark Subject, and select OK. 4. Scroll down to the message field and enter the message content. When you write a text message, the message length indicator shows how many characters you can enter in the message.
■ E-mail When you create a new mailbox, the name you give to the mailbox replaces New mailbox. You can have up to six mailboxes. IMAP4 and POP3 mailboxes Select > Messaging and the mailbox. Connect to mailbox? is displayed. To connect to your mailbox (network service), select Yes, or to view previously retrieved e-mail messages offline, select No. To connect to the mailbox afterwards, select Options > Connect.
To postpone sending a message, scroll to a message, and select Options > Defer sending. ■ Message reader To listen to a message in Inbox or a mailbox, scroll to the message or mark the messages, and select Options > Listen. Tip: When you have received a new message, to listen to the received messages, in the standby mode, press and hold the left selection key until Msg. reader starts.
Multimedia messaging settings To define multimedia message settings, such as which access point is used and whether multimedia messages are retrieved automatically, select > Messaging > Options > Settings > Multimedia message.
To view information about the memory consumption of contacts, select Options > Contacts info. To view the list of fixed dialling numbers, select Options > SIM numbers > Fixed dial contacts. This setting is only shown if supported by your SIM card. When fixed dialling is activated, calls may be possible to the official emergency number programmed into your device. To assign default numbers and addresses to a contact, select it, and select Options > Defaults.
is subject to change with the United States Department of Defense civil GPS policy and the Federal Radionavigation Plan. Accuracy can also be affected by poor satellite geometry. Availability and quality of GPS signals may be affected by your location, buildings, natural obstacles, and weather conditions. The GPS receiver should only be used outdoors to allow reception of GPS signals.
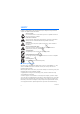
Hold your device correctly When using the receiver, from an upright position, move the device to an angle of about 45 degrees, with an unobstructed view of the sky. Establishing a GPS connection may take from a couple of seconds to several minutes, even longer in a vehicle. See “GPS light,” p. 16. Using the GPS receiver may drain the device battery faster. If your device cannot find the satellite signal, consider the following: • If you are indoors, go outdoors to receive a better signal.
About Maps With Maps, you can see your current location on the map, browse maps for different cities and countries, navigate to a destination with voice guidance, search for addresses and different points of interest, plan routes from one location to another, and save locations as landmarks and send them to compatible devices. You can also purchase extra services, such as travel guides and traffic information. These services are not available in all countries or regions.
your location. After the initial calculation, signals from three satellites may be enough. To zoom in or out, press * or #. To move on the map, use the scroll key. A new map is automatically downloaded if you scroll to an area which is not covered by maps already downloaded. See “Download maps,” p. 38. The maps are free of charge, but downloading may involve the transmission of large amounts of data through your service provider's network.
of the address, enter the only first three characters of the address. To find a city in a different country, enter the country’s name in English or the three-letter ISO country code and the city. For example, to find London using the country code, enter GBR London, and select Search. To find a specific address, select Options > Search > Addresses. Country/Region and City or post code are mandatory.
Downloading maps may involve the transmission of large amounts of data through your service provider’s network. Contact your service provider for information about data transmission charges. To prevent automatic downloading of maps, for example, when outside your home network, select Options > Tools > Settings > Internet > Go online at start-up > No.
Navigate to the destination To start navigating, select a location, press the scroll key, and select Drive to or Walk to. When you use car navigation for the first time, your device may ask you to select the language for the voice guidance. To change the language later, in the Maps main view, select Options > Tools > Settings > Navigation > Voice guidance. Voice guidance is not available for pedestrian navigation.
To browse travel guide categories, select a category. If there are subcategories, select a subcategory. To download a new guide to your device, scroll to the desired guide, and select Yes. You can pay for the guides using a credit card or in your phone bill, if supported by your service provider. ■ Landmarks Select > Landmarks. With Landmarks, you can save the position information of specific locations to your device. You can use your saved landmarks in compatible applications, such as GPS data and Maps.
Position To save your location as a landmark, select Position > Options > Save position. > Applications > GPS data > Trip meter To activate trip distance calculation, select > Applications > GPS data > Trip distance > Options > Start. To deactivate it, select Options > Stop. The calculated values remain on the display. To set the trip distance and time and average and maximum speeds to zero, and to start a new calculation, select Reset. To set the odometer and total time to zero, select Restart.
■ Download files To download images or video clips, select > Gallery > Images or Video clips and the image icon (Dwnl. imgs.) or the video icon (Downld. videos). The browser opens. Choose a bookmark for the site to download from. ■ View images To view images in Gallery, scroll to the image, select Open. To open the toolbar when viewing an image, press the scroll key. To zoom in or out when viewing an image, press * or #.
drafts and continue later, and view the content of the albums. The supported content types may vary depending on the online sharing service provider. To share images and video clips online, you must have an account with an online image sharing service. You can usually subscribe to such a service on the web page of your service provider. For more information and applicable terms and costs, contact your service provider. Select > Internet > Share online.
Service providers — to view the list of service providers My accounts — to create a new account, select Options > Add new account. To edit an existing account, select an account and Options > Edit. You can enter the name for the account, and the user name and password for the account. Application settings — to select the size for the images shown on the display, and the font size used in drafts or text entries Advanced — to select the default access point and the way for polling new content from the server.
2. To zoom in or out, scroll up or down. 3. To capture an image, select Capture. Close the camera To close the camera, select Options > Exit. If you open the Gallery from the camera, the camera is closed. ■ Record video clips 1. To activate the main camera, press the camera key. To activate the secondary camera, scroll left or right to open the toolbar, and select . If the camera is in the image mode ( ), scroll left or right to open the toolbar, and select . ft 2.
10. Media ■ Music player Warning: Listen to music at a moderate level. Continuous exposure to high volume may damage your hearing. Do not hold the device near your ear when the loudspeaker is in use, because the volume may be extremely loud. You can listen to music and podcast episodes also when the Offline profile is activated. See “Offline profile,” p. 14. For more information about copyright protection, see “Licences,” p. 64. Listen to music or a podcast episode 1.
Playlists Select > Applications > Music player > Playlists. To view details of a playlist, scroll to the playlist, and select Options > Playlist details. Create a playlist 1. Select Options > Create playlist. 2. Enter a name for the playlist, and select OK. 3. To add songs now, select Yes. To add songs later, select No. 4. Select artists to find the songs you want to include in the playlist. To add a song, press the scroll key. 5. When you have made your selections, select Done.
Transfer music from PC To synchronise music with Windows Media Player, connect the compatible USB cable and select Media transfer as the connection mode. You can transfer WMDRM protected music files only using media transfer. A compatible memory card needs to be inserted in the device. To use Nokia Music Manager in Nokia PC Suite, see the Nokia PC Suite user guide.
To subscribe to a channel and add it to your podcasts, select Options > Subscribe. You can also mark channels to add them all at the same time. Directories Directories help you to find new podcast episodes to which to subscribe. An episode is a particular media file of a podcast. Select > Applications > Podcasting > Directories. Select a directory folder to update it (network service). When the colour of the folder icon changes, select to open it, and select a folder topic to view the list of podcasts.
To update the selected podcast or marked podcasts, for a new episode, select Options > Update. To add a new podcast by entering the URL of the podcast, select Options > New podcast. To edit the URL of a selected podcast, select Edit. To update, delete, and send a group of selected podcasts at once, select Options > Mark/Unmark, mark the podcasts, and select Options and the desired action. To open the website of the podcast (network service), select Options > Open web page.
To view the list of saved stations, select Options > Stations. To change the settings of a station, select the station and Edit. Radio functions To adjust the volume, press the volume keys. If there are any saved stations, scroll right or left to the next or previous stations. You can make or answer a call while listening to the radio. The radio is muted when there is an active call. To listen to the radio in the background and go to the standby mode, select Options > Play in background.
■ Flash Player To view, play, and interact with flash files made for mobile devices, select Applications > Flash Player. To open a folder or play a flash file, select it. > ■ Recorder With voice recorder, you can record voice call conversations and voice memos. If you record a phone conversation, all parties hear a beeping sound during recording. 11. Internet ■ Browse the web > Internet > Web, or press and hold 0 in the ra To browse web pages, select standby mode.
Keys and commands for browsing To open a link, make selections, or check boxes, press the scroll key. To go to the previous page while browsing, select Back. If Back is not available, to view a chronological list of the pages visited during a browsing session, select Options > Navigation options > History. Scroll left or right, and select the desired page. The history list is cleared each time a session is closed. To save a bookmark while browsing, select Options > Save as bookmark.
To show the page overview of the current page, press 8. To find the desired spot on the page, scroll up or down. Press 8 again to zoom in and view the desired section of the page. Web feeds Web feeds are widely used to share the latest headlines or recent news. The browser automatically detects if a web page contains web feeds. To subscribe to a web feed, select Options > Subscribe to web feeds and a feed, or click on the link.
■ Search Use Search to get access to search engines, and find and connect to local services, websites, images, and mobile content (network service). For example, you can use the application to find local restaurants and shops. You can also search for data in your device and memory card. Select > Internet > Search. 12. Personalisation ■ Themes To change the look of your device display, activate a theme. ft Select > Settings > Themes. To view the available themes, select General.
13. Time management ■ Clock Select > Office > Clock. To change the clock settings, and to set the time and date, select Options > Settings. To set the device to show the time in other locations, scroll right to World clock. To add a location, select Options > Add location. To set your current location, scroll to a location, and select Options > Set as current location. The location is displayed in the clock main view, and the time in your device is changed according to the location selected.
■ Notes Select > Office > Notes. To write a new note, start writing. To save the note, select Done. You can save plain text files (.txt format) you receive to Notes. ■ Calculator Select > Office > Calculator. When entering numbers, to add a decimal point, press #. Note: This calculator has limited accuracy and is designed for simple calculations. ■ Converter ft Select > Office > Converter. You can convert measurements, such as length from one unit to another, for example, from yards to metres.
The display shows abbreviations for source and target languages. To change the source and target language, select Options > Languages > Source and Target. Enter the word to be translated, and select Translate. To hear the word spoken, select Listen. ■ Adobe Reader Use Adobe Reader to view portable document format (.pdf) documents. To open the application, select > Office > Adobe PDF. Open a .pdf file View a document ft To open a recently viewed document, select it.
15. Settings ■ Voice commands To select the functions to use by voice command, select > Settings > Voice comm.. The voice commands for changing profiles are in the Profiles folder. To change the voice command for an application, scroll to the application, and select Edit, or Options > Change command. To play the activated voice command, select Options > Playback. To use voice commands, see “Voice dialling,” p. 21. ■ Phone settings Select ft General > Settings > Phone sett.
Phone See “Call settings,” p. 23. Connection Select > Settings > Phone sett. > Connection and from the following: Bluetooth — to switch Bluetooth technology on or off, and edit Bluetooth settings. See “Bluetooth connection settings,” p. 68. USB — to edit USB settings. See “USB connection,” p. 69. Destinations — to define the connection methods used for reaching a particular destination Packet data — to select the packet data connection settings.
by the user, for example push to talk groups. You may receive the settings from your service provider. See “Configuration settings,” p. 11. Configurations — to view and delete configuration contexts. Certain functions, such as web browsing and multimedia messaging, may require configuration settings. You may receive the settings from your service provider. See “Configuration settings,” p. 11. APN control — to restrict the use of packet data access points.
Application Installer in Nokia PC Suite to install an application to your device or a memory card. To find installed applications, select > Applications > My own. To open Application manager, select > Settings > Data mgr. > App. mgr.. Install an application The .jar file is required for installing Java applications. If it is missing, the device may ask you to download it. 1. To install an application or software package, select Installation files, and scroll to an installation file.
device memory. See “File manager,” p. 64. If the .sis file is a message attachment, delete the message from the Messaging inbox. Remove an application In the Application manager main view, select Installed apps., scroll to the software package, and select Options > Uninstall. ■ File manager To browse, open, and manage files and folders in the device memory or on a memory card, select > Office > File mgr..
protect the content, content owners may ask that such DRM software's ability to access new DRM-protected content be revoked. Revocation may also prevent renewal of such DRMprotected content already in your device. Revocation of such DRM software does not affect the use of content protected with other types of DRM or the use of non-DRM-protected content. Digital rights management (DRM) protected content comes with an associated activation key that defines your rights to use the content.
To open the device manager, select > Settings > Data mgr. > Device mgr.. Update software Warning: If you install a software update, you cannot use the device, even to make emergency calls, until the installation is completed and the device is restarted. Be sure to back up data before accepting installation of an update. Downloading software updates may involve the transmission of large amounts of data through your service provider's network.
Depending on the other device, synchronisation may not be possible and data can be copied only once. 1. To transfer or synchronise data, select > Settings > Connectivity > Switch. If you have not used Phone switch before, information about the application is displayed. To start transferring data, select Continue. If you have used Phone switch, select the icon Start sync, Start retrieving or Start sending. 2. When using Bluetooth technology, the devices need to be paired to transfer data.
A Bluetooth connection is disconnected automatically after sending or receiving data. Bluetooth connection settings Select > Settings > Connectivity > Bluetooth. Bluetooth — to switch Bluetooth connectivity on or off My phone's visibility — to allow your device to be found by other devices with Bluetooth connectivity at all times, select Shown to all. To allow your device to be found for a defined time period, select Define period.
Pair and block devices To open a list of paired devices, in the Bluetooth view, scroll right to Paired devices. To pair with a device, select Options > New paired device, select the device with which to pair, and exchange passcodes. To cancel pairing, scroll to the device whose pairing you want to cancel, and press the clear key. If you want to cancel all pairings, select Options > Delete all. To set a device to be authorised, scroll to the device, and select Options > Set as authorised.
■ Remote synchronisation Sync enables you to synchronise data such as your calendar entries, contacts, and notes with a compatible computer or a remote internet server. Select > Settings > Connectivity > Sync. To create a new profile, select Options > New sync profile and enter the required settings. To synchronise data, in the main view, mark the data to be synchronised, and select Options > Synchronise.
2. When the connection has been established, to talk to the other participant, press and hold the call key while you talk. 3. To end the PTT call, select Disconnect, or, if there are several PTT calls, select Options > Disconnect. Make a PTT group call To call a group, select Options > PTT contacts > Contacts > Options > Talk to many, mark the contacts you want to call, and select OK.
For availability of approved enhancements, please check with your dealer. When you disconnect the power cord of any enhancement, grasp and pull the plug, not the cord. 19. Battery and charger information Your device is powered by a rechargeable battery. The battery intended for use with this device is BL-5F. This device is intended for use when supplied with power from the following chargers: AC-4, AC-5, AC-6, AC-8 or DC-4 chargers.
Do not modify, remanufacture, attempt to insert foreign objects into the battery, or immerse or expose it to water or other liquids. Improper battery use may result in a fire, explosion, or other hazard. If the device or battery is dropped, especially on a hard surface, and you believe the battery has been damaged, take it to a service centre for inspection before continuing to use it. Use the battery only for its intended purpose. Never use any charger or battery that is damaged.
What if your battery is not authentic? If you cannot confirm that your Nokia battery with the hologram on the label is an authentic Nokia battery, please do not use the battery. Take it to the nearest authorised Nokia service point or dealer for assistance. The use of a battery that is not approved by the manufacturer may be dangerous and may result in poor performance and damage to your device and its enhancements. It may also invalidate any approval or warranty applying to the device.
Disposal The crossed-out wheeled-bin symbol on your product, literature, or packaging reminds you that all electrical and electronic products, batteries, and accumulators must be taken to separate collection at the end of their working life. This requirement applies to the European Union and other locations where separate collection systems are available. Do not dispose of these products as unsorted municipal waste.
Implanted medical devices Manufacturers of medical devices recommend that a minimum separation of 15.3 centimeters (6 inches) should be maintained between a wireless device and an implanted medical device, such as a pacemaker or implanted cardioverter defibrillator, to avoid potential interference with the medical device. Persons who have such devices should: • Always keep the wireless device more than 15.3 centimeters (6 inches) from the medical device when the wireless device is turned on.
■ Potentially explosive environments Switch off your device when in any area with a potentially explosive atmosphere, and obey all signs and instructions. Potentially explosive atmospheres include areas where you would normally be advised to turn off your vehicle engine. Sparks in such areas could cause an explosion or fire resulting in bodily injury or even death. Switch off the device at refuelling points such as near gas pumps at service stations.
were developed by the independent scientific organization ICNIRP and include safety margins designed to assure the protection of all persons, regardless of age and health. The exposure guidelines for mobile devices employ a unit of measurement known as the Specific Absorption Rate or SAR. The SAR limit stated in the ICNIRP guidelines is 2.0 watts/ kilogram (W/kg) averaged over 10 grams of tissue.
Index A E A-GPS 34 alarm clock. See clock. assisted GPS 34 e-mail messages 30 B file manager 64 finding locations 37 Flash Player 53 forwarding calls. See diverting calls F C gallery 42 GPS GPS connection 33 maps 35 positioning 33 H help 8 I D ra cache 55 calendar 57 calibrating compass 37 call register. See log.
notes 58 active notes 57 data call 61 messaging 31 packet data 61 phone 60 Setting wizard 12 speech 62 writing language 27 sharing online 43 software updates 66 speed dialling 21 standby theme 14 switching between applications 17 synchronisation 70 O T offline mode. See offline profile offline profile 14 one-touch dial. See speed dialling.