Nokia X2–01 User Guide Issue 2.
Contents Contents Safety 4 Your Nokia X2-01 in brief Key features Keys and parts 5 5 5 Get started Insert the SIM card and battery Remove the SIM card Switch on or off Antennas Charge the battery Connect a headset Insert a memory card Remove the memory card Connect a USB data cable Attach a wrist strap Access codes PUK codes Home screen Keypad lock Use your device without a SIM card Applications running in background 7 7 8 9 9 9 10 10 11 11 12 12 13 13 16 16 16 Calls Make and answer a call Loudspe
Contents Web or Internet About Web Connect to a web service 35 35 35 Operator menu 35 SIM services 36 Find more help Support About phone software updates Update phone software using your phone Update phone software using your PC 36 36 36 Protect the environment Save energy Recycle 38 38 38 Product and safety information 39 37 38 3
Safety Safety Read these simple guidelines. Not following them may be dangerous or illegal. Read the complete user guide for further information. SWITCH OFF IN RESTRICTED AREAS Switch the device off when cell phone use is not allowed or when it may cause interference or danger, for example, in aircraft, in hospitals or near medical equipment, fuel, chemicals, or blasting areas. Obey all instructions in restricted areas. ROAD SAFETY COMES FIRST Obey all local laws.
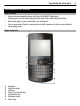
Your Nokia X2-01 in brief Your Nokia X2-01 in brief Key features • Enjoy the messaging features with the full QWERTY keyboard. • Manage your social networking profiles and music with dedicated keys. • Read and reply to your mail when out and about. • See an overview of your correspondence with someone in the conversational messaging view.
Your Nokia X2-01 in brief 8 9 Microphone Space key 10 11 12 13 14 15 Music key Function key Shift key Sym key Messaging key Ctrl key 16 17 18 19 20 Headset connector/Nokia AV connector (3.
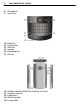
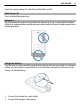
Get started 7 21 Micro USB connector 22 Memory card slot To access some messaging or music features, press the messaging or music key. You can assign different functions to the keys. Get started Insert the SIM card and battery Note: Switch the device off and disconnect the charger and any other device before removing any covers. Avoid touching electronic components while changing any covers. Always store and use the device with any covers attached.
1 2 3 4 Get started Place your finger in the recess at the bottom of the device, and carefully lift and open the back cover (1). Insert the SIM card. Make sure the contact area of the card is facing down (2). Line up the contacts of the battery and the battery compartment, and insert the battery (3). To replace the back cover, direct the top locking catches toward their slots (4), and press down until the cover locks into place (5).
Get started 9 Press the release spring (1), and slide out the SIM card (2). Switch on or off Press and hold the power key. Antennas Avoid touching the antenna area while the antenna is in use. Contact with antennas affects the communication quality and may reduce battery life due to higher power level during operation. Charge the battery Your battery has been partially charged at the factory, but you may need to recharge it before you can switch on your phone for the first time.
3 Get started When the phone indicates a full charge, disconnect the charger from the phone, then from the wall outlet. You do not need to charge the battery for a specific length of time, and you can use the phone while it is charging. If the battery is completely discharged, it may take several minutes before the charging indicator is displayed or before any calls can be made.
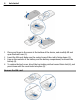
Get started 1 2 3 11 Open the cover of the memory card slot. Insert the card into the memory card slot with the contact surface facing up, and press until it locks into place. Close the cover of the memory card slot. Remove the memory card Important: Do not remove the memory card when an application is using it. Doing so may damage the memory card and the device and corrupt data stored on the card.
Get started To modify the USB settings, select Menu > Settings > Connectivity > USB data cable and the desired mode. Attach a wrist strap Thread the wrist strap, and tighten it. Access codes The security code helps to protect your phone against unauthorized use. You can create and change the code, and set the phone to request the code. Keep the code secret and in a safe place separate from your phone. If you forget the code and your phone is locked, your phone will require service.
Get started 13 To set how your phone uses the access codes and security settings, select Menu > Settings > Security. The personal unblocking key (PUK) code and the universal personal unblocking key (UPUK) code (8 digits) are required to change a blocked PIN code and UPIN code, respectively. The PUK2 code (8 digits) is required to change a blocked PIN2 code. These codes are not supplied with the SIM card. Contact your local service provider for the codes.
Get started Indicators You have unread messages. You have unsent, cancelled, or failed messages. The keypad is locked. or or or The phone does not ring for incoming calls or text messages. An alarm is set. The phone is registered to the GPRS or EGPRS network. A GPRS or EGPRS connection is open. The GPRS or EGPRS connection is suspended (on hold). Bluetooth is activated. All incoming calls are diverted to another number. Calls are limited to a closed user group. The currently active profile is timed.
Get started 15 Add favorite contacts to the home screen With the Favorite contacts widget, you can easily communicate with your family and friends. 1 2 3 4 To activate the enhanced home screen, select Menu > Settings and Display > Home screen > Home scr. mode > On. Select Personalize view. This step is not needed if there are currently no widgets added to the home screen. Scroll to the desired content zone, and select Change or Assign. Select Favorite contacts.
Get started Using social networking services requires network support. This may involve the transmission of large amounts of data and related data traffic costs. For information about data transmission charges, contact your service provider. The social networking services are third party services and not provided by Nokia. Check the privacy settings of the social networking service you are using as you may share information with a large group of people.
Calls 17 Calls Make and answer a call Make a call Enter the phone number, including the country and area code if necessary, and press the call key. For international calls, press + for the international prefix (the + character replaces the international access code), enter the country code, the area code without the leading 0, if necessary, and the phone number. Answer an incoming call Press the call key. Reject a call Press the end key. Adjust the volume During a phone call, scroll up or down.
Write text Set the writing language Select Options > Writing lang. and the desired language. To change the writing language, you can also press the function key, and then press the ctrl key. Switch between number and letter mode Press the function key repeatedly, until the symbol for the desired input method is displayed. Lock number mode Press the function key twice. To return to normal mode, press the function key. Switch between the character cases Press the shift key.
Navigate the menus 19 Switch between predictive and traditional text input Press and hold the ctrl key, and then press the space key. You can also select and hold Options. Write text with predictive text input 1 Start writing a word, using the character keys. Your device suggests possible words. 2 To confirm a word, scroll right or press the space key. If the word is not correct, scroll down to access a list of suggested words, and select the desired word. 3 Start writing the next word.
Messaging To send messages, the correct message centre number must be stored in your device. Normally, this number is set by default through your SIM card. Set the message center number manually 1 Select Menu > Messaging > More > Msg. settings > Text messages > Message center. 2 Enter the name and number supplied by your service provider. When writing a message, you can attach, for example a picture. The text message automatically becomes a multimedia message.
Messaging 3 4 21 To insert a special character or a smiley, select Options > Insert symbol. To attach an object to the message, select Options > Insert object. The message type changes automatically to multimedia message. To add recipients, select Send to and a recipient. To enter a phone number or mail address manually, select Number or mail. Enter a phone number, or select Mail, and enter a mail address. Select Send. Multimedia messages are indicated with an icon at the top of the display.
3 Contacts — Stop the recording. Select Send to and a contact. Mail and Chat Your device may support Mail and Chat for social networking. • • With Mail, you can use your cellular device to access your mail accounts from different mail service providers. With Chat, you can use your cellular phone to chat with other online users. To check if this messaging system is available, select Menu > Mail. This feature is not available in all countries. For details, contact your service provider.
Music 23 Select Menu > Contacts > Names. Add a contact Select Options > Add new > Add new contact. Add details to a contact Ensure that the memory in use is either Phone or Phone and SIM. Scroll to a contact, and select Details > Options > Add detail. Search for a contact Select Names. Scroll through the list of contacts, or enter the first characters of the contact's name. Copy a contact between the device memory and SIM card Select Names, scroll to the contact, and select Options > More > Copy contact.
Music Skip to the next song Scroll right. Rewind the current song Press and hold the scroll key to the left. Fast-forward the current song Press and hold the scroll key to the right. Adjust the volume Scroll up or down. Mute or unmute the music player Press the ctrl key. Leave the music player playing in the background Press the end key. Close the music player Press and hold the end key. FM radio Select Menu > Music > Radio. Automatically search for available stations Select Options > Search all stat..
Photos Adjust the volume Scroll up or down. Leave the radio playing in the background Press the end key. Close the radio Press and hold the end key. Photos Capture images and record videos Your device supports an image capture resolution of 640x480 pixels. Camera mode Use the still image function Select Menu > Photos > Camera. Zoom in or out Scroll up or down. Capture an image Select Capture. Set the preview mode and time Select Options > Settings > Photo prev. time.
Applications View your images and videos View your images Select Menu > Photos > My photos. Watch your videos Select Menu > Photos > My videos. Applications Alarm clock You can set an alarm to sound at a desired time. Set the alarm 1 Select Menu > Applications > Alarm clock. 2 Enter the alarm time. 3 To repeat an alarm on selected days of the week, select Repeat: > On and the days. 4 Select the alarm tone. If you select the radio as the alarm tone, connect the headset to the device.
Calendar 27 View the amount of memory available for game and application installations Select Options > Memory status. Download a game or application Select Options > Downloads > Game downloads or App. downloads. Your device supports J2ME™ Java applications. Ensure that the application is compatible with your device before downloading it. Important: Only install and use applications and other software from sources that you trust.
Settings Add a calendar note Scroll to a date, and select Options > Make a note. View the details of a note Scroll to a note, and select View. Delete all notes from the calendar Select Options > Delete notes > All notes. Settings Profiles Waiting for a call, but can’t let your device ring? There are various settings groups called profiles, which you can customize with ringing tones for different events and environments. Select Menu > Settings > Profiles.
Settings 29 Select Menu > Settings > Tones. You can find the same settings in the Profiles menu. Display settings Select Menu > Settings > Display. You can view or modify the wallpaper, font size, or other settings related to the device display. Display cellular network information in the home screen 1 To activate the enhanced home screen, select Menu > Settings and Display > Home screen > Home scr. mode > On. 2 Select Personalize view.
Settings Assign a shortcut to the scroll key Select Navigation key. Scroll to the desired direction, and select Change or Assign and a function from the list. Synchronization and backup Select Menu > Settings > Sync & backup. Select from the following: Phone switch — Synchronize or copy selected data, such as your contacts, calendar entries, notes, or messages, between your device and another device. Create backup — Back up selected data. Restore backup — Restore data from a backup.
Settings 4 5 6 7 31 To connect your device to an audio accessory, select Conn. to audio acc. and the accessory. To pair your device with any Bluetooth device in range, select Paired devices > Add new device. Scroll to a found device, and select Add. Enter a passcode (up to 16 characters) on your device, and allow the connection on the other Bluetooth device. Operating the device in hidden mode is a safer way to avoid malicious software.
Settings 1-touch dialing — Call a contact assigned to a number key (2-9) when you press and hold the corresponding number key. Call waiting — Set the network to notify you of an incoming call during a call in progress (network service). Call duration display — Display the duration of an ongoing call. Summ. after call — Briefly display the approximate duration of a call when the call ends. Send my caller ID — Show your phone number to the person you are calling (network service).
Settings 33 Hearing aid Optimize the sound quality when using a T-coil hearing aid Select Hearing aid > T-coil hear. aid > On. indicates that T-coil hear. aid is active. Configuration You can configure your device with settings that are required for certain services. Your service provider may also send you these settings. Select Menu > Settings and Configuration Select from the following: Default config. sett. — View the service providers saved in the device, and set a default service provider. Act.
About the web browser request to be deactivated. This option may not be available depending on your SIM card. For details, contact your network service provider. Code in use — Select the type of PIN code. Auth. certificates or User certificates — View the list of the authority or user certificates downloaded to your device. See "Browser security," p. 34. Browser security Security features may be required for some services, such as banking services or online shopping.
Web or Internet 35 To browse the web, you must be connected to the internet. For availability, pricing, and instructions, contact your service provider. You may receive the configuration settings required for browsing as a configuration message from your service provider. Web or Internet About Web Select Menu > Internet. Depending on your device, the web browsing function may be displayed as Web or Internet in the menu, hereafter referred to as Web.
SIM services SIM services Your SIM card may provide additional services. You can access this menu only if it is supported by your SIM card. The name and contents of the menu depend on the available services. Find more help For local services and warranty information, please refer to the separate booklet. Support When you want to learn more about how to use your product or you are unsure how your phone should function, go to www.nokia.com/support, or using your cell phone, nokia.mobi/support.
Find more help 37 Make sure that the device battery has enough power, or connect the charger before starting the update. After the update, the instructions in the user guide may no longer be up to date. Update phone software using your phone Want to improve the performance of your phone and get application updates and great new features? Update the software regularly to get the most out of your phone. You can also set your phone to automatically check for updates.
3 4 Protect the environment To download and install a software update, select Downl. ph. sw. Follow the displayed instructions. If the installation was cancelled after the download, select Install sw update. The software update may take several minutes. If there are problems with the installation, contact your network service provider. Check for software updates automatically Select Auto sw update, and define how often to check for new software updates.
Product and safety information 39 how to recycle your old Nokia products and where to find collection sites, go to www.nokia.com/werecycle, or call the Nokia Contact Center. Recycle packaging and user guides at your local recycling scheme. For more information on the environmental attributes of your phone, go to www.nokia.com/ecoprofile. Product and safety information Network services and costs Your device is approved for use on the (E)GSM 850, 900, 1800, 1900 MHz networks.
Product and safety information If your device has OMA DRM-protected content, to back up both the licenses and the content, use the backup feature of Nokia PC Suite. Other transfer methods may not transfer the licenses which need to be restored with the content for you to be able to continue the use of OMA DRM-protected content after the device memory is formatted. You may also need to restore the licenses if the files on your device become corrupted.
Product and safety information 2 Check for adequate signal strength. You may also need to do the following: • • • Insert a SIM card. Deactivate call restrictions you have activated for your device, such as call restricting, fixed dialing, or closed user group. Make sure the flight profile is not activated. 3 Press the end key repeatedly, until the home screen is displayed. 5 Press the call key. 4 6 41 Enter the official emergency number for your present location.
Product and safety information Operating environment This device meets radio frequency exposure guidelines in the normal use position at the ear or at least 1.5 centimeters (5/8 inch) away from the body. Any carry case, belt clip, or holder for body-worn operation should not contain metal and should position the device the above-stated distance from your body. To send data files or messages requires a quality connection to the network.
Copyright and other notices 43 Copyright and other notices DECLARATION OF CONFORMITY Hereby, NOKIA CORPORATION declares that this RM-717 product is in compliance with the essential requirements and other relevant provisions of Directive 1999/5/EC. A copy of the Declaration of Conformity can be found at http://www.nokia.com/ phones/declaration_of_conformity/. © 2010 Nokia. All rights reserved. Nokia, Nokia Connecting People and X2-01 are trademarks or registered trademarks of Nokia Corporation.
Copyright and other notices FCC/INDUSTRY CANADA NOTICE Your device may cause TV or radio interference (for example, when using a telephone in close proximity to receiving equipment). The FCC or Industry Canada can require you to stop using your telephone if such interference cannot be eliminated. If you require assistance, contact your local service facility. This device complies with part 15 of the FCC rules and Industry Canada licenseexempt RSS standard(s).