User Guide
TM Nokia 2705 Shade User Guide 9212665 Issue 1.
© 2009 Nokia. All rights reserved. Nokia, Nokia Connecting People, Navi, Shade, Xpress-On and Nokia Original Accessories are trademarks or registered trademarks of Nokia Corporation. Nokia tune is a sound mark of Nokia Corporation. Other product and company names mentioned herein may be trademarks or tradenames of their respective owners. Reproduction, transfer, distribution, or storage of part or all of the contents in this document in any form without the prior written permission of Nokia is prohibited.
Contents Safety..................................................................................................................................................................... 5 Section 1: Get Started......................................................................................................................................... 6 Remove or Replace Xpress-OnTM Back Cover...............................................................................................................................
Message Settings........................................................................................................................................................................................... 22 Section 7: My Ringtones.................................................................................................................................. 24 Get New Applications...............................................................................................................................
Safety Safety Read these simple guidelines. Not following them may be dangerous or illegal. Read the complete user guide for further information. SWITCH ON SAFELY Do not switch the device on when wireless phone use is prohibited or when it may cause interference or danger. ROAD SAFETY COMES FIRST Obey all local laws. Always keep your hands free to operate the vehicle while driving. Your first consideration while driving should be road safety.
Remove or Replace Xpress-On TM Back Cover Section 1: Get Started Topics Covered • • • • • • • • • Remove or Replace Xpress-OnTM Back Cover Install or Remove the Battery Remove or Replace Xpress-OnTM Front Cover Switch Your Device On or Off Charge the Battery Antenna How to Read This Guide Get Help Green Tips This section describes how to start using your device after activating your services, how to read this guide, and how to contact customer support.
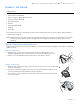
Insert or Remove the Battery Insert or Remove the Battery Insert the Battery 1. With the back of the phone facing you, open the phone slightly. Place your fingernail under the tip of the cover at the bottom of the phone and pull up to release. 2. Insert the battery, making sure to align the contacts, and press down until the battery fits into place. 3. Place the tabs at the top of the back cover into the slots at the top of the phone. 4.
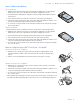
Switch Your Device On or Off Switch Your Device On or Off To power your phone on or off, press and hold the End/Power Key until the display powers on or off. Charge the Battery 1. Connect the Wall Charger to an AC outlet. 2. Open the Accessory Port cover and connect the Wall Charger. 3. Disconnect the charger from the phone and AC outlet when the battery indicator bar stops scrolling. When the phone is fully charged, it displays a message to ask you to unplug the charger.
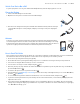
Get Help Get Help Nokia Support and Contact Information See www.nokiausa.com/support or your local Nokia website for the latest guides, additional information, downloads, and services related to your Nokia product. On the website, you can get information on the use of Nokia products and services. If you need to contact customer service, check the list of local Nokia Care contact centers at www.nokiausa.com/customerservice.
Keys and Parts Section 2: Your Device Topics Covered • • • • Keys and Parts Display Screen Airplane Mode Find Your Phone Number This section describes the basic mechanical components of your device, elements on the display, how to activate Airplane Mode, and how to find your phone number. Keys and Parts 1. Earpiece 2. Main Display Screen 3. Directional Key 4. Right Soft Key 5. Camera Key* 6. End/Power Key 7. Alphanumeric Keypad 8. Vibration Key 9. Microphone 10. Voicemail Key 11. Clear Key 12.
Display Screen Display Screen Idle Mode When the device is ready for use, and you have not entered any characters, the device is in Idle Mode. 1. Signal strength — The strength of the signal received by the device is indicated by the number of bars displayed. 2. Message — Press the Left Soft Key to select this menu option. 3. MENU — Press the Key to access the Main Menu. 4. Contacts — Press the Right Soft Key to select this menu option. 5. Battery strength — Four bars indicate a fully charged battery. 6.
Airplane Mode A group of a contact. A picture ID of a contact. A distinctive ringtone for a caller. The fax number of a contact. Set speed dial for a contact. There are unread messages in your Inbox. There are read messages in your Inbox. There are picture messages in your Inbox. Sent messages. Message was delivered successfully. Message was delivered incompletely. Sent message failed. Message is locked. Draft text message. Draft picture message. Indicates high priority level.
Make a Call Section 3: Call Functions Topics Covered • • • • • Make a Call Answer or Reject a Call Options During a Call Speakerphone Recent Calls This section describes how to make, answer, and reject a call. It also describes how to use the speakerphone and view call logs. Make a Call Use the Keypad Enter the phone number (including the area code if necessary), and press the Send Key. Use the Contact List 1. Press the Right Soft Key (Contacts). 2.
Options During a Call Options During a Call During a call, press the Right Soft Key (Options), and then select from the following: New Message — Send or retrieve messages. Contact List — Search your Contact List. Recent Calls — Check recent calls. Bluetooth Menu — Use a Bluetooth headset. The following options are available if a Bluetooth headset is connected. Select Audio to Phone to hear the other party on the device, or Audio to Device to hear the other party on the Bluetooth headset.
Entry Modes Section 4: Text Entry Topics Covered • • • • • • Entry Modes Abc and ABC Modes Word Mode Number Entry Symbol Entry Quick Text This section describes how to select the desired entry modes and how to use predictive text entry mode. Entry Modes Your device offers six entry modes: Word, Abc, ABC,123, Symbols, and Quick Text. The following rules apply: • To delete a character, press the Clear Key ; to delete a word, press and hold the Clear Key .
Media Center Section 5: Media Center Topics Covered • • • • • • • • • • Media Center Tunes & Tones Pictures Games Mobile Web Browse & Download Extras Info Calls while Downloading an Application Security and Functionality This section describes how to download ringtones, sounds, pictures, games, and extras. It also describes how to take, record, and store pictures, sounds, and ringtones with your device.
Pictures Pictures Take a Picture Your device may not include camera functionality. 1. From Idle Mode, with the flip open, press the Camera Key . 2. To take a picture, press the Key (TAKE). 3. The picture can be saved to your device, sent in a picture message, or deleted. • To save the picture to My Pictures, press the Left Soft Key (Save). • To send the picture in a picture message, press the Key (SEND), complete the message, and then press the Key (SEND).
Browse & Download Tip: From Idle Mode, to quickly access Mobile Web, press the Directional Key up. Browse & Download Get New Applications This menu allows you to download applications. You pay per application at the time of download. Airtime or megabyte charges (depending on your price plan) may apply while browsing for, downloading, using or even removing an application. Contact Verizon Wireless for more information about pricing. 1. Press the Key (MENU), and then press Media Center. 2.
Security and Functionality Security and Functionality Your device supports a digital rights management system to protect acquired content. Content such as ringtones may be protected and associated with certain usage rules. Usage rules are defined in the content activation key that can be delivered with the content or delivered separately. You may be able to update the activation key. Always check the delivery terms of any content and activation key before acquiring them, as they may be subject to a fee.
Messaging Section 6: Messaging Topics Covered • • • • • • • • • Messaging Text Messages Picture or Voice Messages Message Folders Voicemail Email Messages Chat Blogs Message Settings This section describes how to send different types of messages. It also describes other messaging features. Messaging Your device supports text, picture, voice messages, chat, blog, and email.
Picture or Voice Message TXT message options To customize a new text message, press the Right Soft Key (Options) when the cursor is in the Text: field, select from the following, and then press the Key: Insert Quick Text — Insert text from the Add Quick Text gallery into your message. See the Quick Text option under "Message Settings," p. 22. Save As Draft — Save your message in the Drafts folder. Add — Include a graphic, sound clip, or name card in your message. Priority Level — Set the priority level.
Voicemail Voicemail Receive a Voicemail Message When you receive a new voicemail message, the device displays a voicemail notification. To listen to the message, select Listen Now and follow the voice prompts to access your voicemail box. To listen to your voicemail at another time, select Listen Later. The Voicemail Indicator will appear at the bottom of the display. Listen to a Voicemail Message 1. Press the Key (MENU), and then press Messaging. 2.
Message Settings Picture Auto Receive — Select whether to save incoming picture messages automatically. If set to Off, you can select Reject to refuse to receive the message. Quick Text — View and edit Quick Text entries, which are short, prewritten messages that can be recalled and inserted into a text message. The gallery of preloaded and user-defined Quick Text entries is displayed. To add an entry, press the Right Soft Key (Options), select New, enter the text, and then press the Key (SAVE).
Get New Applications Section 7: My Ringtones Topics Covered • Get New Applications • Apply a Ringtone • Play a Ringtone This section describes how to download ringtones, and how to set your favorite music as a ringtone, a contact ID for a particular contact, or the alert sounds for incoming messages. Get New Applications 1. Press the Key (MENU), and then press My Ringtones. 2. To download new applications, press Get New Applications, and then press on-screen prompts. Get New Applications.
View a Picture Section 8: My Pictures Topics Covered • View a Picture • Delete a Picture • Other Options This section describes how to download pictures. It also describes how to set a picture as a wallpaper or contact ID for a particular contact. View a Picture 1. Press the Key (MENU), and then press My Pictures. 2. Scroll to a picture, and then press the Key (VIEW). Delete a Picture 1. Press the Key (MENU), and then press My Pictures. 2. Scroll to a picture, and then press the Left Soft Key (Erase).
Bluetooth Section 9: Bluetooth Topics Covered • • • • • Bluetooth Bluetooth Wizard Activate or Deactivate Bluetooth Connectivity Pair Bluetooth Settings Bluetooth Bluetooth technology enables wireless connections between electronic devices within a range of 10 meters (33 feet). It can be used to send images, gallery files, or to connect to other devices using Bluetooth technology, such as computers. You can synchronize your device and your PC using Bluetooth connectivity.
Bluetooth Settings Bluetooth Settings 1. Press the Key (MENU), and then press Bluetooth. 2. To configure the Bluetooth settings, press the Right Soft Key (Options), and then select from the following: Bluetooth Wizard — Activate the Bluetooth wizard. My Phone Name — Enter a customized name for your device. Discovery Mode — Allow other devices to see your device. Supported Profiles — Display a list of supported Bluetooth profiles. Scroll to a profile, and press Key (VIEW) to see the details.
Create New Contacts Section 10: Contacts Topics Covered • • • • • • • Create New Contacts Contact List Backup Assistant Groups Speed Dials Emergency Contacts My Name Card This section describes how to manage and use your contacts by storing their names, numbers, and other information. Create New Contacts Create a New Contact 1. 2. 3. 4. Press the Key (MENU), and then press Contacts. Press New Contact. Enter the name of the contact in the Name: field.
Backup Assistant View a Contact Entry 1. Press the Key (MENU), and then press Contacts. 2. Press Contact List. 3. Scroll to a contact, and then press the Key (VIEW). • To delete the contact, press the Left Soft Key (Erase). • To modify the contact information, press the Key (EDIT). • To send a message, or to call the contact, press the Right Soft Key Options), and then select the appropriate option.
Speed Dials Rename a Group 1. 2. 3. 4. Press the Key (MENU), and then press Contacts. Press Groups. Scroll to the group you want to rename (except the default groups), and then press the Right Soft Key (Options). Press Rename, edit the group name, and then press the Key (SAVE). Erase a Group 1. 2. 3. 4. Press the Key (MENU), and then press Contacts. Press Groups. Scroll to the group you want to erase (except the default groups), and then press the Right Soft Key (Options).
My Name Card Tip: When you have assigned ICE contacts and your device is locked, press the Left Soft Key (In Case of Emergency) to view the emergency information without unlocking the device. Add a New ICE Contact You can set up to three contacts as your In Case of Emergency (ICE) contacts. You can call ICE contacts even if your device is locked. See "Security," p. 37. A contact can only be assigned as one ICE contact.
VZ Navigator Section 11: VZ Navigator Topics Covered • VZ Navigator VZ Navigator VZ Navigator supports GPS-related service, helping you find your way. With VZ Navigator, you can get your current location, or get directions from your current location to a selected address. 1. Press the Key (MENU), and then press VZ Navigator. 2. Follow the voice instructions to download navigator applications. To use this service, you must select Location On in the Location settings. See "Location," p. 37.
My Verizon Section 12: Settings Topics Covered • • • • • • • • My Verizon Sounds Settings Display Settings Phone Settings Call Settings Memory Phone Information Set-up Wizard This section describes how to define settings for your device. My Verizon My Verizon connects to the Verizon Wireless Mobile Web, which allows you to browse the web from your device. For more information, see "Mobile Web," p. 17. Sounds Settings You can adjust volumes and assign sounds to phone calls and alarms. Easy Set-up 1.
Display Settings Digit Dial Readout You can set the device to read the number automatically when you press the corresponding digit. 1. Press the Key (MENU), and then press Settings & Tools. 2. Press Sound Settings, and then press Digit Dial Readout. 3. Scroll to On, and then press the Key. Service Alerts 1. Press the Key (MENU), and then press Settings & Tools. 2.
Display Settings ERI Banner — Displays ERI text over your personal banner, alerting you to the current cellular status (network service). Backlight 1. Press the Key (MENU), and then press Settings & Tools. 2. Press Display Settings, press Backlight, and then select Display or Keypad to set how long the display or keypad backlight remains on before dimming. Select from 7 seconds, 15 seconds, 30 seconds, Always On or Always Off (for Display only), and then press the Key (SET). Wallpaper 1.
Phone Settings Dial Fonts 1. Press the Key (MENU), and then press Settings & Tools. 2. Press Display Settings, and then press Dial Fonts. 3. Scroll to Normal or Large Only, and then press the Key. Menu Font Size 1. Press the Key (MENU), and then press Settings & Tools. 2. Press Display Settings, and then press Menu Font Size. 3. Scroll to Normal or Large, and then press the Key. Clock Format 1. Press the Key (MENU), and then press Settings & Tools. 2.
Phone Settings To change the shortcuts, do the following: 1. Press the Key (MENU), and then press Settings & Tools. 2. Press Phone Settings, and then press Set Shortcuts. 3. Press Set My Shortcuts, or Set Directional Keys, scroll to the shortcut or the Directional Key to be assigned, and then press the Key (SET). 4. Scroll to the desired application, and then press the Key. Voice Commands Settings 1. Press the Key (MENU), and then press Settings & Tools. 2.
Call Settings Phone Lock Setting — Select from Unlocked or On Power Up. For On Power Up, only emergency calls, answering incoming calls, and functions of viewing personal information under ICE Contact List are available. To disable this setting, select Unlocked. Lock Phone Now — Lock the device with the security code. When the device is locked, you must enter your lock code to use the device again. Restore Phone — Reset phone settings to factory defaults. System Select 1.
Call Settings TTY Mode A phone with teletype/telecommunication support for the deaf (TTY/TDD) can translate typed characters to voice. Voice can also be translated into characters and displayed on the TTY device. To attach a TTY device, do the following: 1. Press the Key (MENU), and then press Settings & Tools. 2. Press Call Settings, press TTY Mode, and then select from the following: TTY Full — Activate full TTY capability. TTY + Talk — Activate TTY in voice carry-over (VCO) mode.
Memory Memory You can monitor the amount of phone memory you are using for file storage. 1. Press the Key (MENU), and then press Settings & Tools. 2. Press Memory, and then select from the following: Memory Usage — Display the total used and available memory (in kB or MB, depending on the file size). My Pictures, My Ringtones, or My Sounds — Display the size of each picture, ringtone, or sound clip in the My Pictures, My Ringtones, or My Sounds folder. My Contacts — View the Contact List.
Voice Commands Section 13: Tools Topics Covered • • • • • • • • Voice Commands Calculator Calendar Calendar Preview Alarm Clock Stopwatch World Clock Notepad This section describes how to use the Voice Commands, calculator, tip calculator, converter, calendar, calendar preview, alarm clock, stopwatch, world clock, and notepad. Voice Commands You can call contacts and carry out device functions by giving a voice command. Voice Commands are language-dependent, and you must set the recognition language.
Calculator Calculator Basic Calculator The calculator allows you to perform simple mathematical calculations using your device. 1. Press the Key (MENU), and then press Settings & Tools. 2. Press Tools, press Calculator, and then press Basic Calculator. 3. Enter the first number of the calculation by using the Alphanumeric Keypad. • To change a number to a negative, press . • To insert a decimal point, press . 4.
Calendar Preview Add a New Event 1. Press the Key (MENU), and then press Settings & Tools. 2. Press Tools, and then press Calendar. 3. Scroll to the required event date, press the Left Soft Key (Add), and then adjust the following as necessary: • Enter the event title, start and end date, and start and end time by using the Alphanumeric Keypad.
Stopwatch Set an Alarm 1. Press the Key (MENU), and then press Settings & Tools. 2. Press Tools, and then press Alarm Clock. 3. Select Alarm 1, Alarm 2, or Alarm 3, press the Key, and then select from the following: • Scroll left or right to activate the alarm in the Set on/ Set off field. • To enter the time of the alarm, scroll to the Set Time field, enter a time by using the Alphanumeric Keypad, and press the Left Soft Key to select either AM or PM.
Accessories Section 14: Accessories For availability of approved accessories, please check with your dealer. When you disconnect the power cord of any accessory, grasp and pull the plug, not the cord. Warning: Use only batteries, chargers, and accessories approved by Nokia for use with this particular model. The use of any other types may invalidate any approval or warranty, and may be dangerous.
Nokia Battery Authentication Guidelines Section 15: Battery and Charger Information Your device is powered by a rechargeable battery. The battery intended for use with this device is BL-4C. Nokia may make additional battery models available for this device. This device is intended for use when supplied with power from the following chargers: AC-6U and AC-10U. The exact charger model number may vary depending on the type of plug.
Talk, Standby, and Changing Times What if your battery is not authentic? If you cannot confirm that your Nokia battery with the hologram on the label is an authentic Nokia battery, please do not use the battery. Take it to the nearest authorized Nokia service center or dealer for assistance. The use of a battery that is not approved by Nokia may be dangerous and may result in poor performance and damage to your device and its accessories.
Care and Maintenance Care and Maintenance Your device is a product of superior design and craftsmanship and should be treated with care. The following suggestions will help you protect your warranty coverage. • Keep the device dry. Precipitation, humidity, and all types of liquids or moisture can contain minerals that will corrode electronic circuits. If your device does get wet, remove the battery, and allow the device to dry completely before replacing it.
Additional Safety Information Additional Safety Information Small children Your device and its accessories may contain small parts. Keep them out of the reach of small children. Operating environment This device meets RF exposure guidelines when used either in the normal use position against the ear or when positioned at least 2.2 centimeters (7/8 inches) away from the body.
Potentially explosive environments Potentially explosive environments Switch off your device when in any area with a potentially explosive atmosphere, and obey all signs and instructions. Potentially explosive atmospheres include areas where you would normally be advised to turn off your vehicle engine. Sparks in such areas could cause an explosion or fire resulting in bodily injury or even death. Switch off the device at refuelling points such as near gas pumps at service stations.
Index A accessories battery . . . . . . . . . . . . . . . . . . . . . . . . . . . . . . . . . . . . . . . . . . . . . . . . . . . 8 charger . . . . . . . . . . . . . . . . . . . . . . . . . . . . . . . . . . . . . . . . . . . . . . . . . . 8 answer options . . . . . . . . . . . . . . . . . . . . . . . . . . . . . . . . . . . . . . . . . . . . 38 antenna . . . . . . . . . . . . . . . . . . . . . . . . . . . . . . . . . . . . . . . . . . . . . . . . . . . . 8 B backlight . . . . . . . . . . . . . . . . . . .
signature . . . . . . . . . . . . . . . . . . . . . . . . . . . . . . . . . . . . . . . . . . . . . . . . . . 23 silent mode . . . . . . . . . . . . . . . . . . . . . . . . . . . . . . . . . . . . . . . . . . . . . . . 34 software version . . . . . . . . . . . . . . . . . . . . . . . . . . . . . . . . . . . . . . . . . . 40 sounds alert . . . . . . . . . . . . . . . . . . . . . . . . . . . . . . . . . . . . . . . . . . . . . . . . . . . . 33 speakerphone . . . . . . . . . . . . . . . . . . . . . . . . . . .
Guía del Usuario
Manual del Usuario de Nokia 2705 Shade 9212665 Edición 1.
© 2009 Nokia. Todos los derechos reservados. Nokia, Nokia Connecting People, Navi, Shade, Xpress-On y Nokia Original Accessories son marcas comerciales o marcas registradas de Nokia Corporation. Nokia tune es una marca de sonido de Nokia Corporation. Otros nombres de productos y compañías aquí mencionados pueden ser marcas comerciales o nombres comerciales de sus respectivos propietarios.
Contenido Seguridad............................................................................................................................................................... 5 Section 1: Inicio................................................................................................................................................... 6 Retirar o volver a colocar la cubierta posterior Xpress-OnTM........................................................................................................
Configuraciones de mensajes..................................................................................................................................................................... 22 Sección 7: Mis tonos de timbre....................................................................................................................... 24 Obtener nuevas aplicaciones.......................................................................................................................................
Seguridad Seguridad Lea estas sencillas indicaciones. Su incumplimiento puede ser peligroso o ilegal. Lea todo el manual del usuario para obtener más información. ENCIENDA EL TELÉFONO EN FORMA SEGURA No encienda el dispositivo donde el uso de teléfonos móviles esté prohibido o pueda causar interferencia o peligro. LA SEGURIDAD VIAL ANTE TODO Obedezca las leyes locales. Mantenga siempre las manos libres para maniobrar el vehículo mientras conduce. La seguridad vial debe ser su prioridad cuando conduce.
Retirar o volver a colocar la cubierta posterior Xpress-On TM Section 1: Inicio Temas incluidos • • • • • • • • • Retirar o volver a colocar la cubierta posterior Xpress-OnTM Instalar o retirar la batería Retirar o volver a colocar la cubierta delantera Xpress-OnTM Encender o apagar el dispositivo Cargar la batería Antena Cómo leer este manual Solicitar ayuda Consejos ambientales Esta sección describe cómo comenzar a usar el dispositivo después de activar los servicios, cómo leer este manual y cómo comu
Insertar o retirar la batería Insertar o retirar la batería Insertar la batería 1. Con la parte posterior del teléfono orientada hacia arriba, abra levemente el teléfono. Con la uña del dedo, levante la punta de la cubierta, en la parte inferior del teléfono y tírela hacia arriba para liberarla. 2. Inserte la batería, asegurándose de que esté alineada con los contactos, y presione hasta que se ajuste en su lugar. 3.
Encender o apagar el dispositivo Encender o apagar el dispositivo Para encender o apagar el teléfono, mantenga pulsada la tecla Encender/Apagar hasta que la pantalla se encienda o se apague. Cargar la batería 1. Conecte el cargador de pared a un tomacorriente de CA. 2. Abra la tapa del Puerto accesorio y conecte el cargador de pared. 3. Desconecte el cargador del teléfono y el tomacorriente CA cuando la barra del indicador de la batería deje de desplazarse.
Solicitar ayuda Solicitar ayuda Información de soporte y contacto de Nokia Consulte www.nokiausa.com/support para Estados Unidos y www.latinoamerica.nokia.com/soporte para Latinoamérica, para obtener los manuales más recientes, información adicional, descargas y servicios relacionados con su producto Nokia. En el sitio Web, puede obtener información acerca del uso de los productos y servicios de Nokia.
Teclas y partes Sección 2: Su dispositivo Temas incluidos • • • • Teclas y partes Pantalla Modo Avión Buscar su número de teléfono Esta sección describe los componentes mecánicos básicos del dispositivo, los elementos de la pantalla, cómo activar el Modo Avión y cómo buscar su número de teléfono. Teclas y partes 1. Audífono 2. Pantalla principal 3. Tecla de dirección 4. Tecla programable derecha 5. Tecla de cámara* 6. Tecla Encender/Apagar/Finalizar 7. Teclado alfanumérico 8. Tecla de vibración 9.
Pantalla Pantalla Modo inactivo Cuando el dispositivo está listo para usarse y no ha ingresado ningún carácter, el dispositivo está en el Modo inactivo. 1. Intensidad de la señal: el número de barras que aparecen indican la intensidad de la señal recibida en el dispositivo. 2. Mensaje: pulse la tecla programable izquierda para seleccionar esta opción de menú. 3. MENÚ: pulse la tecla para acceder al Menú principal. 4. Contactos: pulse la tecla programable derecha para seleccionar esta opción de menú. 5.
Modo Avión La dirección de e-mail secundaria de un contacto. Un grupo de un contacto. Una ID de imagen de un contacto. Un tono de timbre distintivo para una persona que llama. El número de fax de un contacto. Configurar la marcación rápida para un contacto. Hay mensajes no leídos en el Buzón de entrada. Hay mensajes leídos en el Buzón de entrada. Hay mensajes de foto en el Buzón de entrada. Mensajes enviados. El mensaje se entregó correctamente. El mensaje se entregó en forma incompleta.
Realizar una llamada Sección 3: Funciones de llamada Temas incluidos • • • • • Realizar una llamada Contestar o rechazar una llamada Opciones durante una llamada Altavoz Llamadas recientes Esta sección describe cómo realizar, contestar y rechazar una llamada. También describe cómo usar el altavoz y ver los registros de llamadas. Realizar una llamada Usar el teclado Ingrese el número de teléfono (incluido el código de área, si es necesario) y pulse la tecla Enviar. Usar la lista de contactos 1.
Altavoz Lista de Contactos: busque la lista de contactos. Llmdas Rctes: revise las llamadas recientes. Menú de Bluetooth: utilice un auricular Bluetooth. Las siguientes opciones están disponibles si está conectado un audífono Bluetooth. Seleccione Audio al Teléfono para escuchar al otro participante en el dispositivo o Audio al Aparato para escuchar al otro participante en el auricular Bluetooth. Menú Principal: acceder al menú principal. Cdno Anotacns: abrir el bloc de notas.
Modos de ingreso Sección 4: Ingreso de texto Temas incluidos • • • • • • Modos de ingreso Modos Abc y ABC Modo Word Ingreso numérico Ingreso de símbolos Texto rápido Esta sección describe cómo seleccionar los modos de ingreso deseados y cómo usar el modo de ingreso de texto predictivo. Modos de ingreso El dispositivo cuenta con seis modos de ingreso: Word, Abc, ABC, 123, Símbolos y Texto rápido.
Centro de medios Sección 5: Centro de medios Temas incluidos • • • • • • • • • • Centro de medios Melodías y tonos Fotos Juegos Internet Móvil Explorar y Descargar Extras Información Llamadas durante la descarga de una aplicación Seguridad y funcionalidad Esta sección describe cómo descargar tonos de timbre, sonidos, imágenes, juegos y extras. También describe cómo tomar, grabar y almacenar imágenes, sonidos y tonos de timbre con el dispositivo.
Fotos Borrar Todo: borre todos los clips de sonido grabados automáticamente que estén guardados en el dispositivo. Info de Arch: vea el nombre, tamaño y tipo de archivo de un clip de sonido. Fotos Tomar una foto Puede que su dispositivo no incluya la funcionalidad de la cámara. 1. En el Modo inactivo, con la tapa abierta, pulse la tecla de cámara . 2. Para capturar una imagen, pulse la tecla (TOM). 3.
Internet Móvil Internet Móvil Busque las noticias que quiera o deje que lleguen a usted. Ahora, sólo se necesitan unos pocos segundos para recibir la información más reciente. Aplican cargos por tiempo de transmisión. Consulte "Servicios de red," pág. 5. Abrir Internet móvil de Verizon Wireless 1. Pulse la tecla (MENÚ) y luego pulse 2. Pulse Internet Móvil. Centro de Medios. Sugerencia: En el modo inactivo, para acceder rápidamente a Internet Móvil, pulse la tecla de dirección hacia arriba.
Llamadas durante la descarga de una aplicación Llamadas durante la descarga de una aplicación La descarga de aplicaciones se interrumpe con las llamadas de voz entrantes. Realizar una llamada de emergencia mientras está en línea Puede terminar la conexión de datos para realizar una llamada de emergencia. 1. Para finalizar la conexión, pulse la tecla Finalizar/Encender/Apagar tantas veces como sea necesario para borrar la pantalla. 2. Marque 911. 3. Pulse la tecla Enviar.
Mensajería Sección 6: Mensajería Temas incluidos • • • • • • • • • Mensajería Mensajes de texto Mensajes con imagen o voz Carpetas de mensajes Mensajes de voz E-mail Chatear Blogs Configuraciones de mensajes Esta sección describe cómo enviar diferentes tipos de mensajes. También describe otras funciones de mensajería. Mensajería Su dispositivo admite mensajes de texto, imagen, voz, chat, blog y e-mail.
Mensaje con imagen o de voz Para responder un mensaje, mientras lee el nuevo mensaje, pulse la tecla pulse la tecla (ENV). (CONTESTAR), escriba el mensaje y luego Opciones de mensaje de texto Para personalizar un nuevo mensaje de texto, pulse la tecla programable derecha (Opciones) cuando el cursor esté en el campo Texto: luego seleccione alguna de las siguientes opciones y pulse la tecla . Insertar Texto Ráp.: inserte texto desde la galería Añadir Text Rápido en el mensaje.
Carpetas de mensajes Carpetas de mensajes El dispositivo guarda los mensajes recibidos en la carpeta Buzón de entrada. La carpeta Enviado se usa para almacenar los mensajes que han sido entregados a sus destinatarios. La carpeta Borradores se usa para almacenar borradores de mensajes. Para abrir las carpetas Buzón de entrada, Enviado o Borradores, pulse la tecla programable izquierda (Mensaje), seleccione Bzn Ent, Enviado o Borradores, y luego pulse la tecla . Aparece el mensaje.
Configuraciones de mensajes Auto Borrar Entrante: seleccione si desea borrar automáticamente el mensaje más antiguo (desbloqueado) de la carpeta Buzón de Entrada cuando la memoria del dispositivo esté llena. Si está configurado en Apag, se le indicará que elimine mensajes del Buzón de entrada cuando la memoria esté llena. Tamaño Fuente de MSJ: seleccione un tamaño de letra para los mensajes en Normal o Grande. Ver TXT Autmtc: seleccione si desea ver los mensajes de texto entrantes automáticamente.
Obtener nuevas aplicaciones Sección 7: Mis tonos de timbre Temas incluidos • Obtener nuevas aplicaciones • Aplicar un tono de timbre • Reproducir un tono de timbre Esta sección describe cómo descargar tonos de timbre y cómo configurar la música favorita como tono de timbre, cómo configurar la ID de contacto para un contacto en particular o los sonidos de alerta para mensajes entrantes. Obtener nuevas aplicaciones 1. Pulse la tecla (MENÚ) y luego pulse 2.
Ver una imagen Sección 8: Mis fotos Temas incluidos • Ver una imagen • Eliminar una imagen • Otras opciones Esta sección describe cómo descargar imágenes. También describe cómo configurar una imagen como imagen de fondo o como ID de contacto para un contacto para un contacto en particular. Ver una imagen 1. Pulse la tecla (MENÚ) y luego pulse Mis Fotos. 2. Desplácese hasta una imagen y luego pulse la tecla (VER). Eliminar una imagen 1. Pulse la tecla (MENÚ) y luego pulse Mis Fotos. 2.
Bluetooth Sección 9: Bluetooth Temas incluidos • • • • • Bluetooth Asistente Bluetooth Activar o desactivar la conectividad Bluetooth Vincular Configuración de Bluetooth Bluetooth La tecnología Bluetooth permite conexiones inalámbricas entre dispositivos electrónicos dentro de un alcance de 10 metros (33 pies). Se puede utilizar para enviar imágenes, archivos de la galería o para conectarse a otros dispositivos mediante la tecnología Bluetooth, como computadoras.
Configuración de Bluetooth 5. Si corresponde, el dispositivo le pedirá la contraseña. Consulte las instrucciones del accesorio Bluetooth® (se vende por separado) para obtener la clave de acceso correspondiente (generalmente es 0000). Ingrese la clave de acceso y pulse la tecla . 6. Conectar a : (Nombre del Dispositivo) aparecerá en la pantalla. Seleccione Preguntar Siempre o Siempre Conectar y pulse la tecla . El dispositivo luego se vinculará con otro dispositivo.
Crear nuevos contactos Sección 10: Contactos Temas incluidos • • • • • • • Crear nuevos contactos Lista de contactos Backup Assistant Grupos Marcados rápidos Contactos de emergencia Tarjeta de Datos Esta sección describe cómo administrar y utilizar sus contactos mediante el almacenamiento de sus nombres, números y otra información. Crear nuevos contactos Crear un contacto nuevo 1. 2. 3. 4. Pulse la tecla (MENÚ) y luego pulse Contactos. Pulse Nuevo Contacto.
Backup Assistant Editar un ingreso de contacto 1. Pulse la tecla (MENÚ) y luego pulse Contactos. 2. Pulse Lista de Contactos. 3. Desplácese hasta un contacto deseado y luego pulse la tecla programable izquierda (Edit). Para conocer las opciones de edición, consulte "Crear nuevos contactos," pág. 28. 4. Ajuste la información según se necesite y luego pulse la tecla (GUARDAR) para actualizar la entrada del contacto. Ver un ingreso de contacto 1. Pulse la tecla (MENÚ) y luego pulse Contactos. 2.
Marcados rápidos Agregar ingresos de contacto a un grupo 1. 2. 3. 4. 5. Pulse la tecla (MENÚ) y luego pulse Contactos. Pulse Grupos. Desplácese hasta el grupo que desea, pulse la tecla (VER) y luego pulse la tecla (AÑADIR). Desplácese hasta el contacto que desea y luego pulse la tecla (MARCAR). Repita el paso anterior hasta marcar todos los contactos que desea y luego pulse la tecla programable izquierda (Hecho). Sólo puede asociar un contacto a un grupo a la vez. Renombrar un grupo 1.
Contactos de emergencia 6. Seleccione Sí cuando aparezca ¿Programar marcado rápido a contacto? , y luego pulse la tecla para ajustar. Eliminar una ubicación de marcados rápidos 1. 2. 3. 4. Pulse la tecla (MENÚ) y luego pulse Contactos. Pulse Marcados Rápidos. Desplácese hasta una ubicación de marcación rápida asignada y pulse la tecla programable derecha (Borrar). Seleccione Sí cuando Despejar marcado rápido? aparezca en pantalla y luego pulse la tecla .
Tarjeta de Datos Tarjeta de Datos Editar tarjetas de datos 1. 2. 3. 4. Pulse la tecla (MENÚ) y luego pulse Contactos. Pulse Tarjeta de Datos. Desplácese hasta cada campo y ajuste el nombre, el número o la dirección de e-mail con el teclado alfanumérico. Pulse la tecla (GUARDAR). Enviar tarjetas de datos Puede enviar y recibir tarjetas de datos entre otros dispositivos compatibles. 1. Pulse la tecla (MENÚ) y luego pulse Contactos. 2. Pulse Tarjeta de Datos. 3. Pulse la tecla programable derecha (Enviar).
Navegador VZ Sección 11: Navegador VZ Temas incluidos • Navegador VZ Navegador VZ Navegador VZ admite servicios relacionados con GPS, lo que le permite encontrar su ruta. Con VZ Navigator, puede obtener su ubicación actual o recibir indicaciones desde la ubicación actual a una dirección seleccionada. 1. Pulse la tecla (MENÚ) y luego pulse VZ Navigator. 2. Siga las instrucciones de voz para descargar las aplicaciones del navegador.
Mi Verizon Sección 12: Programación Temas incluidos • • • • • • • • Mi Verizon Configuraciones de sonido Configuraciones de pantalla Configuraciones de teléfono Configuraciones de llamadas Memoria Información de teléfono Asistente de configuración Esta sección describe cómo definir la programación del dispositivo. Mi Verizon Mi Verizon se conecta a la Internet móvil de Verizon Wireless, la cual le permite navegar por Internet desde el dispositivo.
Configuraciones de pantalla Volumen del teclado 1. Pulse la tecla (MENÚ) y luego pulse Programación y Herrs. 2. Pulse Programación de Sonidos, y luego pulse Volumen de Teclado. 3. Para configurar el volumen de los tonos de teclado, pulse la tecla de dirección hacia arriba o hacia abajo y luego pulse la tecla . Lectura de marcación de dígitos Puede configurar el dispositivo para que lea automáticamente el número cuando pulse el dígito correspondiente. 1.
Configuraciones de pantalla FORMATO RELOJ DEL.: configure el formato para el reloj frontal. Aviso Puede crear su propio saludo personalizado que aparece en el Modo de inicio o seleccionar el Aviso IRO que muestra la red a la que se suscribió. 1. Pulse la tecla (MENÚ) y luego pulse Programación y Herrs. 2. Pulse Programación Present Pant, pulse Aviso y luego seleccione alguna de las siguientes opciones: Personal Aviso: ingrese su propio título de hasta 18 caracteres.
Configuraciones de teléfono Posicionar elementos de menú 1. 2. 3. 4. 5. 6. Pulse la tecla (MENÚ) y luego pulse Programación y Herrs. Pulse Programación Present Pant y luego pulse Configuraciones menú principal. Pulse Elem. Menú Posición. Desplácese hasta el elemento de menú que desea mover y pulse la tecla (Mver). Use la tecla direccional para mover el menú a la posición que desea y luego pulse la tecla (FIJAR).
Configuraciones de teléfono Configurar accesos directos Puede asignar aplicaciones a las teclas de dirección ARRIBA, IZQUIERDA o ABAJO. Éstas se pueden abrir al pulsar las teclas correspondientes en el Modo inactivo. La tecla de dirección DERECHA se usa para acceder a MIS TECLAS DE ATAJO. Los accesos directos predeterminados se presentan en una lista como sigue: • Tecla de dirección ARRIBA: acceder a la Web móvil. • Tecla de dirección ABAJO: abrir la Agenda.
Configuraciones de llamadas Para llamadas de emergencia, el operador de la emergencia puede utilizar la información de ubicación para determinar la posición del dispositivo. Es posible que esta función no opere en todas las áreas o en todos los horarios. La operación y precisión de esta función dependen de la red, los sistemas de satélite, la agencia que recibe la información y la posición de la tapa. Mantener la tapa abierta ayuda a fortalecer la señal de la antena GPS interna. Seguridad 1.
Configuraciones de llamadas Respuesta de texto Puede enviar una respuesta de texto cuando no pueda contestar una llamada. 1. Pulse la tecla (MENÚ) y luego pulse Programación y Herrs. 2. Pulse Programación de llamada y luego pulse Respuesta TXT. • Si no desea enviar una respuesta de texto, desplácese hasta Apag. • Para enviar una respuesta de texto, desplácese hasta el campo Mensaje y luego edite el contenido del mensaje. 3. Pulse la tecla (GUARDAR).
Memoria Tonos DTMF Los tonos de multifrecuencia de doble tono (DTMF) son los tonos designados para las teclas del teclado. Puede utilizarlos para servicios telefónicos automatizados, como bancos y aerolíneas, o para ingresar su número y contraseña de correo de voz. 1. Pulse la tecla (MENÚ) y luego pulse Programación y Herrs. 2. Pulse Programación de Llamada y luego pulse Tonos DTMF. 3. Desplácese hasta Normal o Largo y luego pulse la tecla .
Comandos De Voz Sección 13: Herramientas Temas incluidos • • • • • • • • Comandos De Voz Calculadora Agenda Calendario Avance Reloj Despertador Cronómetro Reloj Mundial Cdno Anotacns Esta sección describe cómo utilizar los comandos de voz, la calculadora, la calculadora de propinas, el convertidor, la agenda, la vista previa de la agenda, la alarma, el cronómetro, el reloj mundial y el bloc de notas.
Calculadora Calculadora Calculadora básica La calculadora le permite realizar cálculos matemáticos simples en el dispositivo. 1. Pulse la tecla (MENÚ) y luego pulse Programación y Herrs. 2. Pulse Herramientas, pulse Calculadora y luego pulse Calculadora Básica. 3. Ingrese el primer número del cálculo con el teclado alfanumérico. • Para cambiar un número a un valor negativo, pulse . • Para insertar un punto decimal, pulse . 4.
Calendario Avance Agregar un nuevo evento 1. Pulse la tecla (MENÚ) y luego pulse Programación y Herrs. 2. Pulse Herramientas y luego pulse Calendario. 3. Deslácese hasta la fecha requerida para el evento, pulse la tecla programable izquierda (Añadir) y luego ajuste las siguientes opciones, si es necesario: • Ingrese el título, la fecha de inicio y término, y la hora de inicio y término del evento con el teclado alfanumérico.
Reloj Despertador Reloj Despertador Sugerencia: En el Modo inactivo, para acceder rápidamente al Reloj Despertador, pulse la tecla direccional hacia la derecha, luego pulse Reloj Despertador. Fijar una alarma 1. Pulse la tecla (MENÚ) y luego pulse Programación y Herrs. 2. Pulse Herramientas y luego pulse Reloj Despertador. 3.
Cdno Anotacns Cdno Anotacns El Cdno Anotacns le permite agregar, leer, editar o borrar notas. 1. Pulse la tecla (MENÚ) y luego pulse Programación y Herrs. 2. Pulse Herramientas y luego pulse Cdno Anotacns. • Para agregar una nota, pulse la tecla programable izquierda (Nvo), escriba el texto de la nota y luego pulse la tecla (GUARDAR). • Para ver una nota, desplácese hasta la nota y luego pulse la tecla (VER).
Accesorios Sección 14: Accesorios Comuníquese con su distribuidor para obtener información acerca de la disponibilidad de accesorios aprobados. Cuando desconecte el cable de alimentación de cualquier accesorio, sujételo y tírelo del enchufe, no del cable. Aviso: Utilice sólo baterías, cargadores y accesorios aprobados por Nokia para este modelo en particular. El uso de otros accesorios puede anular toda aprobación o garantía aplicables y puede resultar peligroso.
Normas de autenticación de baterías Nokia Sección 15: Información sobre baterías y cargadores Su dispositivo recibe alimentación eléctrica a través de una batería recargable. La batería indicada para este dispositivo es BL-4C. Es posible que Nokia tenga disponibles modelos de batería adicionales para este dispositivo. Este dispositivo está diseñado para su uso con los siguientes cargadores: AC-6U y AC-10U. Es posible que el número exacto de modelo de cargador varíe según el tipo de enchufe.
Tiempos de conversación, de reserva y de carga Completar con éxito los pasos no asegura totalmente la autenticidad de la batería. Si tiene alguna razón para creer que su batería no es una batería auténtica y original de Nokia, evite usarla y llévela al centro de servicio autorizado Nokia más cercano o a un distribuidor Nokia para solicitar asistencia. Ante la imposibilidad de verificar la autenticidad de la batería, devuélvala al lugar de compra.
Cuidado y mantenimiento Cuidado y mantenimiento Su dispositivo es un producto de diseño y fabricación superiores, y se le debe tratar con cuidado. Las siguientes sugerencias lo ayudarán a mantener la cobertura de su garantía. • Mantenga el dispositivo seco. Las precipitaciones, la humedad y todos los tipos de líquidos o humedad contienen minerales que corroen los circuitos electrónicos.
Información adicional de seguridad Información adicional de seguridad Niños pequeños Su dispositivo y los accesorios pueden contener partes pequeñas. Manténgalos fuera del alcance de los niños. Entorno operativo Este dispositivo cumple con lo establecido en las normas de exposición RF cuando se lo usa en su posición normal cerca del oído o cuando se lo coloca a una distancia mínima de 2,2 centímetros (7/8 pulgadas) del cuerpo.
Zonas potencialmente explosivas Se prohíbe el uso de dispositivos celulares a bordo de las aeronaves. Apague su dispositivo antes de abordar el avión. Su uso puede resultar peligroso para el funcionamiento del avión, interrumpir la red del teléfono móvil y puede ser ilegal. Zonas potencialmente explosivas Apague el dispositivo en áreas donde puedan producirse explosiones y obedezca todas las señales e instrucciones.
Índice A accesorios batería . . . . . . . . . . . . . . . . . . . . . . . . . . . . . . . . . . . . . . . . . . . . . . . . . . . 8 cargador . . . . . . . . . . . . . . . . . . . . . . . . . . . . . . . . . . . . . . . . . . . . . . . . . 8 accesos directos . . . . . . . . . . . . . . . . . . . . . . . . . . . . . . . . . . . . . . . . . . . 38 álbum en línea . . . . . . . . . . . . . . . . . . . . . . . . . . . . . . . . . . . . . . . . . . . . 16 altavoz . . . . . . . . . . . . . . . . . . . . . . . . . .
números ingreso de texto de . . . . . . . . . . . . . . . . . . . . . . . . . . . . . . . . . . . . . . 15 O opciones de respuesta . . . . . . . . . . . . . . . . . . . . . . . . . . . . . . . . . . . . 39 P pantalla luz de pantalla . . . . . . . . . . . . . . . . . . . . . . . . . . . . . . . . . . . . . . . . . . 36 tamaño de letra . . . . . . . . . . . . . . . . . . . . . . . . . . . . . . . . . . . . . . . . . 37 R red servicio . . . . . . . . . . . . . . . . . . . . . . . . . . . . . . . . . . . . . .