
User manual
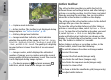
Table Of Contents
- Nokia N95 8GB User Guide
- Contents
- For your safety
- Get connected
- Useful information
- Your device
- Web browser
- Connections
- Nokia Video Centre
- Music folder
- Media folder
- Camera
- Gallery
- Positioning (GPS)
- Personalise your device
- Time management
- Messaging
- Make calls
- Contacts (phonebook)
- Applications folder
- Tools folder
- Settings
- Troubleshooting
- Battery information
- Care and maintenance
- Additional safety information
- Index

Tip: To open Gallery and view the pictures you
have taken, press
on the side of your
device twice.
To activate the front camera, select Options > Use
secondary camera. To take a picture, press the scroll
key. To zoom in or out, scroll up or down.
To leave the camera open in the background and use
other applications, press
. To return to the camera,
press and hold the capture key.
After taking a picture
Select the following from the active toolbar (available
only if you select Show captured image > On in the
still image camera settings):
● If you do not want to keep the image, select
Delete (
).
● To send the image using a multimedia message, e-
mail, or other connection methods, such as
Bluetooth connectivity, press the call key, or select
Send (
). See "Write and send messages", p. 72.
This option is not available during an active call.
You can also send the image to a call recipient during
an active call. Select Send to caller (
) (only
available during an active call).
● To tag images to the print basket for later printing,
select Add to Print basket (
).
● To send the image to a compatible online album,
select
(available only if you have set up an
account for a compatible online album).
See "Share
images and videos online", p. 59.
To zoom in an image after taking it, press
to
open the image in Gallery, and select the zooming
option from the options list.
To use the image as wallpaper in the active standby,
select Options > Set as wallpaper.
To set the image as a call image for a contact, select
Options > Set as contact call img. > Assign to
contact.
To return to the viewfinder to capture a new image,
press the capture key.
Flash
The flash is available only in the main camera.
Keep a safe distance when using the flash. Do not use
the flash on people or animals at close range. Do not
cover the flash while taking a picture.
The camera of your device has an LED flash for low light
conditions. The following flash modes are available for
the still image camera: Automatic (
), Red-eye ( ),
On (
), and Off ( ).
To change the flash mode, in the active toolbar, select
the desired flash mode.
50
Camera