
User manual

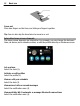

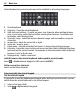
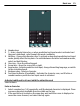

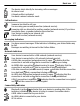
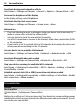
Table Of Contents
- Nokia N8–00 User Guide
- Contents
- Safety
- Get started
- Keys and parts
- Change the volume of a call, song, or video
- Lock or unlock the keys and screen
- Insert or remove the SIM card
- Insert or remove the memory card
- Charging
- Antenna locations
- Attach the wrist strap
- Headset
- Switch the device on or off
- Use your device for the first time
- Copy contacts or pictures from your old device
- Device set-up
- Use the in-device user guide
- Install Nokia Ovi Suite on your PC
- Basic use
- Personalization
- Telephone
- Call a phone number
- Search for a contact
- Call a contact
- Make a conference call
- Use 1-touch dialing
- Use your voice to call a contact
- Make calls over the internet
- Call the last dialed number
- Record a phone conversation
- Turn to silence
- View your missed calls
- Call your voice mailbox
- Forward calls to your voice mailbox or another phone number
- Prevent making or receiving calls
- Allow calls only to certain numbers
- Video sharing
- Contacts
- About Contacts
- Save phone numbers and mail addresses
- Save a number from a received call or message
- Contact your most important people quickly
- Set a ringtone for a specific contact
- Send your contact information using My Card
- Create a contact group
- Send a message to a group of people
- Copy contacts from the SIM card to your device
- Back up your contacts to Ovi by Nokia
- Messaging
- Internet
- Social networks
- About Social
- See your friends' status updates in one view
- Post your status to social networking services
- Link your online friends to their contact information
- See your friends' status updates on the home screen
- Upload a picture or video to a service
- Share your location in your status update
- Contact a friend from a social networking service
- Add an event to your device calendar
- Camera
- Your pictures and videos
- Videos and TV
- Music and audio
- Maps
- Time management
- Office
- Connectivity
- Device management
- Find more help
- Access codes
- Troubleshooting
- Protect the environment
- Product and safety information
- Copyright and other notices
- Index

Virtual keyboard in portrait mode may not be available in all writing languages.
1 Virtual keyboard
2 Close key - Close the virtual keyboard.
3 Shift and caps lock key - To enter an upper case character when writing in lower
case, or vice versa, select the key before entering the character. To activate caps
lock mode, select the key twice.
4 Character range - Select the desired character range, such as numbers or special
characters.
5 Arrows keys - Move the cursor left or right.
6 Space bar - Insert a space.
7 Input menu - Activate predictive text input, or change the writing language.
8 Enter key - Move the cursor to the next row or text input field. Additional functions
are based on the current context. For example, in the web address field of the web
browser, it acts as the Go icon.
9 Backspace key - Delete a character.
Switch between the virtual keyboard and keypad in portrait mode
Select
> Alphanumeric keypad or Full screen QWERTY.
Add an accent to a character
Select and hold the character.
Enter text with the virtual keypad
Use the virtual keypad
If you prefer to use the alphanumeric keypad when writing in portrait mode, you can
switch from the virtual keyboard to the virtual keypad.
1 Select a text input field.
2 Select
> Alphanumeric keypad.
24 Basic use