User Guide Lumia 950 Issue 1.
User Guide Lumia 950 Contents For your safety 4 Text input 53 Get started 5 Clock and calendar 58 Keys and parts 5 Browse your SIM apps 62 Insert the SIM and memory card 5 Store 62 Remove the SIM and memory card 8 People & messaging 66 Turn the phone on 10 Calls 66 Lock the keys and screen 11 Contacts 68 Charge your phone 12 Social networks 71 Change the volume 13 Messages 72 Connect the headset 15 Email 76 Antenna locations 16 Camera 81 Your first Lumia? 17 Op
Troubleshoot internet connection issues 94 Find your model number and serial number (IMEI) 131 Entertainment 96 Product and safety info 131 Watch and listen 96 Sync music and videos between your phone and computer 98 Games 99 Lifestyle apps and services 102 Office 104 Work with Word 104 Work with Excel 105 Work with PowerPoint 105 Write a note in OneNote 106 Use your phone like a PC with Continuum 107 Connect devices with Continuum 108 Work with Continuum 108 Use the calculat
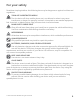
For your safety Read these simple guidelines. Not following them may be dangerous or against local laws and regulations. TURN OFF IN RESTRICTED AREAS Turn the device off when mobile phone use is not allowed or when it may cause interference or danger, for example, in aircraft, in hospitals or near medical equipment, fuel, chemicals, or blasting areas. Obey all instructions in restricted areas. ROAD SAFETY COMES FIRST Obey all local laws. Always keep your hands free to operate the vehicle while driving.
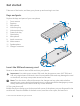
Get started Take care of the basics, and have your phone up and running in no time. Keys and parts Explore the keys and parts of your new phone. 1 2 3 4 5 6 7 8 9 Front camera Earpiece Microphone Volume up key Volume down key Power/Lock key Camera key Microphone Audio connector 10 11 12 Main camera Speakerphone Charger connector Insert the SIM and memory card Read on to learn how to insert a SIM card into your phone. Important: Your device uses a nano-SIM card, also known as a nano-UICC SIM card.
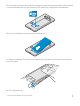
4 :3 12 Do not use any tools, as they may damage the phone. 3. If the battery is in, put your fingernail in the recess on its top edge, and lift it out. 4. Slide the nano-SIM card into the SIM slot with the metal contact area down until it locks into place. © 2015 Microsoft Mobile. All rights reserved.
5. If you have a memory card, slide the card into the memory card slot until it locks into place. It is recommended that you use a fast microSD card from a well-known manufacturer. 6. Line up the battery contacts, and put the battery in. 7. Press the top edge of the back cover against the top edge of your phone, and snap the cover into place. 8. Turn your phone on. © 2015 Microsoft Mobile. All rights reserved.
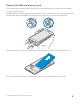
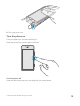
Remove the SIM and memory card Got a new SIM or memory card? Learn how to remove the previous card from your phone. 12 :3 1. Turn your phone off. 2. With the phone facing up, at the bottom left corner of the phone, put your fingernail in the small recess. Press the middle of the back cover, bend the cover open, and remove it. 4 3. If the battery is in, put your fingernail in the recess on its bottom edge, and lift it out. 4.
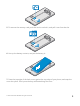
5. To remove the memory card, push the card to unlock it, and pull it out from the slot. 6. Line up the battery contacts, and put the battery in. 7. Press the top edge of the back cover against the top edge of your phone, and snap the cover into place. Don't press the keys while attaching the cover. © 2015 Microsoft Mobile. All rights reserved.
8. Turn your phone on. Turn the phone on Turn your phone on, and start exploring it. Press the power key until the phone vibrates. Turn the phone off Press and hold the power key, and drag the lock screen down. © 2015 Microsoft Mobile. All rights reserved.
Lock the keys and screen If you want to avoid accidentally making a call when your phone is in your pocket or bag, you can lock your keys and screen. You can also set the keys and screen to lock automatically. To lock your keys and screen, press the power key. Unlock the keys and screen Press the power key, and drag the lock screen up. Tip: If you can hide your navigation bar, you can also lock your keys and screen by double-tapping the bar.
tap All settings > Personalization > Lock screen, and turn Double-tap the navigation bar to turn off the screen on . Set the keys and screen to lock automatically Swipe down from the top of the screen, tap All settings > Personalization > Lock screen, and under Screen times out after, select the length of time after which the keys and screen are locked automatically. Charge your phone Learn how to charge your phone.
You don't need to charge the battery for a specific length of time, and you can use the phone while it's charging. If the battery is completely discharged, it may take several minutes before the charging indicator is displayed. Tip: You can use USB charging when a wall outlet is not available. Data can be transferred while charging the device. The efficiency of USB charging power varies significantly, and it may take a long time for charging to start and the device to start functioning.
If you have connected headphones, the volume keys control both ringtone and media volume at the same time. The maximum volume level is 30. Change the volume for media and apps Press a volume key on the side of your phone to see the volume status bar, tap , and tap the volume bar for media and apps to set the volume you want. The maximum volume level is 30.
Tip: Don’t want to keep your phone in silent mode but can’t answer right now? To silence an incoming call, press the volume down key. Turn the vibration on If you want your phone to vibrate, press a volume key on the side of your phone, tap on the volume status bar, and tap Vibrate off. To turn the vibration off, tap Vibrate on. Tip: To change other sound settings, swipe down from the top of the screen, and tap All settings > Personalization > Sounds.
Antenna locations Learn where the antennas are located on your phone to get the best possible performance. Avoid touching the antenna area while the antenna is in use. Contact with antennas affects the communication quality and may reduce battery life due to higher power level during operation. The antenna areas are highlighted. © 2015 Microsoft Mobile. All rights reserved.
Your first Lumia? Let’s get started. Set up your new phone, explore your phone’s views and menus, and learn how to use the touch screen. Learn more about your phone When you want to learn more about your phone, or if you're unsure how your phone should work, there are several support channels for you to check. To help you get the most out of your phone, you can explore www.microsoft.com/mobile/ support.
• • • • • Xbox Groove and Movies & TV OneDrive Hotmail Outlook You can use the same username and password on your computer and phone. 1. Turn your phone on, and follow the instructions shown on your phone. 2. When asked, create a Microsoft account. If you already have an account for Microsoft services, such as Xbox Live, Hotmail, or Outlook, or you have created a Microsoft account on your Surface tablet or Windows PC, sign in with that username.
1. To see all the apps on your phone, on the start screen, simply swipe left. To return to the start screen, swipe right. Tip: To go back to the start screen from any view, tap the start key . The apps menu is the home to all your apps – in neat alphabetical order. All the installed apps end up here. To look up an app in the apps menu, tap the search bar at the top of the screen, or tap a letter. © 2015 Microsoft Mobile. All rights reserved.
Recently installed apps show up at the top of the apps menu. 2. To add an app shortcut to your start screen, in the apps menu, tap and hold the app, and tap Pin to Start. Check notifications and change settings quickly Swipe down from the top of the screen. In the action center, you can quickly see notifications, such as your missed calls and unread emails and messages, open the camera, and access all phone settings. © 2015 Microsoft Mobile. All rights reserved.
Navigate inside an app There’s more to your apps than meets the eye. To find more views in an app, swipe left. To discover more actions, use the options menu. In most apps, to go to another view, swipe left. Tip: To switch between views, you can also tap the tab heading at the top of the screen. Find more options in an app or . Tap In the options menu, you can find additional settings and actions that are not shown as icons. © 2015 Microsoft Mobile. All rights reserved.
Use the touch screen Explore your phone with a tap, swipe, or drag. Important: Avoid scratching the touch screen. Never use an actual pen, pencil, or other sharp object on the touch screen. To open an app or other item, tap the app or item. Tap and hold to open further options Place your finger on an item until the menu opens. Tap and hold to drag an item Place your finger on the item for a couple of seconds, and slide your finger across the screen. © 2015 Microsoft Mobile. All rights reserved.
Swipe Place your finger on the screen, and slide your finger in the direction you want. For example, swipe left or right between the start screen and the apps menu, or between different views in the apps. 12:34 Scroll through a long list or menu Slide your finger quickly in a flicking motion up or down the screen, and lift your finger. To stop the scrolling, tap the screen. Zoom in or out Place 2 fingers on an item, such as a map, photo, or web page, and slide your fingers apart or together.
Lock the screen orientation The screen rotates automatically when you turn the phone 90 degrees. To lock the screen in its current orientation, swipe down from the top of the screen, tap All settings > System > Display, and switch Rotation lock to On . Screen rotation may not work in all apps or views. Back, start, and search keys The back, start, and search keys help you navigate your phone. • • • • • • To see which apps you have open, tap and hold the back key .
• To switch the vibration of these keys on or off, swipe down from the top of the screen, tap All settings > Extras > Touch, and switch Vibrate when I tap the navigation keys. on or off . Changing the vibration setting for incoming calls doesn’t affect the vibration of the keys. Transfer content to your Lumia phone Learn how to transfer content to your Lumia phone.
Tip: If your old phone is a Lumia, or if you have previously backed up your contacts to your Microsoft account, to import your contacts from the service, just sign in to your account on your phone. The contacts are imported automatically. Your old phone needs to support Bluetooth. The contacts on your old phone need to be stored in the phone memory, not on the SIM. 1. On your old phone, switch Bluetooth on, and make sure the phone is visible to other devices. 2. On your new phone, tap Transfer my Data. 3.
• • • Store for Windows phones (if not already in phone) Mac App Store for an Apple Mac support.microsoft.com for your PC You need a Microsoft account to sign in to OneDrive. OneDrive may not be available for all phone models. 1. On your old phone, open the OneDrive app. 2. Upload the files you want to transfer to your new phone. You can now sign in to OneDrive with your Microsoft account to access your content on any device and download it when you need it.
Your emails, contacts, and calendar entries are automatically synced to your new phone. It may take a while before the content is available. Tip: You can also transfer photos and videos from your old phone to your new Lumia. On your Android phone or iPhone, install the Microsoft OneDrive app, sign in to the app using your Microsoft account, and add the files you want to OneDrive. For more information on how to sync your content using the Outlook app, go to support.microsoft.
Basics Learn how to get the most out of your new phone. What’s new in this release? Check some of the key things in this release at a glance. • • • • • • • • • Set up Windows Hello Beta, a biometric authentication feature, and unlock your phone with one look. Add a full-size background photo to your start screen and apps menu. Find your recently installed apps easily at the top of the apps menu. Find your settings quickly in the new setting groups.
Start screen: The animated live tiles show your missed calls and received messages, the latest news and weather forecasts, and more. Updates of your pinned contacts are shown on the tile, and you can view your contacts' details directly on the start screen. Apps menu: All your apps are listed here, all neatly ordered. If you have a lot of apps, to look one up, tap the search bar at the top of the screen. You can easily see your recently installed apps at the top of the apps menu.
Navigate the settings menu Swipe down from the top of the screen, and tap All settings. To go to a settings group, tap any settings group title, and select the group you want. To search for a particular setting, tap the search bar at the top of the screen, and start typing the name of the setting. Hide the navigation bar when you don’t need it All Lumia phones have 3 keys across the bottom:the back, start, and search key.You can hide this navigation bar from the start screen when you don’t need it.
Change the navigation bar color You can change the navigation bar color to make it pop out better, or even match your theme.Swipe down from the top of the screen, tap All settings > Personalization > Colors, and switch Apply color to navigation bar to On . Check notifications on your phone You can quickly check notifications, change some settings, or add shortcuts to some apps in the action center that opens from the top of the screen. The notification icon shows you have unread notifications. 1.
Personalize the action center Swipe down from the top of the screen, and tap All settings > System > Notifications & actions. To change a shortcut, tap the shortcut and the app you want. You can also select which notifications you want to receive and how. Use your phone in airplane mode In places where you don't want to make or receive calls, you can still access your music, videos, and offline games if you switch airplane mode on.
Single letters, combinations of letters, or combinations of letters and numbers show the type of mobile network to which you're connected. Icons that show the network connection type may vary between regions and network service providers. An EDGE data connection is open. A GPRS data connection is open. Your phone is connected to a 4G network. An LTE data connection is open. Data is transferred over a cellular data connection. Wi-Fi connection A Wi-Fi connection is active.
Accounts Learn about the different accounts on your phone and what you can do with them. Benefits of creating a Microsoft account With a Microsoft account, you can access Microsoft services with a single username and password on your computer or phone. You can also use the same username and password on your Xbox.
Create your Microsoft account Spice up your life and get more from your phone – create a Microsoft account. If you didn’t create a Microsoft account during the first start-up, you can always do it later. If you already have an Xbox Live, Hotmail.com, or Outlook.com account, or if you have created a Microsoft account on your Surface tablet or Windows PC, you don’t have to create a new one – just sign in with the username and password for that account.
You can also create or manage your account at account.microsoft.com. Add a Microsoft account to your phone If you didn’t sign in to your Microsoft account during the first start-up, you can add the account to your phone later and get your data and settings easily on all your devices. 1. Swipe down from the top of the screen, and tap All settings > Accounts > Your email and accounts > Sign in with a Microsoft account instead. 2. Sign in with your existing Microsoft account username and password.
OneDrive Learn what OneDrive is and how to use it. OneDrive cloud storage Store your stuff in the clouds. You don't need to worry about freeing memory for your favorite or new apps. OneDrive is cloud storage for all your documents, photos, and music, so you can access, share, or restore them if needed. You can also set OneDrive to back up your stuff automatically, so when you take a photo or record a video, it's copied to your cloud album.
Save a file to OneDrive Tap OneDrive > > This device . When working on a Word, Excel, or PowerPoint document, your files are saved automatically to OneDrive. You can continue working on the document right where you left it, on any device connected to your Microsoft account – just open it from OneDrive. Tip: You can also upload files stored on your memory card. Tap SD card, and select the file you want to upload.
Personalize your phone Learn how to personalize the start screen, and how to change ringtones. Personalize the start screen Make your start screen yours – choose your background photo, pin your favorite apps and much more to the start screen, or change the tile size and layout as you like. To get the most out of the space on the start screen, group apps into folders. Add a background photo 1. Swipe down from the top of the screen, and tap All settings > Start. 2.
Resize or unpin a tile To resize, tap and hold the tile, and tap the arrow icon. The tiles can be either small, medium, or wide. The bigger the tile is, the more information it can show. To unpin the tile, tap and hold the tile, and tap . Tiles are shortcuts to your apps. If you unpin the tile, the app is not deleted from your phone. © 2015 Microsoft Mobile. All rights reserved.
Group tiles into folders Tap and hold the tile, and drag and drop it on top of the tile or folder you want to group it with. To open an app from the folder, tap the folder, then tap the app you want. To change the name of the folder, tap and hold the name, and type in the name you want. To remove a folder, unpin the tiles in it. Pin an app Swipe left to go to the apps menu, tap and hold the app, and tap Pin to Start. Pin a contact Tap People, tap and hold the contact, and tap Pin to Start.
Personalize the lock screen Change the lock screen to your liking. You can, for example, have your own favorite photo in the background. Add a background photo Swipe down from the top of the screen, and tap All settings > Personalization > Lock screen. Switch Background to My picture, and tap Browse. Select a photo, adjust it to get the best possible fit, and tap . Change the background photo Swipe down from the top of the screen, and tap All settings > Personalization > Lock screen.
Change the glance screen settings To save power, your screen goes on standby when you’re not using your phone actively.With the glance screen, you can easily check the time and other lock screen content even when your screen times out. Some of the glance screen settings are not supported by all phones. 1. Swipe down from the top of the screen, and tap screen. 2. Choose the time the glance screen stays on.
As Microsoft Edge is not available in Kid's Corner, you don’t have to worry about the websites your kids visit. Go to your own start screen Press the power key twice, and swipe up on your own lock screen. If you've set a sign-in PIN, type it in. Go back to the kid's start screen On your own lock screen, swipe left, and on the kid's lock screen, swipe up.
2. To switch to silent mode, tap . Turning silent mode on does not affect your alarms and reminders. If you want to rest, make sure you don’t have any incoming alarms or reminders, or turn your phone off. Tip: Don’t want to keep your phone in silent mode but can’t answer right now? To silence an incoming call, press the volume down key. Turn silent mode off Press a volume key on the side of your phone, tap volume you want.
Cortana voice assistant Keep your busy life in check – Cortana is your personal assistant on your phone, only a word away. Cortana is not available in all regions and languages. For information on the supported languages, go to support.microsoft.com, and browse to the instructions for Windows phones.
Use Cortana If you’ve got your hands full, but need to use your phone, you can use your voice to make a call, schedule a meeting, search the web, or open an app. Cortana is not available in all regions and languages. For information on the supported languages, go to support.microsoft.com, and browse to the instructions for Windows phones. 1. Tap the search key . 2. Tap , say what you want to do, and follow the instructions shown on your phone.
Example: To check your schedule, say Open calendar. Use your phone with ease Make the fonts larger and the screen easier to view. You can also use your phone with a teletypewriter (TTY/TDD). Change the font size 1. Swipe down from the top of the screen, tap All settings > 2. Tap More options, and drag the Text scaling slider. Turn high contrast on Swipe down from the top of the screen, tap All settings > contrast, and switch High Contrast to On . Ease of Access.
Use the screen reader The screen reader reads the information on your screen aloud. Not all languages are supported, and you may need to download additional language packages. 1. Swipe down from the top of the screen, tap All settings > Ease of Access > Narrator, and switch Narrator to On . 2. To hear the names of the items on the screen, move your finger on the screen.To open an item, double-tap the item. When the screen reader is turned on, some touch screen actions, such as swipe, are disabled.
Extend battery life Get the most out of your phone while getting the battery life you need. There are steps you can take to save power on your phone. To save power: Charge wisely Always charge the battery fully. Select only the sounds that you need Mute unnecessary sounds, such as key press sounds. Swipe down from the top of the screen, tap All settings > Personalization > Sounds, and select which sounds to keep. Use wired headphones Use wired headphones, rather than the speakerphone.
Stop apps from running in the background • • Use location services selectively Use network connections selectively Turn location services off when you don’t need them. Swipe down from the top of the screen, and tap All settings > Privacy > Location, and turn Location off . • • • • • • © 2015 Microsoft Mobile. All rights reserved. Close the apps you are not using. To close most of the apps, tap and hold the back key , and tap on the apps you want to close.
Check battery use To check which apps have been eating up your battery life, swipe down from the top of the screen, and tap All settings > System > Battery saver > Battery use. Save on data roaming costs You can cut data roaming costs and save on your phone bills by changing cellular data settings. To use the optimal connection method, change the Wi-Fi, cellular data, and email download settings.
Use the on-screen keyboard Writing with the on-screen keyboard is easy. You can use the keyboard when holding your phone in portrait or landscape mode. You can write your messages by tapping the letters or by swiping through them. Tap a text box. 1 2 3 4 5 6 7 8 9 Character keys Shift key Cursor controller Numbers and symbols key Smiley key Comma key Space key Enter key Backspace key The keyboard layout can vary in different apps and languages.
Type in a number or special character Tap the numbers and symbols key. To see more special character keys, tap . Some special character keys bring up more symbols. To see more symbols, tap and hold a symbol or special character. Tip: To quickly type in a number or special character, while holding the numbers and symbol key, slide your finger to the character, and lift your finger. Tip: To put a period at the end of a sentence, and to start a new sentence, tap the space key twice.
Use keyboard word suggestions Your phone suggests words as you write, to help you write quickly and more accurately. Word suggestions may not be available in all languages. When you start writing a word, your phone suggests possible words. When the word you want is shown in the suggestion bar, select the word. To see more suggestions, swipe left. Tip: If the suggested word is marked in bold, your phone automatically uses it to replace the word you wrote.
Turn word suggestions off Swipe down from the top of the screen, and tap All settings > Time & language > Keyboard. Tap your language keyboard, and clear the Suggest text check box. Add a writing language You can add several writing languages to your keyboard and switch between the languages when writing. 1. Swipe down from the top of the screen, and tap All settings > Keyboard > Add keyboards. 2. Select the languages you want to write in, and tap .
Remove a language from your phone Swipe down from the top of the screen, tap All settings > Time & language > Language, tap and hold the language you want to remove, and tap Remove. Clock and calendar Keep track of time – learn how to use your phone as a clock, as well as an alarm clock, and how to keep your appointments, tasks, and schedules up to date. Set an alarm You can use your phone as an alarm clock, and even set your favorite song as your alarm tone. © 2015 Microsoft Mobile. All rights reserved.
1. Tap Alarms & Clock > . 2. Set the time, and tap . 3. Fill in the other alarm details, and tap . Tip: Too tired to fiddle with the phone much? Tap and hold the search key Cortana when you need the alarm. , and tell For the alarm to sound, your phone must be turned on. Tip: You can quickly see the time of the next active alarm if you have pinned the Alarms Clock app to the start screen. The tile size must be at least medium.
Use the countdown timer No more overcooking – use the countdown timer to measure your cooking times. 1. Tap Alarms & Clock > Timer > . 2. Set the duration, and tap > . 3. To start the countdown, tap . Tip: To pause, tap . To start the countdown again, tap See the timer in full screen Tap . To go back to the normal view, tap . . Use the stopwatch Use the stopwatch to see how you improve on the running track. 1. Tap Alarms & Clock > Stopwatch > . 2. To save your lap or split time, tap .
Example: You can create an event to a calendar you are sharing with other people, such as your work calendar, so they know when you are busy. Change your status for an event When creating an event, tap , and select the status you want. Create a private appointment When creating an event, tap > Private. The event does not show in shared calendars. Delete an appointment Tap Outlook Calendar, and tap the event and .
Browse your SIM apps If your service provider has included apps on your SIM card, here's how to find them. 1. Swipe down from the top of the screen, and tap wireless > Cellular & SIM. 2. Under the SIM, tap SIM settings. 3. Tap SIM applications. All settings > Network & Store Make your phone your own with more apps, games, and other items, some of which are free of charge. Browse Store to find the latest content for you and your phone.
The availability of Store and the selection of items available for download depend on your region. To download from Store, you need to be signed in to your Microsoft account on your phone. When you're signed in, you are offered content compatible with your phone. Many items are free of charge, but some you need to pay for with your credit card or on your phone bill. The availability of payment methods depends on your country of residence and your network service provider.
For more information on an item, contact the publisher of the item. Tip: Use a Wi-Fi connection to download large files. Tip: In the Store main view, you can see a notification at the top right corner of the screen on how many of your downloaded apps, games, and other content have updates. Tip: If your kid’s phone is running Windows Phone 8.1 or Windows 10 Mobile, you can use the My Family website to manage their game and app downloads and settings. To set up My Family, go to account.microsoft.
Troubleshoot Store issues If you can’t download a game • • • • • Check that your cellular data connection or Wi-Fi connection is turned on. The app you want to download may require more memory than available on your phone. Try freeing up some space by uninstalling apps or deleting other data, like photos. Use only a Wi-Fi connection to download large files. If My Family is set up on your phone, you may be restricted from downloading some apps. Check that the time and date are set correctly.
People & messaging Contact your friends and family, and share your files, such as photos, using your phone. Stay tuned with the latest updates to your social networking services even when on the go. Calls Learn how to make calls on your new phone and talk to your friends. Call a contact Calling your friends is quick and easy when you've saved them as contacts in your phone. 1. Tap > . 2. Tap the contact and the number, if the contact has several numbers.
Call the last dialed number Call your friend again if you forgot to say something. In the call history view, you can see information about the calls you have made and received. 1. Tap > History. 2. Tap the name or phone number. Use your voice to make a call You can use your voice to call a contact. 1. Tap and hold the search key . 2. Say Call and the contact's name. Tip: You can also use voice dialing with a Bluetooth headset. Cortana is not available in all regions and languages.
Call your voice mailbox If you've forwarded incoming calls to your voice mailbox, you can call it and listen to the messages your friends have left. 1. Tap > . If asked, type in the voice mail password you received from your network service provider. 2. You can listen or reply to voice mail messages, delete them, or record a greeting message. For the availability of the voice mailbox service, and for information on setting up how long before calls are forwarded, contact your network service provider.
Add or delete a contact Keep your friends with you. Save their phone numbers, addresses, and other information to the People app. Add a contact 1. Tap People > CONTACTS > . 2. If you're signed in to several accounts, select the account to which you want to save the contact. You cannot save a contact to your phone only, it’s always saved to an account. 3. Add the contact details, and tap . Tip: When editing a phone number, to see more special characters, tap and hold the period key.
4. Edit the contact details, and tap . Search for a contact If you need to contact a friend quickly, you don’t have to scroll through all your contacts. You can search or jump to a letter or character in the contacts list. You can also use a voice command to call or send a message to a contact. 1. Tap People > CONTACTS. 2. Tap Search, and start writing a name. The list filters as you write. Tip: Pin your most important contacts or contact groups to the start screen.
Remove a contact from a group Tap People > GROUPS. Tap the group and group. , then tap the contact and Remove from Rename a group Tap People > GROUPS. Tap the group, then tap name, and tap . Delete a contact group Tap People > GROUPS. Tap the group and and the group name. Write the new > Delete. Share a contact You can easily share a contact with your friends. 1. Tap People > CONTACTS. 2. Tap a contact and > Share Contact > . 3. Select how you want to share, and follow the instructions.
See your friends' status updates Tap People > What’s New. Comment on a friend's status update You can contact your friends by commenting on their status updates. 1. Tap People > What’s New. 2. On the post, tap . This takes you to the comment section under the post in a social networking app. Share a photo in social networking services After you take a photo, upload it to the web so all your friends can see what you're up to. 1. Tap Photos. 2. Tap the photo you want to share, and tap . 3.
Forward a message Tap Messaging. Tap a conversation, tap and hold the message you want to forward, and tap forward. Before forwarding the message, you can edit what's written or add or remove attachments. Forward multiple messages Tap Messaging. Tap a conversation and > select messages, tap the check boxes that appear next to the messages, and tap to forward the messages. Read a message You can see on the start screen when you've received a message.
accordingly. Characters with accents, other marks, or some language options, take more space, and limit the number of characters that can be sent in a single message. Save an attachment Tap the attachment, such as a photo, and tap . Delete a conversation Tap Messaging > , select the conversation you want to delete, and tap . Delete a single message in a conversation Tap a conversation, tap and hold the message you want to delete, and tap delete.
Use your voice to write a message Too busy to write a message? Write and send a text message with your voice. This feature is not available in all languages. For information on the supported languages, go to support.microsoft.com, and browse to the instructions for Windows phones. You may also need to download a language package before you can use the feature.
Email You can use your phone to read and reply to email when you're on the go. Add or delete an email account If you use different email addresses for business and leisure, no problem – you can add several different accounts to your phone’s Outlook inbox. Add your first account To set up email in your phone, you must be connected to the internet. If you are signed in to your Microsoft account, the Outlook mailbox associated with it is added automatically. 1. Tap Outlook Mail. 2.
Tip: To add your Exchange work email, contacts, and calendar to your phone, select Exchange as your account, write your work email address and password, and tap Sign in. Your new account is added to your Outlook inbox. Delete an account Tap Outlook Mail > > Accounts and the account you want to delete. You can’t remove the Outlook inbox that’s associated with your Microsoft account. If you want to remove the inbox (for example, if you’re going to sell your phone), you must reset your phone.
You can pin several mailboxes to the start screen. For example, dedicate a tile for business email and another for personal email. 1. Tap Outlook Mail > . 2. Tap and hold the account you want to pin to your start screen, and tap Pin to start. Your mailbox appears on the start screen as a new tile. To read your email, tap the tile. Send email Don't let your email pile up. Use your phone to read and write email on the go. 1. Tap Outlook Mail. 2. In your inbox, tap . 3.
Read email If you’re waiting for important news, you don’t have to wait until you’re at your desk. Use your phone to read your emails. You can see when you have new email on the start screen. 1. Tap Outlook Mail. 2. In your inbox, tap the email. Unread email is marked in a different color. Tip: To zoom in or out, place 2 fingers on the screen, and slide them together or apart. Tip: If an email contains a web address, tap it to go to the website.
Delete email When your mailbox is overflowing, delete some mails to free up space in your phone. 1. In your mailbox, tap to the left of the emails you want to delete. 2. Tap the check boxes that appear next to the emails, and tap . All the emails you selected are deleted. Depending on your email account, the email may be deleted from your email server, too. Delete one email Open the email, and tap .
Camera Why carry a separate camera if your phone has all you need for capturing memories? With your phone camera, you can easily take photos or record videos. Open your camera quickly Make sure you get to your camera in a flash when you need it – use the shortcut in the action center. If your phone has a camera key, it is the fastest way to start snapping. Swipe down from the top of the screen, and tap Camera. Tip: If the Camera shortcut is not visible, tap Expand.
Tip: To see the screen at its best, make sure you're not covering the light sensor. Keep a safe distance when using the flash. Do not use the flash on people or animals at close range. Do not cover the flash while taking a photo. Record a video Besides taking photos with your phone, you can also capture your special moments as videos. 1. Tap Camera. 2. To switch from photo to video mode, tap . 3. To zoom in or out, slide your fingers apart or together. 4. To start recording, tap . The timer starts to run.
2. Check that Location is switched to On location. , and that your camera is allowed to use your Location info can be attached to a photo or video, if your location can be determined using satellite or network methods. If you share a photo or video that contains location information, the location information may be shown to those who view the photo or video. You can turn off geotagging in the phone settings.
The photos you take from now on are taken in timer mode. 4. To take the photo, tap . Turn timer mode off Tap Camera > > Photo timer > . Pick the best exposure with bracketing If the lighting conditions are challenging, use bracketing mode to capture several photos at once with different exposure settings. Then you can choose the best shot among them. When exposure bracketing is used, the camera takes several photos at once, some of them brighter, some darker.
Photos and videos Here's how you view, organize, share, and edit your photos and videos. View photos and videos Relive those important moments – view the photos and videos on your phone. 1. Tap Photos. 2. To view a photo or video you've taken, tap it. 3. To view the next photo or video, swipe left. To view the previous photo or video, swipe right. Tip: To zoom in or out, place 2 fingers on the screen, and slide your fingers together or apart.
By default, your phone uploads your photos and videos to OneDrive automatically. You can access them on any device connected to your Microsoft account. To change OneDrive settings, tap OneDrive > > . Edit a photo You can do quick edits, such as rotate and crop, to the photos you have taken. Or use autoenhance to let your phone fix your photo with just one simple tap. 1. Tap 2. Tap Photos and a photo. and an option.
Maps & navigation Explore what’s out there and how to get there. Switch location services on Use Maps to find out where you are, and save your location to the photos you take. Some apps can use your location information to offer you a wider variety of services. 1. Swipe down from the top of the screen, and tap 2. Switch Location to On . All settings > Privacy > Location. Tip: You can choose the apps that can use your location. Under Choose apps that can use your location, tap the apps you want.
Get directions to a place Get directions for walking, driving, or using public transportation – use your current location or any other place as the starting point. 1. Tap Maps > > Directions. 2. If you don't want the start point to be your current location, tap the search bar, and search for a start point. 3. Tap the second search bar, and search for a destination. The route is shown on the map, along with an estimate of how long it takes to get there. To see detailed directions, tap the information.
Delete a map Tap Maps > > Settings > Download or update maps and the map you want to remove, and tap Delete. Positioning methods Your phone shows your location on the map using a satellite positioning system, Wi-Fi, or network (Cell ID) based positioning. The availability, accuracy and completeness of the location info depend on, for example, your location, surroundings, and third party sources, and may be limited. Location information may not be available, for example, inside buildings or underground.
Internet Learn how to create wireless connections and browse the web while keeping your data costs down. Define internet connections If your network service provider charges you on a pay-as-you-use basis, you may want to change the Wi-Fi and cellular data settings to reduce your data costs. You can use different settings for roaming and at home. Important: Use encryption to increase the security of your Wi-Fi connection. Using encryption reduces the risk of others accessing your data.
Use your data plan efficiently If you’re worried about your data usage costs, your phone helps you find more efficient ways to use cellular data and track your usage. You can also cut off data connections entirely. 1. Swipe down from the top of the screen, and tap wireless > Data usage. 2. Tap set limit, and choose the values you want. All settings > Network & Web browser Catch up on the news, and visit your favorite websites. You can use Microsoft Edge in your phone to view web pages on the internet.
Open a new tab When you want to visit several websites at the same time, you can open new browser tabs and switch between them. Tap Microsoft Edge > > . Open a tab for private browsing Tap Microsoft Edge > > > New InPrivate tab. Private browsing prevents your browser from storing browsing data, such as cookies, browsing history, and temporary internet files. Switch between tabs Tap Microsoft Edge > and the tab you want.
Add a website to your favorites If you visit the same websites all the time, add them to your favorites, so you can access them quickly. 1. Tap Microsoft Edge. 2. Go to a website. 3. Tap > add to favorites. 4. Edit the name if you want to, and tap ADD. Tip: You can also pin your favorite websites to the start screen. While browsing a website, tap > Pin this page to Start. Tip: Found a website you want to read, but don’t have time right now? Add it to your reading list. Tap > Add to reading list > ADD.
A cache is a memory location that is used to store data temporarily. If you have, or have tried to, access confidential information or a secure service, requiring passwords, clear the cache after each use. Delete an individual item in your browsing history Tap Microsoft Edge > > History, tap and hold the item you want to delete, and tap delete. Search the web Explore the web and the outside world with Bing search. You can use the keyboard or your voice to write your search words. 1.
• • If you are abroad, check that you have allowed roaming. Swipe down from the top of the screen, tap All settings > Network & wireless > Cellular & SIM and the SIM, tap Properties, and check that Data roaming options is switched to roam. Connecting to the internet when roaming, especially when abroad, can raise data costs substantially. If you have installed new settings from a text message, uninstall the new settings.
Entertainment Learn how to watch videos, listen to your favorite music, and play games. Watch and listen You can use your phone to watch videos and listen to music and podcasts while on the move. Play music Listen to your favorite music wherever you are. 1. Tap Groove Music. 2. Tap the artist, album, song, genre, or playlist you want to play. Tip: To sort your tracks so you can easily find what you’re looking for, tap you want to sort. and how Tip: You can buy music for your playlists from Store.
Play a podcast Keep up with your favorite podcasts and subscribe to them on your phone. 1. Tap Podcasts. 2. Swipe to COLLECTION. 3. Tap audio or video and the podcast you want to watch or listen to. Tip: To select a certain episode of the podcast, tap Subscribe to a podcast Tap the podcast you want to subscribe to, and tap . . Tip: You can also search for a podcast by name. Play a video Have your favorite media with you while on the move – watch videos wherever you are. Movies & TV > > Videos. 1.
Listen to music wirelessly With a wireless speaker, you can listen to music in high audio quality without any cables. Wireless speakers are sold separately. The availability of accessories varies by region. 1. Swipe down from the top of the screen, and tap 2. Switch Tap to share to On . All settings > Devices > NFC. Before using NFC, make sure the screen and keys are unlocked. 3. Touch the NFC area of the speaker with the NFC area of your phone. The speaker connects to your phone automatically.
www.microsoft.com/en-us/mobile/support/product/nokia-photo-transfer-formac/. For information on which app works with which computer, see the following table: Windows Phone app Windows Lumia Windows Phone app Photo Explorer for desktop Transfer for Mac app (photos and videos only) Windows 10 x Windows 8 and 8.1 x Windows 8 RT x Windows 7 x x x x x Windows Vista/XP Mac x x Games Keep yourself entertained by downloading and playing games on your phone. © 2015 Microsoft Mobile.
Get a new game Head to Store to download and install new games on your phone. 1. Tap Store > > Games. 2. Browse the selection, and tap the game you want. 3. If the game has a price, tap the price, or if the game offers a free trial, tap Free trial to try the item for free for a limited time. If the item is free, tap Free. Tip: To uninstall a game, on the start screen, swipe left to the apps menu, tap and hold the game, and tap Uninstall.
Get more games Tap Store > > Games. Resume playing a game When you return to a game, there may be a resume icon in the game itself. If not, tap the screen. Get social with the Xbox app Tap Xbox. In the Xbox app, you can share your gaming experiences with friends. You can also check what games they’re playing, and see their posts, broadcasts, and achievements in the activity feed. If you don’t have an Xbox account yet, you can create one in the app.
Lifestyle apps and services Keep up to date with what’s going on in the world with a glance at your phone. To use the services, you need an internet connection. For information about possible data costs, contact your network service provider. Sign in to your Microsoft account to get the most out of the services. Some services may not be available in all countries or regions. Keep an eye on the stock market Find out what’s happening in the stock market with the Money app. 1. Tap Money. 2.
Follow your favorite sports Catch up with the latest sports news and results while on the go. 1. Tap Sports. 2. Tap and a category. 3. To find other categories, tap > More Sports. Tip: To easily follow your favorite sport or team, add it to My Favourites. Tap My Favourites > , and search for the sport or team. © 2015 Microsoft Mobile. All rights reserved.
Office Stay in touch with your documents while you’re travelling. Learn how to use the Office apps. Work with Word Polish your documents on the road with Word. You need a Microsoft account to edit files. Edit an existing document 1. Tap Word. 2. Tap Browse, and browse to the Word file you want to edit. 3. To zoom in or out, slide your fingers apart or together. 4. To see the page breaks on your document, tap . To go back to the full screen view, tap .
Work with Excel No need to travel to the office to check the latest figures. With Excel, you can edit your spreadsheets, create new ones, and share your work on a SharePoint site. You need a Microsoft account to edit files. Edit an existing Excel document 1. Tap Excel. 2. Tap Browse, and browse to the Excel file you want to edit. 3. To switch to another sheet tab, tap the sheet name at the bottom. 4. To add a new sheet, tap . Tip: To change the name or color of the new sheet, tap the sheet name.
Tip: To find a specific slide, tap a slide thumbnail. 4. To add a slide, tap . Tip: To zoom in or out, slide your fingers apart or together. PowerPoint saves your files automatically, so you don’t have to do it. You can find your files on OneDrive. Tip: If you want to save the document on your phone, tap for the file, tap , write a name for the file, and tap . > Save, choose the location Create a new presentation PowerPoint > New.
3. To format the text, for example, change the font or add bullets, tap the icons in the toolbar above the keyboard. Tip: To add a link, tap > , write the text to show on the link, and add the web address. Use Cortana to create a note Tap and hold the search key , and say Create a note and what you want to have in the note. This feature is not available in all regions and languages. For information on the supported languages, go to support.microsoft.
Tap Continuum, and follow the instructions to set up your connection. Connect devices with Continuum Connect your phone to a monitor, keyboard, and a mouse to use it like a PC. To connect devices with Continuum, you need Microsoft Display Dock, which is sold separately. 1. Connect your Display Dock to the power supply. 2. Connect the monitor or TV to the Display Dock with an HDMI or Display Port cable. 3. Connect the phone to the connector on the front of the Display Dock.
Tip: To quickly open the Continuum app while Continuum is connected, tap your phone’s status bar at the top of the screen. Control both displays separately Connect a mouse and keyboard using the Display Dock or wirelessly using Bluetooth. You can now control the external display’s desktop view with the mouse and keyboard while doing something else on your phone. For example, you can write a Word document on the larger display while checking messages on your phone.
Phone management & connectivity Take care of your phone and its contents. Learn how to connect to accessories and networks, transfer files, create backups, lock your phone, and keep the software up to date. Update your phone software Stay in step with the beat – update your phone software and apps wirelessly to get new and enhanced features for your phone. Updating the software may also improve your phone performance.
By default, your phone automatically downloads available updates whenever the data connection settings allow it. When your phone notifies you that an update is available, just follow the instructions shown on your phone. If your phone is short on memory, you may need to move your apps, photos, and other stuff to the memory card. Tip: By default, your phone updates your apps and other components automatically when you’re connected to a Wi-Fi network.
This device supports the IEEE 802.11 a/b/g/n standard. Note: Using Wi-Fi may be restricted in some countries. For example, in the EU, you are only allowed to use 5150–5350 MHz Wi-Fi indoors, and in the USA and Canada, you are only allowed to use 5.15–5.25 GHz Wi-Fi indoors. For more info, contact your local authorities. Close the connection Swipe down from the top of the screen, tap and hold . , and switch Wi-Fi networking to Off Tip: Your phone can connect back to the Wi-Fi network automatically.
1. Swipe down from the top of the screen, and tap 2. Switch Tap to share to On . All settings > Devices > NFC. Tip: Before using NFC, make sure the screen and keys are unlocked. Enable NFC payments Swipe down from the top of the screen, tap Tap to pay to On . All settings > Devices > NFC, and switch Connect to a Bluetooth accessory with NFC Hands busy? Use a headset. Or why not listen to music using wireless speakers? You only need to tap the compatible accessory with your phone.
Pay with your phone Forgot your wallet or purse at home? Not a problem – you can pay with your phone or use it as a ticket, if supported by your network service provider. This feature may not be available for all regions. For information on availability, contact your network service provider. The services are tied to your SIM. You must have a service subscription with your service provider and your service provider’s app installed in Wallet. 1. To activate the service, contact your network service provider.
(33 feet) of each other, although the connection may be subject to interference from obstructions such as walls or from other electronic devices. Paired devices can connect to your phone when Bluetooth is turned on. Other devices can detect your phone only if the Bluetooth settings view is open. Do not pair with or accept connection requests from an unknown device. This helps to protect your phone from harmful content. 1. Swipe down from the top of the screen, and tap and hold 2. Switch Status to On . 3.
2. Switch Status to On . 3. Tap , select the content you want to send, and tap For example, in the Photos app, tap > , select a photo, and tap Bluetooth. > Bluetooth. 4. Tap the device to connect to. You can see the Bluetooth devices within range. 5. If the other device needs a passcode, type in the passcode. The passcode, which you can make up, must be typed in on both devices. The passcode in some devices is fixed. For details, see the user guide of the other device.
Memory and storage Learn how to manage your apps, files, and other stuff on your phone. Back up and restore data on your phone Accidents can happen – so set your phone to back up your settings, such as your start screen layout, and other stuff to your Microsoft account. You need a Microsoft account to back up your phone. When you have set up your Microsoft account, your contacts and calendar events are backed up automatically and kept in sync with your Microsoft account.
Back up your music to OneDrive Tap OneDrive > > This device, select the music file you want to upload, and tap . Restore backed up data You can restore your backed up data after resetting or updating your phone software, or when setting up a new phone. Sign in to your Microsoft account, and follow the instructions shown on your phone. To reset your phone, swipe down from the top of the screen, and tap All settings > System > About > Reset your phone.
The memory card is sold separately. Select where you want to store your new apps 1. Tap Storage. 2. Under New apps will save to:, choose if you want to store your new apps to your phone memory or memory card. Move apps to the memory card Tap Storage > This Device > Apps & games, tap the app you want to move, and tap Move. You can later move the apps back to your phone from the memory card. The type of the memory card may affect how long it takes to move large files to the card.
Tip: To move or copy several files or folders at once, tap you want, and tap to move or to copy them. Share a file or folder Tap , select what you want to share, tap , select the files or folders , and select how you want to share. Delete a file or folder Tap , select what you want to delete, and tap . Copy content between your phone and computer Copy photos, videos, and other content created by you between your phone and computer.
Tip: If your computer's operating system is Windows 7, Windows 8, or Windows 8.1, you can also use the Windows Phone app for desktop. Windows 8 and Windows 8.1 install the app automatically when you connect your phone to your computer. For Windows 7, you can download it from go.microsoft.com/fwlink/?LinkID=265472.
Security Learn how to protect your phone, and to keep your data secure. Protect your phone with a sign-in PIN Set up a sign-in PIN to make sure nobody else can unlock your phone. In addition, when you have set up a sign-in PIN, your phone asks you for this short PIN instead of your Microsoft account password when you change some security settings or buy an app from Store. 1. Swipe down from the top of the screen, and tap All settings > Accounts > Sign-in options. 2.
Set your phone to lock automatically when not in use Swipe down from the top of the screen, tap All settings > Personalization > Lock screen, and under Screen times out after, set the length of time after which you phone is locked automatically. Unlock your phone with a sign-in PIN Press the power key, drag the lock screen up, and type in your sign-in PIN. Tip: If you set up Windows Hello Beta on your phone, you don’t have to type in your sign-in PIN to unlock your phone.
Unlock with one look For an easy and personal user authentication, set up Windows Hello Beta, a biometric authentication feature, and unlock your phone easily with one look. To set up Windows Hello Beta, you need to set up a sign-in PIN code on your phone. 1. Swipe down from the top of the screen, and tap All settings > Accounts > Sign-in options. 2. To set up a sign-in PIN code, under PIN, tap Add. 3. Select the time after which your phone requires sign-in. 4.
2. Under the SIM, tap SIM settings. 3. If needed, under Security, tap Use SIM PIN. 4. If needed, type in your current SIM PIN, and tap Change SIM PIN. The SIM PIN code can be 4-8 digits. Tip: If you don’t want to protect your SIM with a PIN code, in SIM settings, under Security, tap Remove SIM PIN, and type in your current PIN. Find your lost phone If you misplaced your phone, or are afraid it's been stolen, use Find My Phone to locate your phone, and lock or delete all data from it remotely.
Protect your data with device encryption Swipe down from the top of the screen, tap All settings > encryption, and switch Device encryption to On . System > Device If you selected the recommended settings while setting up your phone, device encryption is off by default. When turned on, device encryption prevents a hacker from accessing your data or getting the files they need to steal your passwords.
Choose what information your apps can access Some apps work better if they can access relevant information, such as your calendar, in your phone. You can decide what information your apps can access. 1. Swipe down from the top of the screen, and tap All settings > 2. Tap the feature, and select if you want to let apps access it. Privacy. If you turn this setting on, you can still prevent specific apps from accessing the feature. Wallet Use Wallet to collect your payment methods in one place.
PUK This is required to unblock a SIM PIN code. If the code is not supplied with your SIM card, contact your network service provider. Security code (sign-in PIN, lock screen PIN) (min. 4 digits) This helps you protect your phone against unauthorized use and verify your identity. You can set your phone to ask for a PIN when you, for example, unlock your phone, change security settings, or buy an app in Store. You can define this PIN yourself.
• If you have installed new settings from a text message, uninstall the new settings. Tap Storage > This Device > Apps & games and the new settings item, and tap Uninstall. © 2015 Microsoft Mobile. All rights reserved.
If your phone doesn't respond If your phone stops working or responding in the way you're used to, you can quickly restart it to get back on track. Try the following: • • Press and hold the power key for about 10 seconds. The phone restarts. Press and hold the volume down key and power key at the same time for about 10 seconds. The phone restarts. If your phone freezes frequently, update your phone software, or reset your phone.
Find your model number and serial number (IMEI) If you need to contact your care point or your service provider, you may need information such as the model number and the serial number (IMEI). To see the information, tap Settings > System > About > More info. You can also find the information on your phone label, which is located under the back cover. The IMEI is also visible on the original sales box.
• Handle hard drives with care. Shock, vibration, bumping, and dropping; other mishandling of the device; extreme temperatures; humidity and liquids may cause the hard drive to malfunction and data to be lost or corrupted. During extended operation, the device may feel warm. In most cases, this is normal. To avoid getting too warm, the device may automatically slow down, close apps, turn off charging, and if necessary, turn itself off.
Always keep the battery between 59°F and 77°F (15°C and 25°C) for optimal performance. Extreme temperatures reduce the capacity and lifetime of the battery. A device with a hot or cold battery may not work temporarily. Accidental short-circuiting can happen when a metallic object touches the metal strips on the battery. This may damage the battery or the other object. Do not dispose of batteries in a fire as they may explode. Obey local regulations. Recycle when possible.
Some wireless devices may interfere with some hearing aids. Your device complies with FCC rules on hearing aid compatibility. These rules require an M3 rating or higher. The M value of your device is marked on the device sales package. To determine the M-rating of your hearing aid and compatibility with this device, consult your hearing health professional. For more information about accessibility, go to www.microsoft.com/en/mobile/accessibility/hearing-aid-compatibility.
Potentially explosive environments Turn your device off in potentially explosive environments, such as near gas station pumps. Sparks may cause an explosion or fire resulting in injury or death. Note restrictions in areas with fuel; chemical plants; or where blasting operations are in progress. Areas with a potentially explosive environment may not be clearly marked.
Downloading of maps, games, music and videos and uploading of images and videos may involve transferring large amounts of data. Your service provider may charge for the data transmission. The availability of particular products, services and features may vary by region. Please check with your local dealer for further details and availability of language options. FCC notice This device complies with part 15 of the FCC rules.