Nokia Lumia 800 User Guide Issue 1.
Contents Contents Safety 4 Get started Keys and parts Back, start, and search keys Insert the SIM card Charge your phone Antenna locations Switch the phone on or off Create your accounts Windows Live ID Nokia account Copy contacts from your old phone Lock or unlock the keys and screen Headset Change the volume Access codes Set your phone to sync with your computer 6 6 7 8 9 12 12 13 14 14 15 15 16 17 17 Basics About the start screen Touch screen actions Use your phone when it's locked Switch between
Contents Entertainment Music and videos Nokia Music Marketplace Games 52 52 54 54 57 Maps & navigation Positioning and location services Nokia Maps Drive Bing Maps 58 58 59 62 65 Office Clock Calendar Microsoft Office Mobile Use the calculator 69 69 70 72 76 Connectivity & phone management Bluetooth Copy a picture or other content between your phone and PC Keep your phone software and applications up to date Back up, sync, and restore your phone Free up phone memory Remove an application from your pho
Safety Safety Read these simple guidelines. Not following them may be dangerous or illegal. For further information, read the complete user guide. SWITCH OFF IN RESTRICTED AREAS Switch the device off when cell phone use is not allowed or when it may cause interference or danger, for example, in aircraft, in hospitals or near medical equipment, fuel, chemicals, or blasting areas. Obey all instructions in restricted areas. ROAD SAFETY COMES FIRST Obey all local laws.
Safety PROTECT YOUR HEARING Listen to a headset at a moderate level, and do not hold the device near your ear when the loudspeaker is in use.
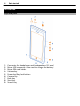
Get started Get started Keys and parts 1 2 3 4 5 6 7 8 9 Connector for headphones and loudspeakers (3.5 mm) Micro-USB connector. Also used to charge the battery.
Get started 10 11 12 13 7 Camera flash Camera lens Microphone Loudspeaker If there is protective tape on the camera lens, remove the tape. Back, start, and search keys The back, start, and search keys help you to navigate your phone. Back key Return to the previous screen Press . Your phone remembers all the apps and websites you have visited since the last time your screen was locked. Switch between open apps Press and hold , swipe left or right, and select the desired app.
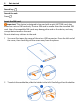
Get started Search key Search the web Press . Insert the SIM card Important: This device is designed to be used with a mini-UICC SIM card, also known as a micro-SIM card only. A micro-SIM card is smaller than the standard SIM card. Use of incompatible SIM cards may damage the card or the device, and may corrupt data stored on the card. Do not attach any stickers to the card. 1 You must first open the cover of the micro-USB connector.
Get started 9 3 Make sure the contact area is facing up, then put the card into the holder. 4 Put the card holder back into the phone, then press and slide the holder to the right. 5 Close the cover of the micro-USB connector. Remove the SIM 1 Switch the phone off. 2 Open the cover of the micro-USB connector. 3 Unlock the card holder, then carefully pull out the holder. 4 Pull the card out of the holder. If you later change your network service provider, for instructions, go to www.nokia.
Get started Do not attempt to remove the battery from the device. To replace the battery, take the device to your nearest authorized service facility. Authorized retail points may also offer a battery replacement service. Important: Only qualified personnel or an authorized service facility should replace the battery. Unauthorized battery replacement may invalidate your warranty.
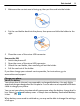
Get started 11 To avoid breaking the charger connector, be careful when connecting or disconnecting the charger cable. Charge from a computer You can use USB charging when a wall outlet is not available. Data can be transferred while charging the device. The efficiency of USB charging power varies significantly, and it may take a long time for charging to start and the device to start functioning. 1 First connect the USB cable to the computer, then to your phone.
2 Get started When the battery is full, first disconnect the USB cable from your phone, then from the computer. If the battery is completely discharged, it may take several minutes before the charging indicator is displayed or before any calls can be made. If the battery has not been used for a long time, to begin charging, you may need to connect the charger, then disconnect and reconnect it. Antenna locations Avoid touching the antenna area while the antenna is in use.
Get started 13 Switch the phone off Press and hold the power key, and drag the lock screen down. Create your accounts Your phone guides you through the initial setup when you put your SIM card in your phone and switch your phone on for the first time. To access all Windows Live and Nokia services, create your Windows Live ID and Nokia account.
Get started To create a Windows Live ID and Nokia account, you need an Internet connection. For info about possible data costs, contact your network service provider. If you can't connect to the internet, you can create the accounts later. If you already have a Windows Live ID or Nokia account, sign in with your existing username and password. Tip: Forgotten your password? You can request it to be sent to you in a mail or text message.
Get started 15 To learn more about the Nokia account and Nokia services, go to www.nokia.com/ support. To create a Nokia account later, use your phone to access a Nokia service, and you are prompted to create an account. You can also create your account at account.nokia.com. Copy contacts from your old phone Have your nearest and dearest instantly at your fingertips. Use the Contacts Transfer app to easily copy your contacts from your old phone. Your old phone needs to support Bluetooth.
Get started Lock the keys and screen Press the power key. Unlock the keys and screen Press the power key, and drag the lock screen up. Set the keys and screen to lock automatically and lock+wallpaper > Screen times out after, and select the length of Select > time after which the keys and screen are locked automatically. Headset You can connect a compatible headset or compatible headphones to your phone. Do not connect products that create an output signal, as this may damage the device.
Get started 17 Change the volume Press the volume keys up or down. The volume keys control all sounds, including the volume of alarms and reminders. The built-in loudspeaker allows you to speak and listen from a short distance without having to hold the phone to your ear. Switch the loudspeaker on or off during a call . Select Access codes PIN code (4-8 digits) This protects your SIM against unauthorized use or is required to access some features.
Basics For more information, contact Nokia Care or your phone dealer. The personal unblocking key (PUK) code and the universal personal unblocking key (UPUK) code (8 digits) are required to change a blocked PIN code and UPIN code, respectively. The PUK2 code (8 digits) is required to change a blocked PIN2 code. These codes are not supplied with the SIM card. Contact your local service provider for the codes.
Basics 19 The animated live tiles show notifications of missed calls and received messages, the latest news and weather forecasts, feeds from web TV channels, your friends' online statuses, and more. The start screen is yours to personalize. Pin contacts, apps, music, pictures, feeds, mailboxes, and other favorites, so they're always with you. When you pin contacts, their updates are displayed on the tile, and you can call them directly from the start screen.
Basics Example: To edit or delete a calendar appointment, tap and hold the appointment, and select the appropriate option. Tap and hold to drag an item Place your finger on the item for a second or two, and slide your finger across the screen. Swipe Place a finger on the screen, and steadily slide your finger in the desired direction.
Basics 21 Example: Swipe left or right between the start screen and the apps menu, or between different views in the hubs. To quickly scroll through a long list or menu, slide your finger quickly in a flicking motion up or down the screen, then lift your finger. To stop the scrolling, tap the screen. Zoom in or out Place two fingers on an item, such as a map, picture, or web page, and slide your fingers apart or together.
Basics Use your phone when it's locked You can use certain features of your phone when it is locked, without having to enter the security code. You can, for example: • • • Change how your phone notifies you about incoming calls Answer or reject an incoming call Pause or resume playing music, or skip to another song To wake up your phone, press the power key. Change how incoming calls are notified or .
Basics 23 Personalize your phone Personalize the start screen Would you like to have only the content you need on the start screen? Move or remove tiles, and pin contacts, apps, and websites to the start screen. You can also pin music and pictures, your latest mail, favorite contacts, and more. When you pin a contact, their feed updates are displayed on the tile, and you can call them directly from the start screen. Pin a contact 1 Select People. 2 Select and hold the contact, then select pin to Start.
Basics Change the background of the Pictures hub and live tile > choose background. 1 In the Pictures hub, select 2 Select a picture, adjust it to get the best possible fit, and select . Tip: If you like variety, select shuffle background, and the phone will shuffle through your pictures. Personalize your ringtone and other tones You can personalize your phone tones. Select > and ringtones+sounds. Select the type of ringtone or alert you want to change, and select the sound.
Basics 25 Text input Use the virtual keyboard To open the virtual keyboard, select a text input field. You can use the virtual keyboard when holding your phone upright or on its side. 1 2 3 4 5 6 7 8 Character keys Shift key Numbers and symbols key Smiley key Space key Language key. Only available when more than one writing language has been selected. Enter key Backspace key The keyboard layout can vary in different apps.
Basics Delete a character Select the backspace key. Switch between the writing languages Select the language key. Move the cursor Tap and hold the screen near the text, until a cursor is displayed. Without lifting your finger, drag the cursor to the desired location. To move the cursor to the next row or text input field, select the enter key. The function of the enter key can change in different apps. For example, in the web address field of the web browser, it acts as the Go icon.
Basics 27 your phone camera to scan things, such as barcodes and book and DVD covers, and get further info on what your phone recognizes. Some services may not be available in all countries, and may be provided only in selected languages. Search the web 1 Press . 2 Write your search word in the search field, then select from the proposed matches. . You can also select Tip: To see related search results, swipe to local or images. Use voice search 1 Press . 2 Select in the search field.
Basics Indicators on the status bar The status bar at the top of the screen tells you the current time, battery and signal strength, and much more. Tip: To see hidden icons, tap the status bar. Signal strength A GPRS data connection (network service) is open. An EDGE data connection (network service) is open. Your phone is connected to a 3G network (network service). An HSDPA/HSUPA data connection (network service) is open. A Wi-Fi connection is available. A Wi-Fi connection is active.
Basics 29 Increase battery life If it seems you're always looking for a charger, there are steps you can take to reduce the power consumption of your phone. The key is to find the balance between getting the most out of your phone while getting the battery life you need. • • Always charge the battery fully. Switch battery saver mode on. Tip: To check the battery status, and switch battery saver mode on, select and battery saver.
Calls Calls Call a contact On the start screen, select > and the contact and the number. Search for a contact On the start screen, select > , and start entering the contact's name. Call the last dialed number Trying to call someone, but they are not answering? It is easy to call them again. In the call history view, you can see information about the calls you have made and received. On the start screen, select Select . next to the name or phone number.
Calls 2 31 Enter the phone number in the Forward calls to field, and select save. To check if call divert is being used, indicated with , tap the top of the screen. Call divert is a network service. For details, contact your network service provider. Make a conference call Your phone supports conference calls between two or more people. The maximum number of participants varies by the network operator. Conference call is a network service. 1 2 Make a call to the first participant.
Contacts & social networking services Use your voice to call a contact You can use your voice to make calls with your phone. This feature may not be available in all languages. 1 2 Press and hold . Say Call and the contact's name. To cancel making the call, press . Tip: You can use your voice to make a phone call also through a Bluetooth headset.
Contacts & social networking services 2 3 33 If the contact has several accounts linked in the contact card, select an account. Select a contact detail, edit the fields, and select . Delete a contact > delete. 1 Select the contact and 2 If the contact has several accounts linked in the contact card, select an account and delete. The contact is deleted both from your phone and, with some exceptions, from the online service where it's stored.
Contacts & social networking services Reduce the number of visible contacts > settings > filter my contact list, and select or clear the appropriate Select check boxes. Use a voice command 1 In any view, press and hold . 2 Say Call or Text and the contact's name. Not all languages may be supported. Tip: Pin your most important contacts or contact groups to the start screen. Select and hold a contact, then select pin to Start.
Contacts & social networking services Delete a contact group Select the group and 35 > delete > delete. Link contacts Do you have contact information for the same person from different social networking services or mail accounts as separate contact entries? You can link multiple contacts so that their information is in a single contact card. Select People, and swipe to all.
Contacts & social networking services 1 2 3 4 Select your own contact card and your picture. Select your picture again, and in the Pictures hub, select a new picture. Drag the picture around to adjust the cropping, and select . To set where to update your picture, select Post to, select or clear the check boxes, and select . 5 Select . See your friends' status updates After you set up social networking services on your phone, you can follow your friends' status updates in the People hub.
Internet 37 Upload a picture to a service After you take a picture, upload it to the web so all your friends can see what you're up to. You can also set up your phone to upload pictures automatically to social networking services. Select Pictures. 1 2 3 4 Browse your photo albums for the picture you want to share. Select and hold the picture, and select share.... Select the sharing method. You can send it in a text message or mail, or upload it to social networking services. .
Internet To use the fastest available mobile connection, switch 3G connection to On . If the signal strength for a 3G network in your area is low, searching for or trying to stay connected to it can use more battery power. Mobile data access points are usually sent to you by your network service provider. You can manually add access points. Manually add a mobile data access point 1 Select cellular > add APN. 2 Enter the APN address in the APN field.
Internet Connect to a hidden Wi-Fi 1 Make sure Wi-Fi networking is switched to On 2 Select advanced > . 3 Enter the network name, and select add. 39 . Close the Wi-Fi connection Switch Wi-Fi networking to Off . Close a network connection If an app in the background is using an internet connection, you can close the connection without closing the app. Select > . Close all mobile data connections 1 Select cellular. 2 Switch Data connection to Off . Close all Wi-Fi connections 1 Select Wi-Fi.
Internet Tip: If you do not have a flat-rate data plan from your network service provider, to save data costs in your phone bill, you can use a Wi-Fi network to connect to the internet. Go to a website Write a web address in the address bar, then select . Search the internet Write a search word in the address bar, then select . Zoom in or out Place two fingers on the screen, then slide your fingers apart or together. Tip: To quickly zoom in on a section of a web page, double-tap the screen.
Messaging & mail While browsing, select 41 > add to favorites. Go to a favorite website > favorites and a website. Select Tip: You can also pin your favorite websites to the start screen. While browsing the > pin to start. website, select Messaging & mail Messages About Messaging Select .
Messaging & mail 1 Select 2 3 4 Select to add a recipient from your contacts list, or type in the phone number. You can add more than one recipient. Select the message field, then write your message. To add an attachment, select and the file. . 5 Select . Reply to a message 1 Select the conversation containing the message. 2 Select the message field, write your reply, then select . Forward a message 1 Select the conversation containing the message.
Messaging & mail 2 3 43 In the People hub, select the contact you want to chat with. You can also chat with a group of people. Write your message, then select . View a conversation You can see the messages you have sent to and received from a particular contact in a single conversation thread, and continue the conversation from that thread. The thread can contain text messages, multimedia messages, and instant messages. On the start screen, select and the conversation.
Messaging & mail View several mailboxes in a unified inbox If you have more than one mail account, you can choose which inboxes you want to link together in a unified inbox. The unified inbox lets you see all your mail at a glance. Link inboxes 1 On the start screen, select a mailbox. > link inboxes. 2 Select 3 In the other inboxes list, select the inboxes you want to link to the first one. 4 Select rename linked inbox, enter a new name, and select . The new unified inbox is pinned to the start screen.
Camera Delete a mail Open the mail, then select 45 . Delete several mails at once In the inbox, tap to the left of the mail you want to delete. Select the check boxes that appear next to the mails, then select . Tip: If a mail contains a web address, to open the address in the phone web browser, select the address. Send a mail You can use your phone to write and send mail, and attach files to your mail. On the start screen, select a mailbox. .
Camera Before using the camera, remove the protective tape from the lens. Take a picture To open the camera, press and hold the camera key. 1 2 3 To zoom in or out, select + or – in . To focus, press and hold the camera key halfway down. The focus is locked when the white rectangle stops blinking. Tip: When the focus is locked, you can keep the camera key pressed halfway down, and recompose the picture. To take the picture, press the camera key fully down.
Camera 47 Press and hold the camera key. Switch night mode on > Scenes > Night. Select Take a picture of a moving object Are you at a sports event and want to capture the action with your phone? Use sports mode to take a sharper picture of moving people. Press and hold the camera key. Switch sports mode on > Scenes > Sports. Select Camera tips Here are some tips to help you get the most out of your phone camera. • • Use both hands to keep the camera steady.
Camera Save location information to your pictures and videos If you want to remember exactly where you were when you took a particular picture or video, you can set your phone to automatically record the location. Switch location recording on > . 1 Select 2 Swipe to applications, and select pictures+camera. 3 .
Your pictures 49 Share your pictures and videos After taking a picture or recording a video you can upload it to a sharing service, such as Facebook or SkyDrive. To open the camera, press and hold the camera key. Share your picture 1 Take a picture. 2 Swipe right, tap and hold the picture, then select share.... 3 Select the sharing service, write a caption if you like, then select . Share your video 1 Record a video. 2 Swipe right, tap and hold the video, then select share....
Your pictures View a picture Tap the picture. To view the next picture, swipe left. To view the previous picture, swipe right. Zoom in or out Place two fingers on the screen, and slide your fingers together or apart. Tip: To quickly zoom in or zoom back out, tap the picture twice. View the available options Tap and hold the picture. Pictures can be sent to you in a mail or multimedia message. To view these pictures later, save them to the Pictures hub.
Your pictures 51 Upload pictures and videos to the web Want to upload your pictures and videos to a social networking service for your friends and family to see? You can do that directly from the Pictures hub, or set your phone to automatically upload pictures to SkyDrive. Select Pictures. 1 2 3 Select a picture or video to upload. Tap and hold the picture or video, and select share... and the service. or .
Entertainment Delete an album 1 Select Pictures and albums. 2 Select and hold an album, and select delete. You cannot delete online albums from your phone. Copy your pictures between your phone and PC Have you taken pictures with your phone that you want to copy to your PC? Use the Zune PC app to copy your pictures between your phone and a PC. 1 2 Use a compatible USB data cable to connect your phone to a compatible computer. On your computer, open Zune. For more information, see the Zune help.
Entertainment 53 Listen to the radio Enjoy your favorite FM radio stations on the go. Connect a compatible headset, and select antenna. and radio. The headset acts as an Go to the next or previous station Swipe left or right. Tip: If you use a shorter swiping motion, you can skip to stations that have a stronger signal. Switch between speakers and headset Select and hold the station number, and select switch to speaker or switch to headset.
Entertainment Copy music and videos from your PC Do you have media on your PC that you want to listen to or watch on your phone? Use the Zune PC app to copy music and videos to your phone, and to manage and synchronize your media collection. 1 2 Use a compatible USB data cable to connect your phone to a compatible computer. On your computer, open Zune. For more information, see the Zune help.
Entertainment • • • • • 55 Games Applications Videos Wallpapers Ringtones The selection of items available for download depends on your region. You can also: • • Get content that is relevant to your tastes and location Share recommendations with your friends To download from Marketplace, you need to be signed in to your Windows Live account on your phone. When you're signed in, you are offered content compatible with your phone.
Entertainment When you view an item, related items are also displayed. Tip: To see what others have to say about an item, select the item. You can also see a description, the price, and the size of the download. Tip: Did you find something in Marketplace that you know your friends would be interested in? You can send them a link. Select the item and share. Download a game, app, or other item Download free games, apps, or videos, or buy more content for your phone.
Entertainment 57 Tip: If you need to, for example, temporarily close your Wi-Fi connection, select and hold the downloading item, and select pause. To resume downloading, select resume. Pause pending items individually. If a download fails, you can re-download the item. Write a review for an app Do you want to share your opinion on an app with other Marketplace users? Review and rate the app. You can post one review per app that you download.
Maps & navigation Get more games Swipe to collection, scroll to the bottom, and select get more games. Tip: If you play a game a lot, to pin it to your start screen, in the collection view, select and hold the game, and select pin to Start. Accept an invitation to play a game 1 Sign in to Xbox LIVE. 2 Swipe to requests, and select the invitation. 3 If you don't have the game, but it is available in your area in Marketplace, you can either download a trial version or buy it right away.
Maps & navigation 59 satellites made by the United States government. GPS signals may not be available inside buildings or underground. Do not use GPS for precise location measurement, and never rely solely on the location information provided by GPS and cellular networks. Switch location services on Applications can use your location information to offer you a wider variety of services. Maps shows you your location and provides directions, and the camera can save your location to the pictures you take.
Maps & navigation shows your current position, if available. If your current position can't be found, shows your last known position. If accurate positioning is not available, a green halo around the positioning icon shows the general area you might be in. In densely populated areas, the accuracy of the estimate increases, and the green halo is smaller than in lightly populated areas. Browse the map Drag the map with your finger. By default, the map is oriented north.
Maps & navigation 61 All types of suggested places are shown on the map. Find suggested places elsewhere Browse to a point in the map, then select . See the details of a place Select the place pin on the map, then select the info bubble. The place card contains general info, photos, reviews, links to guides, and further suggestions of nearby places. Find certain types of nearby places > . 1 Select 2 Select , then swipe to explore. 3 Select a category tile.
Maps & navigation Get directions to a place Want to find your way easily? Get directions for walking, driving, or using public transportation (if available in your city) to a place from where you are now. Select 1 2 . Select the place icon on the map, or select and hold a point on the map, then select the info bubble. In the about view, select get directions. The route is shown on the map, along with an estimation of how long it takes to get to see the detailed directions. there.
Maps & navigation Select 63 . When you open Nokia Drive for the first time, your phone asks you if you want to download street maps for your current location and a navigation voice that matches your phone language settings. If you download the maps using your home Wi-Fi connection before you leave for your trip, you will save on data costs while traveling. 1 2 3 > Set destination, and search for your destination. Select Select your destination and DRIVE TO > START.
2 Maps & navigation Select a continent, a country, and an area if applicable, and select Install. To cancel the download, select . Remove a map Select the map, and on the map details page, select . Remove all maps > delete all > OK. Select Using services or downloading content may cause transfer of large amounts of data, which may result in data traffic costs.
Maps & navigation 65 To give feedback, you need to have an active internet connection. 1 2 3 > Feedback. Select Select how likely you are to recommend Maps to other people. You can also give your reasons. The feedback is anonymous. Select SEND. Bing Maps About Bing Maps > Maps. Select Bing Maps shows you where you are and what is nearby, and guides you where you want to go.
Maps & navigation To view the map with more realistic satellite imagery, use the aerial view. Switch the aerial view on > aerial view on. Select To return to the standard map view, select aerial view off Map coverage varies by country and region. Search for a location Maps helps you find specific locations, places of interest, and businesses. Select 1 2 3 > Maps and Enter the search word, such as a street address, business type, or place name in the search field.
Maps & navigation 67 The Local Scout service is available in Australia, France, the United Kingdom, and the United States. Tip: To use Local Scout for an area other that your current location, open Maps, search . for the area or place, and select Swipe to the following categories: eat+drink — Restaurants, bars, and other places to eat and drink in the neighborhood. see+do — Places to go and things to do nearby. shop — Different types of nearby shops.
Maps & navigation On the map, tap and hold the location. If you open the details page of a pushpin, you can easily get directions to it . the location with friends , or pin it to the start screen , share Open the details page Select the pushpin. Walk to a destination When you need to get to your destination on foot, Maps guides you with displayed turn-by-turn directions. Select > Maps. Select .
Office 69 View a saved place on the map On the details page, select the address. Delete a saved place On the details page, select . Send a place to a friend When you want to tell your friends where to meet, you can send them the address directly from Maps. Select 1 2 3 4 > Maps. Search or browse for the place. On the map, select the marker of the location. On the details page, select . To send in a text message, select Messaging. To send in a mail, select a mail account.
Office Snooze an alarm Don't want to get up just yet? When an alarm sounds, you can snooze the alarm. This pauses the alarm for a predefined length of time. When the alarm sounds, select snooze. Update the time and date automatically You can set your phone to update the time, date, and time zone automatically. Automatic update is a network service. Select > and date+time. Switch Set automatically to On .
Office 71 View a whole month In the day or agenda view, select . To go to the next or previous month, use a short swiping motion up or down on the calendar. To jump to a specific month, select the month at the top of the screen. View a specific day In the day or agenda view, select and the day. Use multiple calendars When you set up mail accounts on your phone, you can see the calendars from all your services in one place. Select > Calendar.
Office Microsoft Office Mobile About Microsoft Office Mobile > Office. Select Microsoft Office Mobile is your office away from the office. Go to the Office hub to create and edit Word documents and Excel workbooks, open and view PowerPoint slide shows, create notes with OneNote, and share documents with SharePoint. You can also save your documents to Windows SkyDrive.
Office 3 To save your document, select 73 > save. Change the text format and color . 1 Select 2 Select a word. To select several words, drag the arrows at each end to expand the selection. 3 Select and the formatting you want to use. Add a comment > . Select Search for text in a document . Select the Word file and Send a document in a mail Select the Word file and > share.... Tip: To access an important document quickly, you can pin it to the start screen.
Office Apply a filter to cells > apply filter. Select Change the cell and text format > format cell.... Select Find data from a workbook . Select the Excel file and Send a workbook in a mail Select the Excel file and > share.... Write a note Notes on paper are easy to lose. Instead of jotting them down on paper, you can write your notes with Microsoft OneNote Mobile. This way, you always have your notes with you.
Office 75 View and edit a PowerPoint presentation Add the finishing touches to your presentation en route to your meeting, with Microsoft PowerPoint Mobile. Select 1 2 3 > Office, and swipe to documents. Select a PowerPoint file, and turn your phone on its side, so it is in landscape mode. To browse between slides, swipe left or right. To go to a specific slide, select and the name of the slide. 4 To add a note to a slide, select 5 6 To edit a slide, select .
Connectivity & phone management Store a file to Windows Live Skydrive Store, access, and share your Microsoft Office files on Windows Live SkyDrive. You can upload files saved on your phone to SkyDrive for easy access from both your phone and computer. To upload files, you need to be signed in to your Windows Live account. 1 2 3 > Office, then swipe to locations. Select Select Phone. Select and hold a file, then select share. Use the calculator > Calculator.
Connectivity & phone management 77 Paired devices can connect to your phone when Bluetooth is switched on. Other devices can detect your phone only if the Bluetooth settings view is open. Do not pair with or accept connection requests from an unknown device. This helps to protect your phone from harmful content.
Connectivity & phone management Keep your phone software and applications up to date About phone software and app updates Stay in step with the beat – update your phone software and apps to get new and enhanced features for your phone. Updating the software may also improve your phone performance. Warning: If you install a software update, you cannot use the device, even to make emergency calls, until the installation is completed and the device is restarted.
Connectivity & phone management 79 Set your phone to notify you about available updates > and phone update > Notify me when new updates are found. Select Back up, sync, and restore your phone Your phone is automatically backed up during the software update, when you update the phone using the primary computer (the computer you first connected your phone to with the USB data cable). If you use a different computer to update your phone software, no backup is created.
• Connectivity & phone management Music, photos, or videos Remove an application from your phone You can remove installed applications that you no longer want to keep or use, to increase the amount of available memory. 1 2 On the start screen, select . Select and hold the application to remove, and select uninstall. You may not be able to remove some applications. If you remove an application, you can reinstall it without purchasing it again, as long as it is available in Marketplace.
Connectivity & phone management 2 81 Enter the security code. Use your phone when it's locked You can use certain features of your phone when it is locked, without having to enter the security code. You can, for example: • • • Change how your phone notifies you about incoming calls Answer or reject an incoming call Pause or resume playing music, or skip to another song To wake up your phone, press the power key. Change how incoming calls are notified or .
Support Support When you want to learn more about how to use your phone, or if you're unsure how your phone should work, read the user guide thoroughly. For support videos, go to www.youtube.com/user/NokiaSupportVideos or go.microsoft.com/fwlink/?LinkId=238503. If you have an issue, do the following: • • • Reboot your phone. Press and hold the power key for about 10 seconds. The phone switches off. To switch your phone on again, press the power key.
Product and safety information 83 During extended operation, the device may feel warm. In most cases, this is normal. If you suspect the device is not working properly, take it to the nearest authorized service facility. Recycle Always return your used electronic products, batteries, and packaging materials to dedicated collection points. This way you help prevent uncontrolled garbage disposal and promote the recycling of materials. Check how to recycle your Nokia products at www.nokia.com/recycling .
Product and safety information Do not dispose of batteries in a fire as they may explode. Dispose of batteries according to local regulations. Recycle when possible. Do not dispose as household garbage. Do not dismantle, cut, open, crush, bend, puncture, or shred cells or batteries. If a battery leaks, do not let battery liquid touch skin or eyes. If this happens, immediately flush the affected areas with water, or seek medical help.
Product and safety information • Not carry the wireless device in a breast pocket. • Hold the wireless device to the ear opposite the medical device. • Turn the wireless device off if there is any reason to suspect that interference is taking place. • Follow the manufacturer directions for the implanted medical device. 85 If you have any questions about using your wireless device with an implanted medical device, consult your health care provider.
Copyright and other notices Only qualified personnel should install the device in a vehicle. Faulty installation or service may be dangerous and may invalidate your warranty. Check regularly that all wireless device equipment in your vehicle is mounted and operating properly. Do not store or carry flammable liquids, gases, or explosive materials in the same compartment as the device, its parts, or accessories. Remember that air bags inflate with great force.
Copyright and other notices 87 longer applicable for the Wi-Fi functionality within this product and, hence, can be disregarded even if it is still present on the product. © 2011 Nokia. All rights reserved. Nokia, Nokia Care, and Nokia Connecting People are trademarks or registered trademarks of Nokia Corporation. Nokia tune is a sound mark of Nokia Corporation. Other product and company names mentioned herein may be trademarks or tradenames of their respective owners.
Copyright and other notices cause undesired operation. Your device may cause TV or radio interference (for example, when using a device in close proximity to receiving equipment). If you require assistance, contact your local service facility. Any changes or modifications not expressly approved by Nokia could void the user's authority to operate this equipment. /Issue 1.
Index Index Symbols/Numbers 3G 37 A access codes accounts airplane mode alarm clock alarms antennas applications appointments apps 17 13 28 69, 70 69, 70 12 54, 80 70 22 B background image backing up content battery — charging — saving power Bing Maps — current location — finding locations — Local Scout — location details — map view — marking locations — navigating — positioning — saving places — search locations — sharing locations — walking Bluetooth bookmarks 51 79 9, 83 10 29 65 65 66 66 67 65 67
Index Drive — changing views — downloading maps — feedback — map view — navigating — removing maps — routes — voice guidance 64 63 64 64 62 63 62 63 E e-mail emergency calls 43 84 F favorites FM radio forwarding calls 40 53 30 G games — buying — downloading GPS (global positioning system) 57 57 57 59 H headset home screen See start screen I icons IM (instant messaging) IMEI number indicators internet See web browser internet connection internet radio 16, 77 45 28 41, 42 17 28 37 52 K keyboar
Index — walking 68 Marketplace 54 — browsing 55 — buying 56 — downloads 56 — reviews 57 — searching 55 media — radio 53 memory — clearing 79 messages — conversations 43 — sending 41, 42 messaging 41 Microsoft Office 72 Microsoft Office Mobile 72 MMS (multimedia message service) 41 multimedia messages 41 multitasking 22 music 52, 54 N navigation tools Nokia account Nokia Maps — browsing — changing views — directions — finding locations — routes Nokia Music Nokia services Nokia support information 59 13, 14
Index settings — access points 37 SharePoint 75 sharing, online 37, 49, 51 shortcuts 23, 33 silent mode 24 SIM card 8, 35, 80 SMS (short message service) 41 social networks 32, 35, 36, 37 software update 78 software updates 78 speakerphone 17 start screen 18, 23, 45 status updates 36 support 82 switching on/off 12 synchronization 79 T taking pictures See camera tasks text input text messages themes time and date to-dos tones — personalizing touch screen transferring content turning on/off U updates — a